Basic OS Environment Setup
-
Using an Installation Package to Install the Linux Environment
-
- What should I do if garbled characters and segmentation faults occur during hb installation?
- What should I do if the message "cannot import 'sysconfig' from 'distutils'" is displayed during hb installation?
- What should I do if the message "module 'platform' has no attribute 'linux_distribution'" is displayed during hb Installation?
- What should I do if the message "ImportError: No module named apt_pkg" is displayed during the execution of an unidentifiable command?
Before setting up the environment for a development board, you must set up the basic OS environment for OpenHarmony first. The basic OS environment refers to the building environment and development environment of OpenHarmony. You can choose one of the following methods to set up the basic OS environment based on your preference and the hardware and software used.
-
Method 1
Install a Windows development environment and use docker to install the Linux environment. For details, see the following sections:
- Environment Requirements
- Installing a Windows Development Environment
- Using Docker to Install the Linux Environment
-
Method 2
Install a Windows development environment and use an installation package to install the Linux environment. For details, see the following sections:
- Environment Requirements
- Installing a Windows Development Environment
- Using an Installation Package to Install the Linux Environment
-
Method 3
Install the Linux development and building environment. For details, see Linux Development Environment in HUAWEI DevEco Studio User Guide.
Environment Requirements
Hardware and Software Requirements
Table 1 Development platform requirements
You can develop programs on the Windows workstation or Linux server via a remote login. |
|||
Ubuntu 16.04 64-bit or later is used for the Linux OS, and bash is used as the shell. |
Development Tools for Windows
Table 2 Development tools and obtaining methods
Remotely connects to a Linux compile server or a serial port. |
Internet (for example, https://www.putty.org/) |
Build Tools for Linux
The following table describes the tools required for setting up the general environment for a Linux server and how to obtain these tools.
Table 3 Development tools and obtaining methods
Installing a Windows Development Environment
The OpenHarmony IDE Development Tool (HUAWEI DevEco Device Tool) integrates the capabilities of terminal tools. For details about how to install the tool, see Preparation and Creating a Project.
Using Docker to Install the Linux Environment
You can use Docker to quickly install the Linux environment. For details, see Setting Up the Docker Environment in Using Docker to Prepare the Build Environment.
Using an Installation Package to Install the Linux Environment
NOTICE:
- If you acquire the source code using an HPM component or HPM CLI tool, compilation tools like gn and ninja are not required.
- (Recommended) If you obtain the source code via the mirror site or code repository, install compilation tools such as gn and ninja. When installing gn and ninja, ensure that the environment variable paths of the compilation tools are unique.
Connecting to a Linux Server
Using PuTTY to log in to a Linux server from a PC running Windows
-
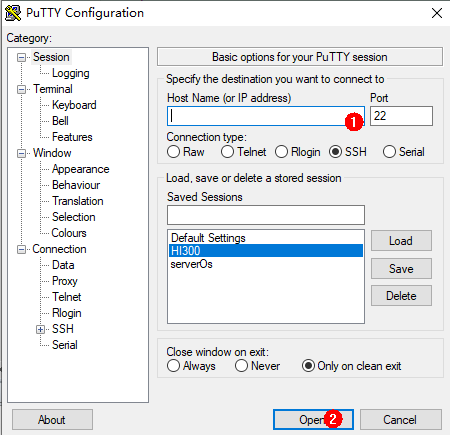
Open PuTTY, enter the IP address of the Linux server, and click Open.
-
Click Yes in the PuTTY Security Alert dialog box.
-
Enter the account and password.
-
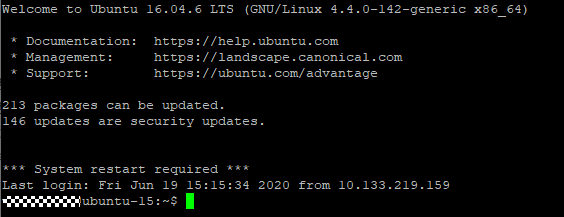
Check that the login is successful.
Installing and Configuring Python
-
Start a Linux server.
-
Check the Python version (Python 3.7 or later is required).
python3 --versionIf Python version is earlier than 3.7, reinstall Python. Do as follows to install Python, for example, Python 3.8.
- Check the Ubuntu version.
cat /etc/issue- Install Python based on the Ubuntu version.
-
If the Ubuntu version is 18 or later, run the following command:
sudo apt-get install python3.8 -
If the Ubuntu version is 16, perform the following steps:
a. Install dependency packages.
sudo apt update && sudo apt install software-properties-commonb. Add the source of deadsnakes PPA and press Enter.
sudo add-apt-repository ppa:deadsnakes/ppac. Install Python 3.8.
sudo apt upgrade && sudo apt install python3.8
-
-
Set the soft link of python and python3 to python3.8.
sudo update-alternatives --install /usr/bin/python python /usr/bin/python3.8 1 sudo update-alternatives --install /usr/bin/python3 python3 /usr/bin/python3.8 1 -
Install and upgrade the Python package management tool (pip3) using either of the following methods:
-
Command line:
sudo apt-get install python3-setuptools python3-pip -y sudo pip3 install --upgrade pip -
Installation package:
curl https://bootstrap.pypa.io/get-pip.py -o get-pip.py
python get-pip.py
-
Installing gn
-
Start a Linux server.
-
Download gn.
-
Create the gn folder in the root directory.
mkdir ~/gn -
Decompress the gn installation package to ~/gn.
tar -xvf gn-linux-x86-1717.tar.gz -C ~/gn -
Set an environment variable.
vim ~/.bashrcCopy the following command to the last line of the .bashrc file, save the file, and exit.
export PATH=~/gn:$PATH -
Validate the environment variable.
source ~/.bashrc
Installing ninja
-
Start a Linux server.
-
Download ninja.
-
Decompress the ninja installation package to ~/ninja.
tar -xvf ninja.1.9.0.tar -C ~/ -
Set an environment variable.
vim ~/.bashrcCopy the following command to the last line of the .bashrc file, save the file, and exit.
export PATH=~/ninja:$PATH -
Validate the environment variable.
source ~/.bashrc
Installing LLVM
-
Start a Linux server.
-
Download LLVM.
-
Decompress the LLVM installation package to ~/llvm.
tar -xvf llvm-linux-9.0.0-36191.tar -C ~/ -
Set an environment variable.
vim ~/.bashrcCopy the following command to the last line of the .bashrc file, save the file, and exit.
export PATH=~/llvm/bin:$PATH -
Validate the environment variable.
source ~/.bashrc
Installing hb
Prerequisites
- Python 3.7.4 or later has been installed. For details, see Installing and Configuring Python.
- The source code has been downloaded. For details, see Source Code Acquisition.
Installation
-
Install hb.
python3 -m pip install --user ohos-build -
Set an environment variable.
vim ~/.bashrcCopy the following command to the last line of the .bashrc file, save the file, and exit.
export PATH=~/.local/bin:$PATHUpdate the environment variable.
source ~/.bashrc -
Run the hb -h command. If the following information is displayed, the installation is successful:
usage: hb

OHOS build system

positional arguments:
  {build,set,env,clean}
    build               Build source code
    set                 OHOS build settings
    env                 Show OHOS build env
    clean               Clean output

optional arguments:
  -h, --help            Show this help message and exit
Uninstallation
python3 -m pip uninstall ohos-build
NOTE: If you encounter any problem during the installation, resort to the FAQ.
Obtaining OpenHarmony Source Code
You need to acquire OpenHarmony source code, download it on a Linux server, and decompress it. For more obtaining methods, see Source Code Acquisition.
FAQ
What should I do if garbled characters and segmentation faults occur during hb installation?
-
Symptom
Garbled characters and segmentation faults occur during the execution of the python3 -m pip install --user ohos-build command.
-
Possible Causes
pip is of an early version.
-
Solutions
Upgrade pip.
python3 -m pip install -U pip
What should I do if the message "cannot import 'sysconfig' from 'distutils'" is displayed during hb installation?
-
Symptom
The message "cannot import 'sysconfig' from 'distutils'" is displayed during the execution of the python3 -m pip install --user ohos-build command.
-
Possible Causes
The distutils module is unavailable.
-
Solutions
Install distutils.
sudo apt-get install python3.8-distutils
What should I do if the message "module 'platform' has no attribute 'linux_distribution'" is displayed during hb Installation?
- Symptom
The message "module 'platform' has no attribute 'linux_distribution'" is displayed during the execution of the python3 -m pip install --user ohos-build command.
-
Possible Causes
There is a compatibility issue of python3-pip.
-
Solutions
Reinstall pip.
sudo apt remove python3-pip
curl https://bootstrap.pypa.io/get-pip.py -o get-pip.py
python get-pip.py
What should I do if the message "ImportError: No module named apt_pkg" is displayed during the execution of an unidentifiable command?
-
Symptom
The message "ImportError: No module named apt_pkg" is displayed when an unidentifiable command is executed on the Linux server.
-
Possible Causes
There is a compatibility issue of python3-apt.
-
Solutions
Reinstall python3-apt.
sudo apt-get remove  python3-apt
sduo apt-get install python3-apt


