Setting Up the Ubuntu Environment
In embedded development, Windows-based tools, such as Visual Studio Code, are widely used in code editing. Yet, because the source code of most development boards, such as Hi3861 and Hi3516, cannot be built in Windows, these development boards require the Ubuntu build environment.
In the Windows+Ubuntu hybrid build environment, you can enjoy the benefits of both DevEco Device Tool for Windows and DevEco Device Tool for Ubuntu (where Visual Studio Code is optional).
The following describes how to set up the Ubuntu environment.
NOTE
If the Ubuntu system has not been set up yet, set it up on a virtual machine running Windows. For details, see Ubuntu Installation Guide. Then, configure the Ubuntu basic environment.
System Requirements
-
Ubuntu: Ubuntu 18.04 to 21.10; version 20.04 with 16 GB or larger memory and a 100 GB or larger hard disk is recommended
-
User name (Ubuntu): cannot contain Chinese characters
-
DevEco Device Tool: latest and same version installed on both Ubuntu and Windows
Procedure
-
Make sure the Ubuntu shell environment is bash.
-
Run the following command and check whether the command output is bash. If the command output is not bash, go to step 2.
ls -l /bin/sh
-
Start the command-line tool, run the following command, enter your password, and select No to set Ubuntu shell to bash.
sudo dpkg-reconfigure dash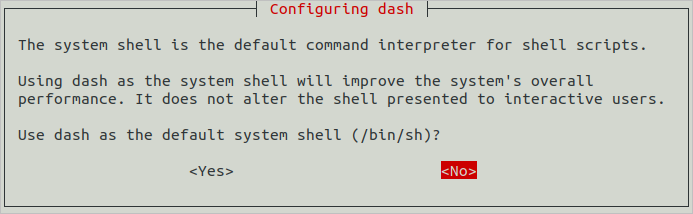
-
-
Download the latest version of DevEco Device Tool for Linux.
-
Decompress the DevEco Device Tool software package and assign permission on the folder obtained from the decompression.
-
Go to the directory where the DevEco Device Tool software package is stored and run the following command to decompress the software package. In the command, devicetool-linux-tool-{Version}.zip indicates the software package name.
unzip devicetool-linux-tool-{Version}.zip -
Open the folder of the decompressed software package and run the following command to grant the execute permission on the installation file. In the command, devicetool-linux-tool-{Version}.sh indicates the installation file name.
chmod u+x devicetool-linux-tool-{Version}.sh
-
-
Run the following command to install DevEco Device Tool, where devicetool-linux-tool-{Version}.sh indicates the installation file name.
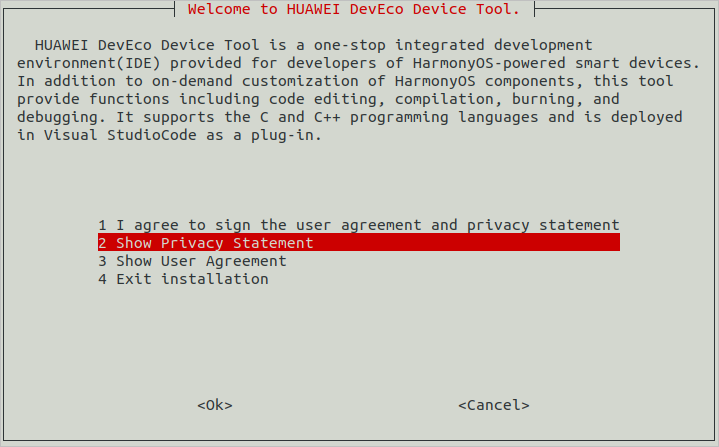
sudo ./devicetool-linux-tool-{Version}.sh -
On the page for agreeing to the user agreement and privacy statement, read and agree to the user agreement and privacy statement. You can scroll through the options by pressing the up and down arrow keys on the keyboard.
Wait until the "DevEco Device Tool successfully installed." message is displayed.

-
Run the following apt-get command:
sudo apt-get update && sudo apt-get install binutils binutils-dev git git-lfs gnupg flex bison gperf build-essential zip curl zlib1g-dev gcc-multilib g++-multilib gcc-arm-linux-gnueabi libc6-dev-i386 libc6-dev-amd64 lib32ncurses5-dev x11proto-core-dev libx11-dev lib32z1-dev ccache libgl1-mesa-dev libxml2-utils xsltproc unzip m4 bc gnutls-bin python3.8 python3-pip ruby genext2fs device-tree-compiler make libffi-dev e2fsprogs pkg-config perl openssl libssl-dev libelf-dev libdwarf-dev u-boot-tools mtd-utils cpio doxygen liblz4-tool openjdk-8-jre gcc g++ texinfo dosfstools mtools default-jre default-jdk libncurses5 apt-utils wget scons python3.8-distutils tar rsync git-core libxml2-dev lib32z-dev grsync xxd libglib2.0-dev libpixman-1-dev kmod jfsutils reiserfsprogs xfsprogs squashfs-tools pcmciautils quota ppp libtinfo-dev libtinfo5 libncurses5-dev libncursesw5 libstdc++6 gcc-arm-none-eabi vim ssh locales libxinerama-dev libxcursor-dev libxrandr-dev libxi-dev NOTEThe preceding command is applicable to Ubuntu 18.04. For other Ubuntu versions, modify the preceding installation command based on the installation package name.
-
Python 3.8 or a later version is required. In this example, Python 3.8 is used.
-
Java 8 or later is required. In this example, Java 8 is used.
-