Call调用开发指导
场景介绍
Call调用是Ability能力的扩展,它为Ability提供一种能够被外部调用并与外部进行通信的能力。Call调用支持前台与后台两种启动方式,使Ability既能被拉起到前台展示UI,也可以在后台被创建并运行。Call调用在调用方与被调用方间建立了IPC通信,因此应用开发者可通过Call调用实现不同Ability之间的数据共享。
Call调用的核心接口是startAbilityByCall方法,与startAbility接口的不同之处在于:
- startAbilityByCall支持前台与后台两种启动方式,而startAbility仅支持前台启动。
- 调用方可使用startAbilityByCall所返回的Caller对象与被调用方进行通信,而startAbilty不具备通信能力。
Call调用的使用场景主要包括:
- 需要与被启动的Ability进行通信
- 希望被启动的Ability在后台运行
表1 Call调用相关名词解释
| 名词 | 描述 |
|---|---|
| CallerAbility | 指代进行Call调用的Ability(调用方) |
| CalleeAbility | 指代被Call调用的Ability(被调用方) |
| Caller | 实际对象,由startAbilityByCall接口所返回,CallerAbility可使用Caller与CalleeAbility进行通信,具体接口见表2 |
| Callee | 实际对象,被CalleeAbility持有,可与Caller进行通信 |
| IPC | 指代进程间通信 |
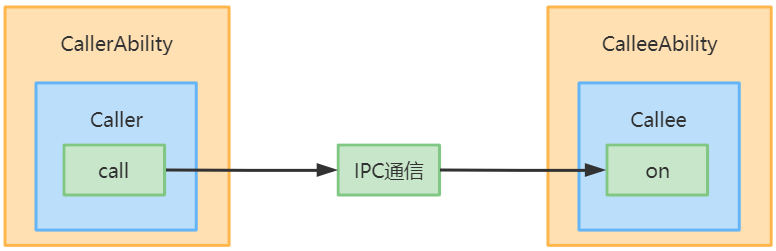
Call调用流程示意图如下:
- CallerAbility调用startAbilityByCall接口获取Caller,并使用Caller对象的call方法向CalleeAbility发送数据
- CalleeAbility持有一个Callee对象,通过Callee的on方法注册回调函数,当接收到Caller发送的数据时将会调用对应的回调函数
说明: CalleeAbility的启动模式需要为单实例。 当前仅支持系统应用使用Call调用。
接口说明
Caller及Callee功能如下:具体的API详见接口文档。
表2 Call API接口功能介绍
| 接口名 | 描述 |
|---|---|
| startAbilityByCall(want: Want): Promise<Caller> | 启动指定Ability并获取其Caller通信接口,默认为后台启动,通过配置want可实现前台启动,详见接口文档。AbilityContext与ServiceExtensionContext均支持该接口。 |
| on(method: string, callback: CalleeCallBack): void | 通用组件Callee注册method对应的callback方法。 |
| off(method: string): void | 通用组件Callee解注册method的callback方法。 |
| call(method: string, data: rpc.Sequenceable): Promise<void> | 向通用组件Callee发送约定序列化数据。 |
| callWithResult(method: string, data: rpc.Sequenceable): Promise<rpc.MessageParcel> | 向通用组件Callee发送约定序列化数据, 并将Callee返回的约定序列化数据带回。 |
| release(): void | 释放通用组件的Caller通信接口。 |
| on(type: "release", callback: OnReleaseCallback): void | 注册通用组件通信断开监听通知。 |
开发步骤
Call调用的开发步骤:
- 创建Callee被调用端。
- 访问Callee被调用端。
创建Callee被调用端
Callee被调用端,需要实现指定方法的数据接收回调函数、数据的序列化及反序列化方法。在需要接收数据期间,通过on接口注册监听,无需接收数据时通过off接口解除监听。 1. 配置Ability的启动模式
配置module.json5,将CalleeAbility配置为单实例"singleton"。
| Json字段 | 字段说明 |
|---|---|
| "launchType" | Ability的启动模式,设置为"singleton"类型。 |
Ability配置标签示例如下:
"abilities":[{
    "name": ".CalleeAbility",
    "srcEnty": "./ets/CalleeAbility/CalleeAbility.ts",
    "launchType": "singleton",
    "description": "$string:CalleeAbility_desc",
    "icon": "$media:icon",
    "label": "$string:CalleeAbility_label",
    "exported": true
}]
2. 导入Ability模块
import Ability from '@ohos.app.ability.UIAbility'
3. 定义约定的序列化数据
调用端及被调用端发送接收的数据格式需协商一致,如下示例约定数据由number和string组成。具体示例代码如下:
export default class MySequenceable {
    num: number = 0
    str: string = ""

    constructor(num, string) {
        this.num = num
        this.str = string
    }

    marshalling(messageParcel) {
        messageParcel.writeInt(this.num)
        messageParcel.writeString(this.str)
        return true
    }

    unmarshalling(messageParcel) {
        this.num = messageParcel.readInt()
        this.str = messageParcel.readString()
        return true
    }
}
4. 实现Callee.on监听及Callee.off解除监听
被调用端Callee的监听函数注册时机, 取决于应用开发者。注册监听之前的数据不会被处理,取消监听之后的数据不会被处理。如下示例在Ability的onCreate注册'MSG_SEND_METHOD'监听,在onDestroy取消监听,收到序列化数据后作相应处理并返回,应用开发者根据实际需要做相应处理。具体示例代码如下:
const TAG: string = '[CalleeAbility]'
const MSG_SEND_METHOD: string = 'CallSendMsg'

function sendMsgCallback(data) {
    console.log('CalleeSortFunc called')

    // 获取Caller发送的序列化数据
    let receivedData = new MySequenceable(0, '')
    data.readSequenceable(receivedData)
    console.log(`receiveData[${receivedData.num}, ${receivedData.str}]`)

    // 作相应处理
    // 返回序列化数据result给Caller
    return new MySequenceable(receivedData.num + 1, `send ${receivedData.str} succeed`)
}

export default class CalleeAbility extends Ability {
    onCreate(want, launchParam) {
        try {
            this.callee.on(MSG_SEND_METHOD, sendMsgCallback)
        } catch (error) {
            console.log(`${MSG_SEND_METHOD} register failed with error ${JSON.stringify(error)}`)
        }
    }

    onDestroy() {
        try {
            this.callee.off(MSG_SEND_METHOD)
        } catch (error) {
            console.error(TAG, `${MSG_SEND_METHOD} unregister failed with error ${JSON.stringify(error)}`)
        }
    }
}
访问Callee被调用端
1. 导入Ability模块
import Ability from '@ohos.app.ability.UIAbility'
2. 获取Caller通信接口
Ability的context属性实现了startAbilityByCall方法,用于获取指定通用组件的Caller通信接口。如下示例通过this.context获取Ability实例的context属性,使用startAbilityByCall拉起Callee被调用端并获取Caller通信接口,注册Caller的onRelease监听。应用开发者根据实际需要做相应处理。具体示例代码如下:
// 注册caller的release监听
private regOnRelease(caller) {
    try {
        caller.on("release", (msg) => {
            console.log(`caller onRelease is called ${msg}`)
        })
        console.log('caller register OnRelease succeed')
    } catch (error) {
        console.log(`caller register OnRelease failed with ${error}`)
    }
}

async onButtonGetCaller() {
    try {
        this.caller = await context.startAbilityByCall({
            bundleName: 'com.samples.CallApplication',
            abilityName: 'CalleeAbility'
        })
        if (this.caller === undefined) {
            console.log('get caller failed')
            return
        }
        console.log('get caller success')
        this.regOnRelease(this.caller)
    } catch (error) {
        console.log(`get caller failed with ${error}`)
    }
}
在跨设备场景下,需指定对端设备deviceId。具体示例代码如下:
async onButtonGetRemoteCaller() {
    var caller = undefined
    var context = this.context

    context.startAbilityByCall({
        deviceId: getRemoteDeviceId(),
        bundleName: 'com.samples.CallApplication',
        abilityName: 'CalleeAbility'
    }).then((data) => {
        if (data != null) {
            caller = data
            console.log('get remote caller success')
            // 注册caller的release监听
            caller.on("release", (msg) => {
                console.log(`remote caller onRelease is called ${msg}`)
            })
            console.log('remote caller register OnRelease succeed')
        }
    }).catch((error) => {
        console.error(`get remote caller failed with ${error}`)
    })
}
从DeviceManager获取指定设备的deviceId,getTrustedDeviceListSync接口仅对系统应用开放。具体示例代码如下:
import deviceManager from '@ohos.distributedHardware.deviceManager';
var dmClass;
function getRemoteDeviceId() {
    if (typeof dmClass === 'object' && dmClass != null) {
        var list = dmClass.getTrustedDeviceListSync()
        if (typeof (list) == 'undefined' || typeof (list.length) == 'undefined') {
            console.log("MainAbility onButtonClick getRemoteDeviceId err: list is null")
            return
        }
        console.log("MainAbility onButtonClick getRemoteDeviceId success:" + list[0].deviceId)
        return list[0].deviceId
    } else {
        console.log("MainAbility onButtonClick getRemoteDeviceId err: dmClass is null")
    }
}
在跨设备场景下,需要向用户申请数据同步的权限。具体示例代码如下:
import abilityAccessCtrl from '@ohos.abilityAccessCtrl.d.ts';

requestPermission() {
    let context = this.context
    let permissions: Array<string> = ['ohos.permission.DISTRIBUTED_DATASYNC']
    let atManager = abilityAccessCtrl.createAtManager();
    atManager.requestPermissionsFromUser(context, permissions).then((data) => {
        console.log("Succeed to request permission from user with data: "+ JSON.stringify(data))
    }).catch((error) => {
        console.log("Failed to request permission from user with error: "+ JSON.stringify(error))
    })
}
3. 发送约定序列化数据
向被调用端发送Sequenceable数据有两种方式,一种是不带返回值,一种是获取被调用端返回的数据,method以及序列化数据需要与被调用端协商一致。如下示例调用Call接口,向Callee被调用端发送数据。具体示例代码如下:
const MSG_SEND_METHOD: string = 'CallSendMsg'
async onButtonCall() {
    try {
        let msg = new MySequenceable(1, 'origin_Msg')
        await this.caller.call(MSG_SEND_METHOD, msg)
    } catch (error) {
        console.log(`caller call failed with ${error}`)
    }
}
如下示例调用CallWithResult接口,向Callee被调用端发送待处理的数据originMsg,并将'CallSendMsg'方法处理完毕的数据赋值给backMsg。具体示例代码如下:
const MSG_SEND_METHOD: string = 'CallSendMsg'
originMsg: string = ''
backMsg: string = ''
async onButtonCallWithResult(originMsg, backMsg) {
    try {
        let msg = new MySequenceable(1, originMsg)
        const data = await this.caller.callWithResult(MSG_SEND_METHOD, msg)
        console.log('caller callWithResult succeed')

        let result = new MySequenceable(0, '')
        data.readSequenceable(result)
        backMsg(result.str)
        console.log(`caller result is [${result.num}, ${result.str}]`)
    } catch (error) {
        console.log(`caller callWithResult failed with ${error}`)
    }
}
4. 释放Caller通信接口
Caller不再使用后,应用开发者可以通过release接口释放Caller。具体示例代码如下:
releaseCall() {
    try {
        this.caller.release()
        this.caller = undefined
        console.log('caller release succeed')
    } catch (error) {
        console.log(`caller release failed with ${error}`)
    }
}