CanvasRenderingContext2D对象
使用CanvasRenderingContext2D在canvas画布组件上进行绘制,绘制对象可以是矩形、文本、图片等。
-
示例
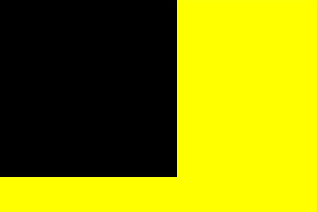
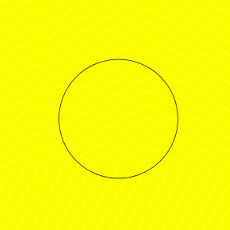
<!-- xxx.hml -->
<div>
  <canvas ref="canvas1" style="width: 200px; height: 150px; background-color: #ffff00;"></canvas>
  <input type="button" style="width: 180px; height: 60px;" value="fillStyle" onclick="handleClick" />
  <input type="button" style="width: 180px; height: 60px;" value="fillStyle" onclick="antialias" />
</div>
// xxx.js export default { handleClick() { const el = this.$refs.canvas1; const ctx = el.getContext('2d'); ctx.beginPath(); ctx.arc(100, 75, 50, 0, 6.28); ctx.stroke(); }, antialias() { const el = this.$refs.canvas1; const ctx = el.getContext('2d', { antialias: true }); ctx.beginPath(); ctx.arc(100, 75, 50, 0, 6.28); ctx.stroke(); } } -
示意图(关闭抗锯齿)

-
示意图(开启抗锯齿)
fillRect()
填充一个矩形。
-
参数
-
返回值
无
-
示例
ctx.fillRect(20, 20, 200, 150);
fillStyle
指定绘制的填充色。
-
参数
-
返回值
无
-
示例
ctx.fillStyle = '#0000ff';
ctx.fillRect(20, 20, 150, 100);
clearRect()
删除指定区域内的绘制内容。
-
参数
-
返回值
无
-
示例
ctx.fillStyle = 'rgb(0,0,255)';
ctx.fillRect(0, 0, 400, 200);
ctx.clearRect(20, 20, 150, 100);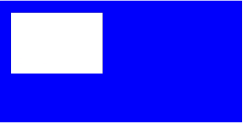
strokeRect()
绘制具有边框的矩形,矩形内部不填充。
-
参数
-
返回值
无
-
示例
ctx.strokeRect(30, 30, 200, 150);
fillText()
绘制填充类文本。
-
参数
-
返回值
无
-
示例
ctx.font = '35px sans-serif';
ctx.fillText("Hello World!", 20, 60);
strokeText()
绘制描边类文本。
-
参数
-
返回值
无
-
示例
ctx.font = '25px sans-serif';
ctx.strokeText("Hello World!", 20, 60);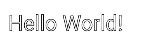
measureText()
该方法返回一个文本测算的对象,通过该对象可以获取指定文本的宽度值。
-
参数
-
返回值
-
示例
ctx.font = '25px sans-serif';
var txt = 'Hello World';
ctx.fillText("width:" + ctx.measureText(txt).width, 20, 60);
ctx.fillText(txt, 20, 110);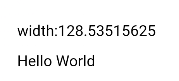
lineWidth
指定绘制线条的宽度值。
-
参数
-
返回值
无
-
示例
ctx.lineWidth = 5;
ctx.strokeRect(25, 25, 85, 105);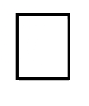
strokeStyle
设置描边的颜色。
-
参数
-
返回值
无
-
示例
ctx.lineWidth = 10;
ctx.strokeStyle = '#0000ff';
ctx.strokeRect(25, 25, 155, 105);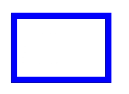
stroke()
进行边框绘制操作。
-
参数
无
-
返回值
无
-
示例
ctx.moveTo(25, 25);
ctx.lineTo(25, 105);
ctx.strokeStyle = 'rgb(0,0,255)';
ctx.stroke();
beginPath()
创建一个新的绘制路径。
-
参数
无
-
返回值
无
-
示例
ctx.beginPath();
ctx.lineWidth = '6';
ctx.strokeStyle = '#0000ff';
ctx.moveTo(15, 80);
ctx.lineTo(280, 160);
ctx.stroke();
moveTo()
路径从当前点移动到指定点。
-
参数
-
返回值
无
-
示例
ctx.beginPath();
ctx.moveTo(10, 10);
ctx.lineTo(280, 160);
ctx.stroke();
lineTo()
从当前点到指定点进行路径连接。
-
参数
-
返回值
无
-
示例
ctx.beginPath();
ctx.moveTo(10, 10);
ctx.lineTo(280, 160);
ctx.stroke();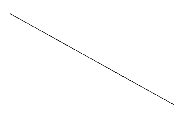
closePath()
结束当前路径形成一个封闭路径。
-
参数
无
-
返回值
无
-
示例
ctx.beginPath();
ctx.moveTo(30, 30);
ctx.lineTo(110, 30);
ctx.lineTo(70, 90);
ctx.closePath();
ctx.stroke();
lineCap
指定线端点的样式。
-
参数
- butt(默认):线端点以方形结束。
- round:线端点以圆形结束。
- square:线端点以方形结束,该样式下会增加一个长度和线段厚度相同,宽度是线段厚度一半的矩形。
-
返回值
无
-
示例
ctx.lineWidth = 8;
ctx.beginPath();
ctx.lineCap = 'round';
ctx.moveTo(30, 50);
ctx.lineTo(220, 50);
ctx.stroke();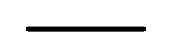
lineJoin
指定线段间相交的交点样式。
-
参数
- round:在线段相连处绘制一个扇形,扇形的圆角半径是线段的宽度。
- bevel:在线段相连处使用三角形为底填充, 每个部分矩形拐角独立。
- miter(默认):在相连部分的外边缘处进行延伸,使其相交于一点,形成一个菱形区域,该属性可以通过设置miterLimit属性展现效果。
-
返回值
无
-
示例
ctx.beginPath();
ctx.lineWidth = 8;
ctx.lineJoin = 'miter';
ctx.moveTo(30, 30);
ctx.lineTo(120, 60);
ctx.lineTo(30, 110);
ctx.stroke();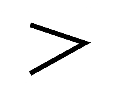
miterLimit
设置斜接面限制值,该值指定了线条相交处内角和外角的距离。
-
参数
-
返回值
无
-
示例
ctx.lineWidth = 8;
ctx.lineJoin = 'miter';
ctx.miterLimit = 3;
ctx.moveTo(30, 30);
ctx.lineTo(60, 35);
ctx.lineTo(30, 37);
ctx.stroke();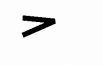
font
设置文本绘制中的字体样式。
-
参数
-
返回值
无
-
示例
ctx.font = '30px sans-serif';
ctx.fillText("Hello World", 20, 60);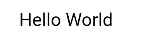
textAlign
设置文本绘制中的文本对齐方式。
-
参数
- left(默认):文本左对齐。
- right:文本右对齐。
- center:文本居中对齐。
- start:文本对齐界线开始的地方。
- end:文本对齐接线结束的地方。
-
返回值
无
-
示例
ctx.strokeStyle = '#0000ff';
ctx.moveTo(140, 10);
ctx.lineTo(140, 160);
ctx.stroke();

ctx.font = '18px sans-serif';

// Show the different textAlign values
ctx.textAlign = 'start';
ctx.fillText('textAlign=start', 140, 60);
ctx.textAlign = 'end';
ctx.fillText('textAlign=end', 140, 80);
ctx.textAlign = 'left';
ctx.fillText('textAlign=left', 140, 100);
ctx.textAlign = 'center';
ctx.fillText('textAlign=center',140, 120);
ctx.textAlign = 'right';
ctx.fillText('textAlign=right',140, 140);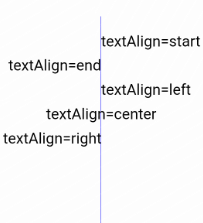
textBaseline
设置文本绘制中的水平对齐方式。
-
参数
-
返回值
无
-
示例
ctx.strokeStyle = '#0000ff';
ctx.moveTo(0, 120);
ctx.lineTo(400, 120);
ctx.stroke();

ctx.font = '20px sans-serif';

ctx.textBaseline = 'top';
ctx.fillText('Top', 10, 120);
ctx.textBaseline = 'bottom';
ctx.fillText('Bottom', 55, 120);
ctx.textBaseline = 'middle';
ctx.fillText('Middle', 125, 120);
ctx.textBaseline = 'alphabetic';
ctx.fillText('Alphabetic', 195, 120);
ctx.textBaseline = 'hanging';
ctx.fillText('Hanging', 295, 120);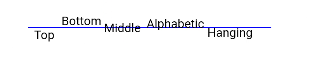
createPattern()
通过指定图像和重复方式创建图片填充的模板。
-
参数
图源对象,具体参考Image对象。
-
返回值
-
示例
var pat = ctx.createPattern(img, 'repeat');
ctx.fillStyle = pat;
ctx.fillRect(0, 0, 20, 20);
bezierCurveTo()
创建三次贝赛尔曲线的路径。
-
参数
-
返回值
无
-
示例
ctx.beginPath();
ctx.moveTo(10, 10);
ctx.bezierCurveTo(20, 100, 200, 100, 200, 20);
ctx.stroke();
quadraticCurveTo()
创建二次贝赛尔曲线的路径。
-
参数
-
返回值
无
-
示例
ctx.beginPath();
ctx.moveTo(20, 20);
ctx.quadraticCurveTo(100, 100, 200, 20);
ctx.stroke();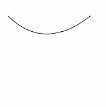
arc()
绘制弧线路径。
-
参数
-
返回值
无
-
示例
ctx.beginPath();
ctx.arc(100, 75, 50, 0, 6.28);
ctx.stroke();
arcTo()
依据圆弧经过的点和圆弧半径创建圆弧路径。
-
参数
-
返回值
无
-
示例
ctx.moveTo(100, 20);
ctx.arcTo(150, 20, 150, 70, 50); // Create an arc
ctx.stroke();
ellipse()6+
在规定的矩形区域绘制一个椭圆。
-
参数
-
返回值
无
-
示例
ctx.beginPath();
ctx.ellipse(200, 200, 50, 100, Math.PI * 0.25, Math.PI * 0.5, Math.PI, 1);
ctx.stroke();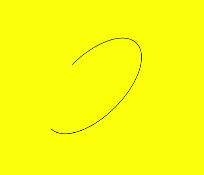
rect()
创建矩形路径。
-
参数
-
返回值
无
-
示例
ctx.rect(20, 20, 100, 100); // Create a 100*100 rectangle at (20, 20)
ctx.stroke(); // Draw it
fill()
对封闭路径进行填充。
-
参数
无
-
返回值
无
-
示例
ctx.rect(20, 20, 100, 100); // Create a 100*100 rectangle at (20, 20)
ctx.fill(); // Draw it in default setting
clip()
设置当前路径为剪切路径。
-
参数
无
-
返回值
无
-
示例
ctx.rect(0, 0, 200, 200);
ctx.stroke();
ctx.clip();
// Draw red rectangle after clip
ctx.fillStyle = "rgb(255,0,0)";
ctx.fillRect(0, 0, 150, 150);
rotate()
针对当前坐标轴进行顺时针旋转。
-
参数
-
返回值
无
-
示例
ctx.rotate(45 * Math.PI / 180); // Rotate the rectangle 45 degrees
ctx.fillRect(70, 20, 50, 50);
scale()
设置canvas画布的缩放变换属性,后续的绘制操作将按照缩放比例进行缩放。
-
参数
-
返回值
无
-
示例
ctx.strokeRect(10, 10, 25, 25);
ctx.scale(2, 2);// Scale to 200%
ctx.strokeRect(10, 10, 25, 25);
transform()
transform()方法对应一个变换矩阵,想对一个图形进行变化的时候,只要设置此变换矩阵相应的参数,对图形的各个定点的坐标分别乘以这个矩阵,就能得到新的定点的坐标。矩阵变换效果可叠加。
说明: 变换后的坐标计算方式(x和y为变换前坐标,x'和y'为变换后坐标):
- x' = scaleX * x + skewY * y + translateX
- y' = skewX * x + scaleY * y + translateY
-
参数
-
返回值
无
-
示例
ctx.fillStyle = 'rgb(0,0,0)';
ctx.fillRect(0, 0, 100, 100)
ctx.transform(1, 0.5, -0.5, 1, 10, 10);
ctx.fillStyle = 'rgb(255,0,0)';
ctx.fillRect(0, 0, 100, 100);
ctx.transform(1, 0.5, -0.5, 1, 10, 10);
ctx.fillStyle = 'rgb(0,0,255)';
ctx.fillRect(0, 0, 100, 100);
setTransform()
setTransfrom()方法使用的参数和transform()方法相同,但setTransform()方法会重置现有的变换矩阵并创建新的变换矩阵。
-
参数
-
返回值
无
-
示例
ctx.fillStyle = 'rgb(255,0,0)';
ctx.fillRect(0, 0, 100, 100)
ctx.setTransform(1,0.5, -0.5, 1, 10, 10);
ctx.fillStyle = 'rgb(0,0,255)';
ctx.fillRect(0, 0, 100, 100);
translate()
移动当前坐标系的原点。
-
参数
-
返回值
无
-
示例
ctx.fillRect(10, 10, 50, 50);
ctx.translate(70, 70);
ctx.fillRect(10, 10, 50, 50);
createPath2D()6+
创建一个Path2D对象。
-
参数
-
返回值
Path2D对象
-
示例
var path1 = ctx.createPath2D();
path1.moveTo(100, 100);
path1.lineTo(200, 100);
path1.lineTo(100, 200);
path1.closePath();
ctx.stroke(path1);
var path2 = ctx.createPath2D("M150 150 L50 250 L250 250 Z");
ctx.stroke(path2);
var path3 = ctx.createPath2D(path2);
ctx.stroke(path3);
globalAlpha
设置透明度。
-
参数
-
返回值
无
-
示例
ctx.fillStyle = 'rgb(255,0,0)';
ctx.fillRect(0, 0, 50, 50);
ctx.globalAlpha = 0.4;
ctx.fillStyle = 'rgb(0,0,255)';
ctx.fillRect(50, 50, 50, 50);
drawImage()
进行图像绘制。
-
参数
图片资源,请参考Image对象。
-
返回值
无
-
示例
var test = this.$element('drawImage');
var ctx = test.getContext('2d');
var img = new Image();
img.src = 'common/image/test.jpg';
ctx.drawImage(img, 50, 80, 80, 80);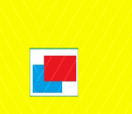
restore()
对保存的绘图上下文进行恢复。
-
参数
无
-
返回值
无
-
示例
ctx.restore();
save()
对当前的绘图上下文进行保存。
-
参数
无
-
返回值
无
-
示例
ctx.save();
createLinearGradient()6+
创建一个线性渐变色,返回CanvasGradient对象,请参考CanvasGradient对象。
-
参数
-
返回值
-
示例
<!-- xxx.hml -->
<canvas ref="canvas" style="width: 500px; height: 500px; background-color: #ffff00;"></canvas>
<input type="button" style="width: 180px; height: 60px;" value="fillStyle" onclick="handleClick" />
// xxx.js export default { handleClick() { const el = this.$refs.canvas; const ctx = el.getContext('2d'); // Linear gradient: start(50,0) end(300,100) var gradient = ctx.createLinearGradient(50,0, 300,100); // Add three color stops gradient.addColorStop(0.0, 'red'); gradient.addColorStop(0.5, 'white'); gradient.addColorStop(1.0, 'green'); // Set the fill style and draw a rectangle ctx.fillStyle = gradient; ctx.fillRect(0, 0, 500, 500); } }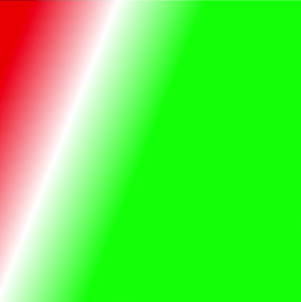
createRadialGradient()6+
创建一个径向渐变色,返回CanvasGradient对象,请参考CanvasGradient
-
参数
-
返回值
-
示例
<!-- xxx.hml -->
<canvas ref="canvas" style="width: 500px; height: 500px; background-color: #ffff00;"></canvas>
<input type="button" style="width: 180px; height: 60px;" value="fillStyle" onclick="handleClick" />
// xxx.js export default { handleClick() { const el = this.$refs.canvas; const ctx = el.getContext('2d'); // Radial gradient: inner circle(200,200,r:50) outer circle(200,200,r:200) var gradient = ctx.createRadialGradient(200,200,50, 200,200,200); // Add three color stops gradient.addColorStop(0.0, 'red'); gradient.addColorStop(0.5, 'white'); gradient.addColorStop(1.0, 'green'); // Set the fill style and draw a rectangle ctx.fillStyle = gradient; ctx.fillRect(0, 0, 500, 500); } }
createImageData()
创建新的ImageData 对象,请参考ImageData对象。
-
参数
-
返回值
-
示例
imageData = ctx.createImageData(50, 100);  // Create ImageData with 50px width and 100px height
newImageData = ctx.createImageData(imageData);  // Create ImageData using the input imageData
getImageData()
以当前canvas指定区域内的像素创建ImageData对象。
-
参数
-
返回值
-
示例
var test = this.$element('getImageData');
var ctx = test.getContext('2d');
var imageData = ctx.getImageData(0, 0, 280, 300);
putImageData()
使用ImageData数据填充新的矩形区域。
-
参数
-
返回值
无
-
示例
var test = this.$element('putImageData');
var ctx = test.getContext('2d');
var imgData = ctx.createImageData(100, 100);
for (var i = 0; i < imgData.data.length; i += 4) {
  imgData.data[i + 0] = 255;
  imgData.data[i + 1] = 0;
  imgData.data[i + 2] = 0;
  imgData.data[i + 3] = 255;
}
ctx.putImageData(imgData, 10, 10);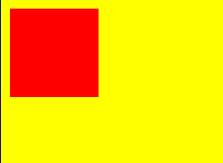
setLineDash()
设置画布的虚线样式。
-
参数
-
返回值
无
-
示例
ctx.arc(100, 75, 50, 0, 6.28);
ctx.setLineDash([10,20]);
ctx.stroke();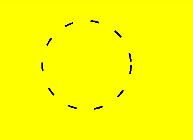
getLineDash()
获得当前画布的虚线样式。
lineDashOffset
设置画布的虚线偏移量。
-
参数
-
返回值
无
-
示例
ctx.arc(100, 75, 50, 0, 6.28);
ctx.setLineDash([10,20]);
ctx.lineDashOffset = 10.0;
ctx.stroke();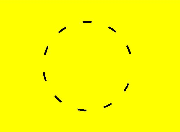
globalCompositeOperation
设置合成操作的方式。
-
参数
合成操作的类型字段。可选值有source-over(默认值),source-atop,source-in,source-out,destination-over,destination-atop,destination-in,destination-out,lighter,copy,xor。
属性值:
-
返回值
无
-
示例
ctx.fillStyle = 'rgb(255,0,0)';
ctx.fillRect(20, 20, 50, 50);
ctx.globalCompositeOperation = 'source-over';
ctx.fillStyle = 'rgb(0,0,255)';
ctx.fillRect(50, 50, 50, 50);
// Start drawing second example
ctx.fillStyle = 'rgb(255,0,0)';
ctx.fillRect(120, 20, 50, 50);
ctx.globalCompositeOperation = 'destination-over';
ctx.fillStyle = 'rgb(0,0,255)';
ctx.fillRect(150, 50, 50, 50);
示例中,新绘制内容是蓝色矩形,现有绘制内容是红色矩形。
shadowBlur
设置绘制阴影时的模糊级别,默认值为0.0。
-
参数
-
返回值
无
-
示例
ctx.shadowBlur = 30;
ctx.shadowColor = 'rgb(0,0,0)';
ctx.fillStyle = 'rgb(255,0,0)';
ctx.fillRect(20, 20, 100, 80);
shadowColor
设置绘制阴影时的阴影颜色。
-
参数
-
返回值
无
-
示例
ctx.shadowBlur = 30;
ctx.shadowColor = 'rgb(0,0,255)';
ctx.fillStyle = 'rgb(255,0,0)';
ctx.fillRect(30, 30, 100, 100);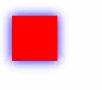
shadowOffsetX
设置绘制阴影时和原有对象的水平偏移值。
-
参数
-
返回值
无
-
示例
ctx.shadowBlur = 10;
ctx.shadowOffsetX = 20;
ctx.shadowColor = 'rgb(0,0,0)';
ctx.fillStyle = 'rgb(255,0,0)';
ctx.fillRect(20, 20, 100, 80);
shadowOffsetY
设置绘制阴影时和原有对象的垂直偏移值。
-
参数
-
返回值
无
-
示例
ctx.shadowBlur = 10;
ctx.shadowOffsetY = 20;
ctx.shadowColor = 'rgb(0,0,0)';
ctx.fillStyle = 'rgb(255,0,0)';
ctx.fillRect(30, 30, 100, 100);
imageSmoothingEnabled6+
用于设置绘制图片时是否进行图像平滑度调整。
-
参数
-
返回值
无
-
示例
var img = new Image();
img.src = 'common/image/example.jpg';
img.onload = function() {
  ctx.imageSmoothingEnabled = false;
  ctx.drawImage(img, 0, 0, 400, 200);
};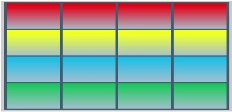
transferFromImageBitmap()7+
显示给定的ImageBitmap对象。
-
参数
-
返回值
无
-
示例
var canvas = this.$refs.canvasId.getContext('2d');
var offscreen = new OffscreenCanvas(500,500);
var offscreenCanvasCtx = offscreen.getContext("2d");
offscreenCanvasCtx.fillRect(0, 0, 200, 200);

var bitmap = offscreen.transferToImageBitmap();
canvas.transferFromImageBitmap(bitmap);