Page Ability Development
Overview
Concepts
The Page ability implements the ArkUI and provides the capability of interacting with developers. When you create an ability in DevEco Studio, DevEco Studio automatically creates template code.
The capabilities related to the Page ability are implemented through the featureAbility, and the lifecycle callbacks are implemented through the callbacks in app.js or app.ets.
Page Ability Lifecycle
Introduction to the Page ability lifecycle:
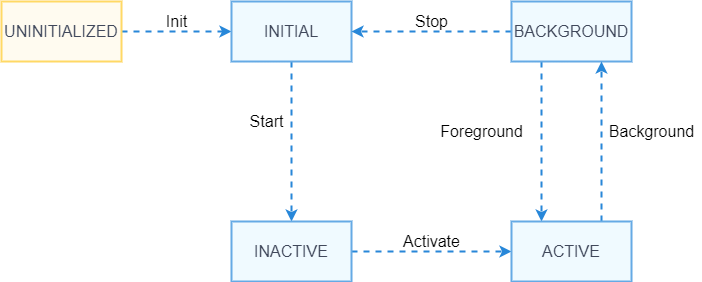
The Page ability lifecycle defines all states of a Page ability, such as INACTIVE, ACTIVE, and BACKGROUND.
The following figure shows the lifecycle state transition of the Page ability.

Description of ability lifecycle states:
-
UNINITIALIZED: The Page ability is not initialized. This is a temporary state, from which a Page ability changes directly to the INITIAL state upon its creation.
-
INITIAL: The Page ability is initialized but not running. The Page ability enters the INACTIVE state after it is started.
-
INACTIVE: The Page ability is visible but does not gain focus.
-
ACTIVE: The Page ability runs in the foreground and has focus.
-
BACKGROUND: The Page ability runs in the background. After being re-activated, the Page ability enters the ACTIVE state. After being destroyed, the Page ability enters the INITIAL state.
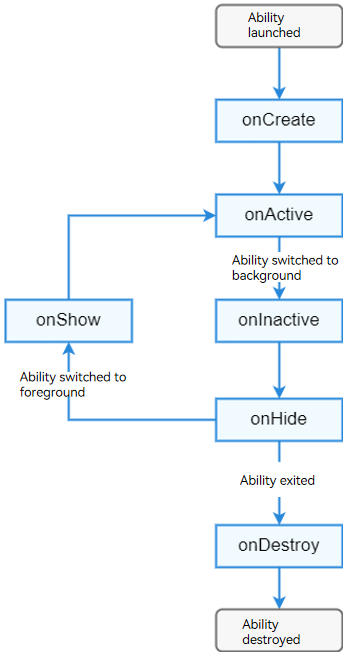
The following figure shows the relationship between lifecycle callbacks and lifecycle states of the Page ability.

You can override the lifecycle callbacks provided by the Page ability in the app.js or app.ets file. Currently, the app.js file provides only the onCreate and onDestroy callbacks, and the app.ets file provides the full lifecycle callbacks.
Launch Type
The ability supports two launch types: singleton and multi-instance.
You can specify the launch type by setting launchType in the config.json file.
Table 1 Startup modes
| Launch Type | Description | Description |
|---|---|---|
| standard | Multi-instance | A new instance is started each time an ability starts. |
| singleton | Singleton | The ability has only one instance in the system. If an instance already exists when an ability is started, that instance is reused. |
By default, singleton is used.
Development Guidelines
Available APIs
Table 2 APIs provided by featureAbility
| API | Description |
|---|---|
| void startAbility(parameter: StartAbilityParameter) | Starts an ability. |
| Context getContext(): | Obtains the application context. |
| void terminateSelf() | Terminates the ability. |
| bool hasWindowFocus() | Checks whether the ability has focus. |
Starting a Local Page Ability
Modules to Import
import featureAbility from '@ohos.ability.featureAbility'
Example
  import featureAbility from '@ohos.ability.featureAbility'
  featureAbility.startAbility({
      want: {
          action: "",
          entities: [""],
          type: "",
          deviceId: "",
          bundleName: "com.example.myapplication",
          /* In the FA model, abilityName consists of package and ability name. */
          abilityName: "com.example.entry.secondAbility",
          uri: ""
      }
  });
Starting a Remote Page Ability
NOTE
This feature applies only to system applications, since the getTrustedDeviceListSync API of the DeviceManager class is open only to system applications.
Modules to Import
  import featureAbility from '@ohos.ability.featureAbility'
  import deviceManager from '@ohos.distributedHardware.deviceManager';
Example
  function onStartRemoteAbility() {
  console.info('onStartRemoteAbility begin');
  let params;
  let wantValue = {
      bundleName: 'ohos.samples.etsDemo',
      abilityName: 'ohos.samples.etsDemo.RemoteAbility',
      deviceId: getRemoteDeviceId(),
      parameters: params
  };
  console.info('onStartRemoteAbility want=' + JSON.stringify(wantValue));
  featureAbility.startAbility({
      want: wantValue
  }).then((data) => {
      console.info('onStartRemoteAbility finished, ' + JSON.stringify(data));
  });
  console.info('onStartRemoteAbility end');
  }
Obtain deviceId from DeviceManager. The sample code is as follows:
  import deviceManager from '@ohos.distributedHardware.deviceManager';
  let dmClass;
  function getRemoteDeviceId() {
      if (typeof dmClass === 'object' && dmClass != null) {
          let list = dmClass.getTrustedDeviceListSync();
          if (typeof (list) == 'undefined' || typeof (list.length) == 'undefined') {
            console.log("MainAbility onButtonClick getRemoteDeviceId err: list is null");
            return;
          }
          console.log("MainAbility onButtonClick getRemoteDeviceId success:" + list[0].deviceId);
          return list[0].deviceId;
      } else {
          console.log("MainAbility onButtonClick getRemoteDeviceId err: dmClass is null");
      }
  }
In the cross-device scenario, the application must also apply for the data synchronization permission from end users. The sample code is as follows:
  import abilityAccessCtrl from "@ohos.abilityAccessCtrl";
  import bundle from '@ohos.bundle';
  async function RequestPermission() {
      console.info('RequestPermission begin');
      let array: Array<string> = ["ohos.permission.DISTRIBUTED_DATASYNC"];
      let bundleFlag = 0;
      let tokenID = undefined;
      let userID = 100;
      let  appInfo = await bundle.getApplicationInfo('ohos.samples.etsDemo', bundleFlag, userID);
      tokenID = appInfo.accessTokenId;
      let atManager = abilityAccessCtrl.createAtManager();
      let requestPermissions: Array<string> = [];
      for (let i = 0;i < array.length; i++) {
          let result = await atManager.verifyAccessToken(tokenID, array[i]);
          console.info("verifyAccessToken result:" + JSON.stringify(result));
          if (result != abilityAccessCtrl.GrantStatus.PERMISSION_GRANTED) {
              requestPermissions.push(array[i]);
          }
      }
      console.info("requestPermissions:" + JSON.stringify(requestPermissions));
      if (requestPermissions.length == 0 || requestPermissions == []) {
          return;
      }
      let context = featureAbility.getContext();
      context.requestPermissionsFromUser(requestPermissions, 1, (data)=>{
          console.info("data:" + JSON.stringify(data));
          console.info("data requestCode:" + data.requestCode);
          console.info("data permissions:" + data.permissions);
          console.info("data authResults:" + data.authResults);
      });
      console.info('RequestPermission end');
  }
Lifecycle APIs
Table 3 Lifecycle callbacks
| API | Description |
|---|---|
| onShow() | Called when the ability is switched from the background to the foreground. In this case, the ability is visible to users. |
| onHide() | Called when the ability is switched from the foreground to the background. In this case, the ability is invisible to users. |
| onDestroy() | Called when the ability is destroyed. In this callback, you can make preparations for application exit, such as recycling resources and clearing the cache. |
| onCreate() | Called when the ability is created for the first time. You can initialize the application in this callback. |
| onInactive() | Called when the ability loses focus. An ability loses focus when it is about to enter the background state. |
| onActive() | Called when the ability is switched to the foreground and gains focus. |
Example
You need to override the lifecycle callbacks except onCreate() and onDestroy() in app.js or app.ets. The onCreate() and onDestroy() callbacks are automatically generated in the template code provided by DevEco Studio.
export default {
  onCreate() {
    console.info('Application onCreate')
  },
  onDestroy() {
    console.info('Application onDestroy')
  },
  onShow(){
    console.info('Application onShow')
  },
  onHide(){
    console.info('Application onHide')
  },
  onInactive(){
    console.info('Application onInactive')
  },
  onActive(){
    console.info('Application onActive')
  },
}