Cross-Device Migration (for System Applications Only)
When to Use
The main task of cross-device migration is to migrate the current task (including the page control status) of an application to the target device so that the task can continue on it. Cross-device migration supports the following functionalities:
-
Storage and restoration of custom data
-
Storage and restoration of page routing information and page control status data
-
Application compatibility detection
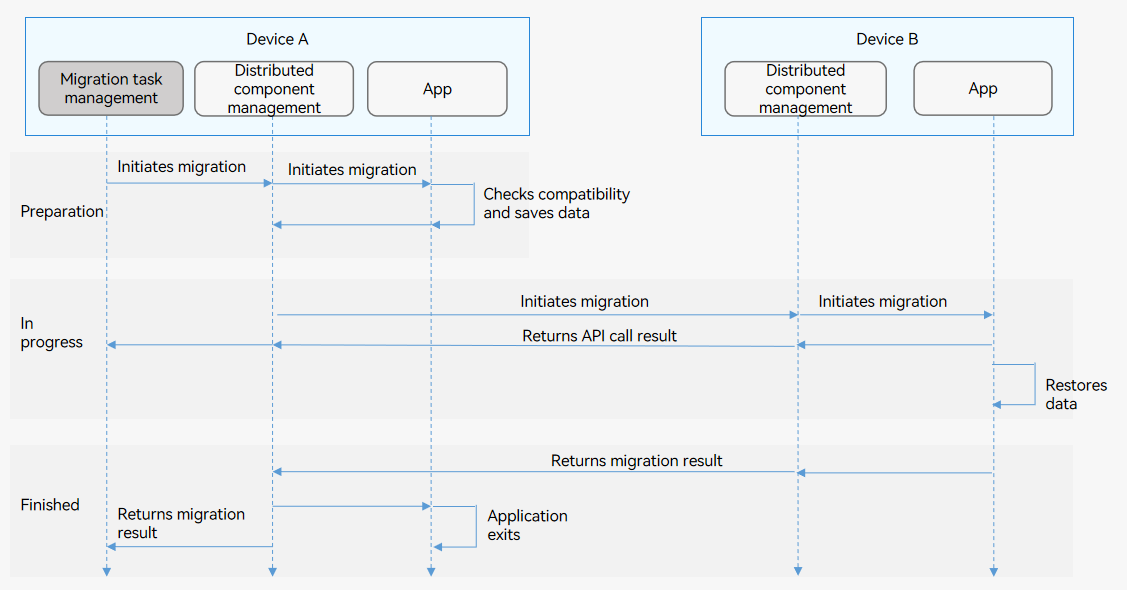
Cross-Device Migration Process
The following figure shows the cross-device migration process.
Figure 1 Cross-device migration process
Constraints
-
Since cross-device migration task management is not available, you can only develop applications that support cross-device migration. Your application cannot initiate migration.
-
Cross-device migration can be performed between the same UIAbility component. In other words, the components must have the same bundleName, abilityName, and signature.
Best Practices
For better user experience, you are advised to use the wantParam parameter to transmit data smaller than 100 KB.
Available APIs
The table below describes the main APIs used for cross-device migration. For details, see API Reference.
Table 1 Cross-device migration APIs
| API | Description |
|---|---|
| onContinue(wantParam : {[key: string]: any}): OnContinueResult | Called by the initiator to store the data required for migration and indicate whether the migration is accepted. - AGREE: The migration is accepted. - REJECT: The migration is rejected. - MISMATCH: The version does not match. |
| onCreate(want: Want, param: AbilityConstant.LaunchParam): void; | Called by the target to restore the data and UI page in the multi-instance migration scenario. |
| onNewWant(want: Want, launchParams: AbilityConstant.LaunchParam): void; | Called by the target to restore the data and UI page in the singleton migration scenario. |
How to Develop
-
Configure the data synchronization permission in the module.json5 file. The sample code is as follows:
{ "module": { "requestPermissions":[ { "name" : "ohos.permission.DISTRIBUTED_DATASYNC", } ] } } -
Configure the fields related to cross-device migration in the configuration file.
-
Configure the application to support migration.
Set the continuable field in the module.json5 file to true. The default value is false. If this parameter is set to false, the application cannot be continued on the target device.
{ "module": { // ... "abilities": [ { // ... "continuable": true, } ] } } -
Configure the application launch type. For details, see UIAbility Component Launch Type.
-
-
Request the data synchronization permission. The sample code for displaying a dialog box to request the permission is as follows:
requestPermission() { let context = this.context let permissions: Array<string> = ['ohos.permission.DISTRIBUTED_DATASYNC'] context.requestPermissionsFromUser(permissions).then((data) => { console.info("Succeed to request permission from user with data: "+ JSON.stringify(data)) }).catch((error) => { console.info("Failed to request permission from user with error: "+ JSON.stringify(error)) }) } -
Implement onContinue() in the UIAbility of the initiator.
onContinue() is called on the initiator. You can save the data in this method to implement application compatibility check and migration decision.
-
Saving migrated data: You can save the data to be migrated in key-value pairs in wantParam.
-
Checking application compatibility: You can obtain the version number of the target application from wantParam and check the compatibility between the target application and the current application.
-
Making a migration decision: You can determine whether to support the migration based on the return value of onContinue(). For details about the return value, see Available APIs.
The sample code is as follows:
import UIAbility from '@ohos.app.ability.UIAbility'; import AbilityConstant from '@ohos.app.ability.AbilityConstant'; onContinue(wantParam : {[key: string]: any}) { console.info(`onContinue version = ${wantParam.version}, targetDevice: ${wantParam.targetDevice}`) let workInput = AppStorage.Get<string>('ContinueWork'); // Set the user input data into wantParam. wantParam["work"] = workInput // set user input data into want params console.info(`onContinue input = ${wantParam["input"]}`); return AbilityConstant.OnContinueResult.AGREE } -
-
Implement onCreate() and onNewWant() in the UIAbility of the target application to implement data restoration.
- Implementation example of onCreate in the multi-instance scenario
-
The target device determines whether the startup is LaunchReason.CONTINUATION based on launchReason in onCreate().
-
You can obtain the saved migration data from the want parameter.
-
After data restoration is complete, call restoreWindowStage() to trigger page restoration.
import UIAbility from '@ohos.app.ability.UIAbility';
import AbilityConstant from '@ohos.app.ability.AbilityConstant';
import distributedObject from '@ohos.data.distributedDataObject';

export default class EntryAbility extends UIAbility {
    storage : LocalStorage;
    onCreate(want, launchParam) {
        console.info(`EntryAbility onCreate ${AbilityConstant.LaunchReason.CONTINUATION}`)
        if (launchParam.launchReason == AbilityConstant.LaunchReason.CONTINUATION) {
            // Obtain the user data from the want parameter.
            let workInput = want.parameters.work
            console.info(`work input ${workInput}`)
            AppStorage.SetOrCreate<string>('ContinueWork', workInput)
            this.storage = new LocalStorage();
            this.context.restoreWindowStage(this.storage);
        }
    }
}
-
- For a singleton ability, use onNewWant() to achieve the same implementation.
- Implementation example of onCreate in the multi-instance scenario