@Observed and @ObjectLink: Observing Attribute Changes in Nested Class Objects
The decorators described above can observe only the changes of the first layer. However, in real-world application development, the application may encapsulate its own data model based on development requirements. In the case of multi-layer nesting, for example, a two-dimensional array, an array item class, or a class insider another class as an attribute, the attribute changes at the second layer cannot be observed. This is where the @Observed and @ObjectLink decorators come in handy.
NOTE
Since API version 9, these two decorators are supported in ArkTS widgets.
Overview
@ObjectLink and @Observed class decorators are used for two-way data synchronization in scenarios involving nested objects or arrays:
-
Regarding classes decorated by @Observed, the attribute changes can be observed.
-
The @ObjectLink decorated state variable in the child component is used to accept the instance of the @Observed decorated class and establish two-way data binding with the corresponding state variable in the parent component. The instance can be an @Observed decorated item in the array or an @Observeddecorated attribute in the class object.
-
Using @Observed alone has no effect. Combined use with @ObjectLink for two-way synchronization or with @Prop for one-way synchronization is required.
Decorator Description
| @Observed Decorator | Description |
|---|---|
| Decorator parameters | None. |
| Class decorator | Decorates a class. You must use new to create a class object before defining the class. |
| @ObjectLink Decorator | Description |
| ----------------- | ---------------------------------------- |
| Decorator parameters | None. |
| Synchronization type | No synchronization with the parent component. |
| Allowed variable types | Objects of @Observed decorated classes. The type must be specified. Simple type variables are not supported. Use @Prop instead. An @ObjectLink decorated variable accepts changes to its attributes, but assignment is not allowed. In other words, an @ObjectLink decorated variable is read-only and cannot be changed. |
| Initial value for the decorated variable | Not allowed. |
Example of a read-only @ObjectLink decorated variable:
// The \@ObjectLink decorated variable accepts changes to its attribute.
this.objLink.a= ...
// Value assignment is not allowed for the \@ObjectLink decorated variable.
this.objLink= ...
NOTE
Value assignment is not allowed for the @ObjectLink decorated variable. To assign a value, use @Prop instead.
@Prop creates a one-way synchronization from the data source to the decorated variable. It takes a copy of its source tp enable changes to remain local. When @Prop observes a change to its source, the local value of the @Prop decorated variable is overwritten.
@ObjectLink creates a two-way synchronization between the data source and the decorated variable. An @ObjectLink decorated variable can be considered as a pointer to the source object inside the parent component. If value assignment of an @ObjectLink decorated variable occurs, the synchronization chain is interrupted.
Variable Transfer/Access Rules
| @ObjectLink Transfer/Access | Description |
|---|---|
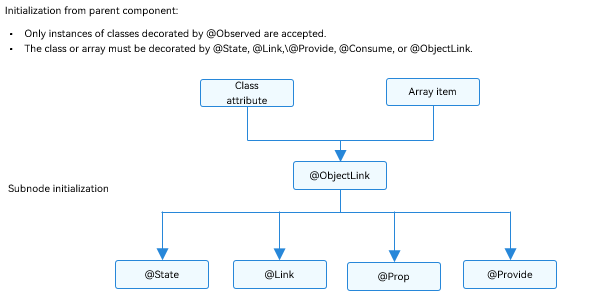
| Initialization from the parent component | Mandatory. To initialize an @ObjectLink decorated variable, a variable in the parent component must meet all the following conditions: - The variable type is an @Observed decorated class. - The initialized value must be an array item or a class attribute. - The class or array of the synchronization source must be decorated by @State, @Link, @Provide, @Consume, or @ObjectLink. For an example where the synchronization source is an array item, see Object Array. For an example of the initialized class, see Nested Object. |
| Synchronize with the source | Two-way. |
| Subnode initialization | Supported; can be used to initialize a regular variable or @State, @Link, @Prop, or @Provide decorated variable in the child component. |
Figure 1 Initialization rule
Observed Changes and Behavior
Observed Changes
If the attribute of an @Observed decorated class is not of the simple type, such as class, object, or array, it must be decorated by @Observed. Otherwise, the attribute changes cannot be observed.
class ClassA {
  public c: number;

  constructor(c: number) {
    this.c = c;
  }
}

@Observed
class ClassB {
  public a: ClassA;
  public b: number;

  constructor(a: ClassA, b: number) {
    this.a = a;
    this.b = b;
  }
}
In the preceding example, ClassB is decorated by @Observed, and the value changes of its member variables can be observed. In contrast, ClassA is not decorated by @Observed, and therefore its attribute changes cannot be observed.
@ObjectLink b: ClassB

// The value assignment can be observed.
this.b.a = new ClassA(5)
this.b.b = 5

// ClassA is not decorated by @Observed, and its attribute changes cannot be observed.
this.b.a.c = 5
@ObjectLink: @ObjectLink can only accept instances of classes decorated by @Observed. The following can be observed:
-
Value changes of the attributes that Object.keys(observedObject) returns. For details, see Nested Object.
-
Replacement of array items for the data source of an array and changes of class attributes for the data source of a class. For details, see Object Array.
Framework Behavior
-
Initial render:
- @Observed causes all instances of the decorated class to be wrapped with an opaque proxy object, which takes over the setter and getter methods of the attributes on the class.
- The @ObjectLink decorated variable in the child component is initialized from the parent component and accepts the instance of the @Observed decorated class. The @ObjectLink decorated wrapped object registers itself with the @Observed decorated class.
-
Attribute update: When the attribute of the @Observed decorated class is updated, the system uses the setter and getter of the proxy, traverses the @ObjectLink decorated wrapped objects that depend on it, and notifies the data update.
Application Scenarios
Nested Object
The following is the data structure of a nested class object.
// objectLinkNestedObjects.ets
let NextID: number = 1;

@Observed
class ClassA {
  public id: number;
  public c: number;

  constructor(c: number) {
    this.id = NextID++;
    this.c = c;
  }
}

@Observed
class ClassB {
  public a: ClassA;

  constructor(a: ClassA) {
    this.a = a;
  }
}
The following component hierarchy presents this data structure.
@Component
struct ViewA {
  label: string = 'ViewA1';
  @ObjectLink a: ClassA;

  build() {
    Row() {
      Button(`ViewA [${this.label}] this.a.c=${this.a.c} +1`)
        .onClick(() => {
          this.a.c += 1;
        })
    }
  }
}

@Entry
@Component
struct ViewB {
  @State b: ClassB = new ClassB(new ClassA(0));

  build() {
    Column() {
      ViewA({ label: 'ViewA #1', a: this.b.a })
      ViewA({ label: 'ViewA #2', a: this.b.a })

      Button(`ViewB: this.b.a.c+= 1`)
        .onClick(() => {
          this.b.a.c += 1;
        })
      Button(`ViewB: this.b.a = new ClassA(0)`)
        .onClick(() => {
          this.b.a = new ClassA(0);
        })
      Button(`ViewB: this.b = new ClassB(ClassA(0))`)
        .onClick(() => {
          this.b = new ClassB(new ClassA(0));
        })
    }
  }
}
Event handlers in ViewB:
-
this.b.a = new ClassA(0) and this.b = new ClassB(new ClassA(0)): Change to the @State decorated variable b and its attributes.
-
this.b.a.c = ... : Second change. [@State](arkts-state.md# observe the change) cannot observe the change of the second layer, but ClassA is decorated by @Observed, and therefore the change of its attribute c can be observed by @ObjectLink.
Event handlers in ViewA:
-
this.a.c += 1: Changes to the @ObjectLink decorated variable which cause the button label to be updated. Unlike @Prop, @ObjectLink does not have a copy of its source. Instead, @ObjectLink creates a reference to its source.
-
The @ObjectLink decorated variable is read-only. Assigning this.a = new ClassA(...) is not allowed. Once value assignment occurs, the reference to the data source is reset and the synchronization is interrupted.
Object Array
An object array is a frequently used data structure. The following example shows the usage of array objects.
@Component
struct ViewA {
  // The type of @ObjectLink of the child component ViewA is ClassA.
  @ObjectLink a: ClassA;
  label: string = 'ViewA1';

  build() {
    Row() {
      Button(`ViewA [${this.label}] this.a.c = ${this.a.c} +1`)
        .onClick(() => {
          this.a.c += 1;
        })
    }
  }
}

@Entry
@Component
struct ViewB {
  // ViewB has the @State decorated ClassA[].
  @State arrA: ClassA[] = [new ClassA(0), new ClassA(0)];

  build() {
    Column() {
      ForEach(this.arrA,
        (item) => {
          ViewA({ label: `#${item.id}`, a: item })
        },
        (item) => item.id.toString()
      )
      // Initialize the @ObjectLink decorated variable using the array item in the @State decorated array, which is an instance of ClassA decorated by @Observed.
      ViewA({ label: `ViewA this.arrA[first]`, a: this.arrA[0] })
      ViewA({ label: `ViewA this.arrA[last]`, a: this.arrA[this.arrA.length-1] })

      Button(`ViewB: reset array`)
        .onClick(() => {
          this.arrA = [new ClassA(0), new ClassA(0)];
        })
      Button(`ViewB: push`)
        .onClick(() => {
          this.arrA.push(new ClassA(0))
        })
      Button(`ViewB: shift`)
        .onClick(() => {
          this.arrA.shift()
        })
      Button(`ViewB: chg item property in middle`)
        .onClick(() => {
          this.arrA[Math.floor(this.arrA.length / 2)].c = 10;
        })
      Button(`ViewB: chg item property in middle`)
        .onClick(() => {
          this.arrA[Math.floor(this.arrA.length / 2)] = new ClassA(11);
        })
    }
  }
}
-
this.arrA[Math.floor(this.arrA.length/2)] = new ClassA(..): The change of this state variable triggers two updates.
- ForEach: The value assignment of the array item causes the change of itemGenerator of ForEach. Therefore, the array item is identified as changed, and the item builder of ForEach is executed to create a ViewA component instance.
- ViewA({ label: ViewA this.arrA[first], a: this.arrA[0] }): The preceding update changes the first element in the array. Therefore, the ViewA component instance bound to this.arrA[0] is updated.
-
this.arrA.push(new ClassA(0)): The change of this state variable triggers two updates with different effects.
- ForEach: The newly added Class A object is unknown to the ForEach itemGenerator. The item builder of ForEach will be executed to create a View A component instance.
- ViewA({ label: ViewA this.arrA[last], a: this.arrA[this.arrA.length-1] }): The last item of the array is changed. As a result, the second View A component instance is changed. For ViewA({ label: ViewA this.arrA[first], a: this.arrA[0] }), a change to the array does not trigger a change to the array item, so the first View A component instance is not refreshed.
-
this.arrA[Math.floor (this.arrA.length/2)].c: [@State] (arkts-state.md#observe-changes) cannot observe changes in the second layer. However, as ClassA is decorated by @Observed, the change of its attributes will be observed by @ObjectLink.
Two-Dimensional Array
@Observed class decoration is required for a two-dimensional array. You can declare an @Observed decorated class that extends from Array.
@Observed
class StringArray extends Array<String> {
}
Declare a class that extends from** Array**: class StringArray extends Array<String> {} and create an instance of StringArray. The use of the new operator is required for the @Observed class decorator to work properly.
@Observed
class StringArray extends Array<String> {
}

@Component
struct ItemPage {
  @ObjectLink itemArr: StringArray;

  build() {
    Row() {
      Text('ItemPage')
        .width(100).height(100)

      ForEach(this.itemArr,
        item => {
          Text(item)
            .width(100).height(100)
        },
        item => item
      )
    }
  }
}

@Entry
@Component
struct IndexPage {
  @State arr: Array<StringArray> = [new StringArray(), new StringArray(), new StringArray()];

  build() {
    Column() {
      ItemPage({ itemArr: this.arr[0] })
      ItemPage({ itemArr: this.arr[1] })
      ItemPage({ itemArr: this.arr[2] })

      Divider()

      ForEach(this.arr,
        itemArr => {
          ItemPage({ itemArr: itemArr })
        },
        itemArr => itemArr[0]
      )

      Divider()

      Button('update')
        .onClick(() => {
          console.error('Update all items in arr');
          if (this.arr[0][0] !== undefined) {
            // We should have a real ID to use with ForEach, but we do no.
            // Therefore, we need to make sure the pushed strings are unique.
            this.arr[0].push(`${this.arr[0].slice(-1).pop()}${this.arr[0].slice(-1).pop()}`);
            this.arr[1].push(`${this.arr[1].slice(-1).pop()}${this.arr[1].slice(-1).pop()}`);
            this.arr[2].push(`${this.arr[2].slice(-1).pop()}${this.arr[2].slice(-1).pop()}`);
          } else {
            this.arr[0].push('Hello');
            this.arr[1].push('World');
            this.arr[2].push('!');
          }
        })
    }
  }
}