Multi-device Collaboration (for System Applications Only)
When to Use
Multi-device coordination involves the following scenarios:
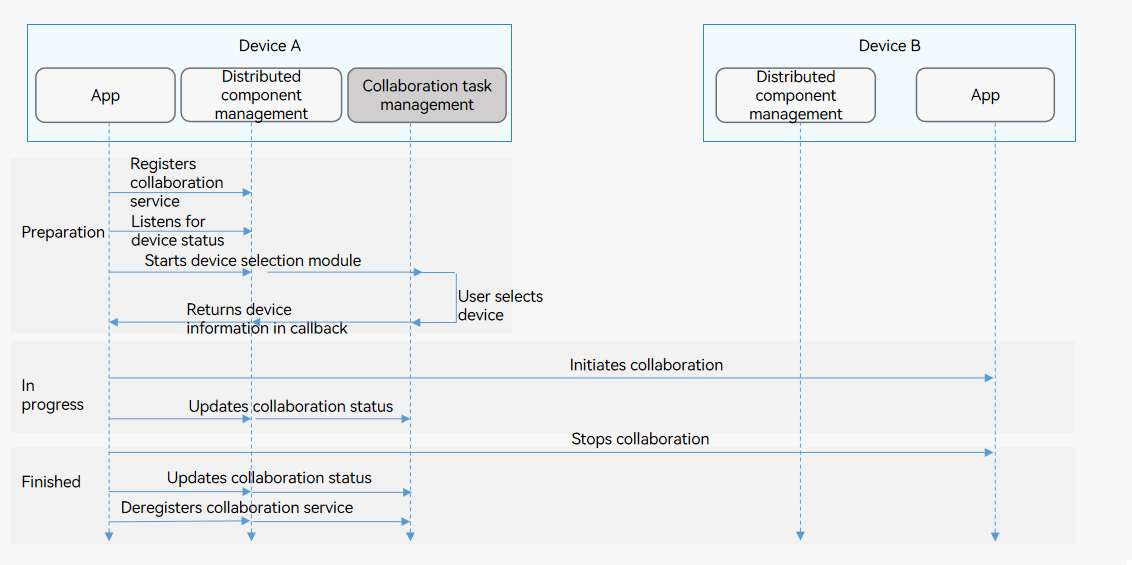
Multi-Device Collaboration Process
The figure below shows the multi-device collaboration process.
Figure 1 Multi-device collaboration process
Constraints
-
Since multi-device collaboration task management is not available, you can obtain the device list by developing system applications. Access to third-party applications is not supported.
-
Multi-device collaboration must comply with Inter-Device Component Startup Rules.
-
For better user experience, you are advised to use the want parameter to transmit data smaller than 100 KB.
Starting UIAbility and ServiceExtensionAbility Across Devices (No Data Returned)
On device A, touch the Start button provided by the initiator application to start a specified UIAbility on device B.
Available APIs
Table 1 Cross-device startup APIs
| API | Description |
|---|---|
| startAbility(want: Want, callback: AsyncCallback<void>): void; | Starts UIAbility and ServiceExtensionAbility. This API uses an asynchronous callback to return the result. |
How to Develop
-
Request the ohos.permission.DISTRIBUTED_DATASYNC permission. For details, see Applying for Permissions.
-
Request the data synchronization permission. The sample code for displaying a dialog box to request the permission is as follows:
requestPermission() { let context = this.context let permissions: Array<string> = ['ohos.permission.DISTRIBUTED_DATASYNC'] context.requestPermissionsFromUser(permissions).then((data) => { console.info("Succeed to request permission from user with data: "+ JSON.stringify(data)) }).catch((error) => { console.info("Failed to request permission from user with error: "+ JSON.stringify(error)) }) } -
Obtain the device ID of the target device.
import deviceManager from '@ohos.distributedHardware.deviceManager'; let dmClass; function initDmClass() { // createDeviceManager is a system API. deviceManager.createDeviceManager('ohos.samples.demo', (err, dm) => { if (err) { // ... return } dmClass = dm }) } function getRemoteDeviceId() { if (typeof dmClass === 'object' && dmClass !== null) { let list = dmClass.getTrustedDeviceListSync() if (typeof (list) === 'undefined' || typeof (list.length) === 'undefined') { console.info('EntryAbility onButtonClick getRemoteDeviceId err: list is null') return; } return list[0].deviceId } else { console.info('EntryAbility onButtonClick getRemoteDeviceId err: dmClass is null') } } -
Set the target component parameters, and call startAbility() to start UIAbility or ServiceExtensionAbility.
let want = {
    deviceId: getRemoteDeviceId(),
    bundleName: 'com.example.myapplication',
    abilityName: 'FuncAbility',
    moduleName: 'module1', // moduleName is optional.
}
// context is the AbilityContext of the initiator UIAbility.
this.context.startAbility(want).then(() => {
    // ...
}).catch((err) => {
    // ...
})
Starting UIAbility Across Devices (Data Returned)
On device A, touch the Start button provided by the initiator application to start a specified UIAbility on device B. When the UIAbility on device B exits, a value is sent back to the initiator application.
Available APIs
Table 2 APIs for starting a UIAbility across devices and returning the result data
| API | Description |
|---|---|
| startAbilityForResult(want: Want, callback: AsyncCallback<AbilityResult>): void; | Starts a UIAbility. This API uses an asynchronous callback to return the result when the UIAbility is terminated. |
| terminateSelfWithResult(parameter: AbilityResult, callback: AsyncCallback<void>): void; | Terminates this UIAbility. This API uses an asynchronous callback to return the ability result information. It is used together with startAbilityForResult. |
| terminateSelfWithResult(parameter: AbilityResult): Promise<void>; | Terminates this UIAbility. This API uses a promise to return the ability result information. It is used together with startAbilityForResult. |
How to Develop
-
Request the ohos.permission.DISTRIBUTED_DATASYNC permission. For details, see Applying for Permissions.
-
Request the data synchronization permission. The sample code for displaying a dialog box to request the permission is as follows:
requestPermission() { let context = this.context let permissions: Array<string> = ['ohos.permission.DISTRIBUTED_DATASYNC'] context.requestPermissionsFromUser(permissions).then((data) => { console.info("Succeed to request permission from user with data: "+ JSON.stringify(data)) }).catch((error) => { console.info("Failed to request permission from user with error: "+ JSON.stringify(error)) }) } -
Set the target component parameters on the initiator, and call startAbilityForResult() to start the target UIAbility. data in the asynchronous callback is used to receive the information returned by the target UIAbility to the initiator UIAbility after the target UIAbility terminates itself. For details about how to implement getRemoteDeviceId(), see Starting UIAbility and ServiceExtensionAbility Across Devices (No Data Returned).
let want = { deviceId: getRemoteDeviceId(), bundleName: 'com.example.myapplication', abilityName: 'FuncAbility', moduleName: 'module1', // moduleName is optional. } // context is the AbilityContext of the initiator UIAbility. this.context.startAbilityForResult(want).then((data) => { // ... }).catch((err) => { // ... }) -
After the UIAbility task at the target device is complete, call terminateSelfWithResult() to return the data to the initiator UIAbility.
const RESULT_CODE: number = 1001; let abilityResult = { resultCode: RESULT_CODE, want: { bundleName: 'com.example.myapplication', abilityName: 'FuncAbility', moduleName: 'module1', }, } // context is the AbilityContext of the target UIAbility. this.context.terminateSelfWithResult(abilityResult, (err) => { // ... }); -
The initiator UIAbility receives the information returned by the target UIAbility and processes the information.
const RESULT_CODE: number = 1001;

// ...

// context is the AbilityContext of the initiator UIAbility.
this.context.startAbilityForResult(want).then((data) => {
    if (data?.resultCode === RESULT_CODE) {
        // Parse the information returned by the target UIAbility.
        let info = data.want?.parameters?.info
        // ...
    }
}).catch((err) => {
    // ...
})
Connecting to ServiceExtensionAbility Across Devices
A system application can connect to a service on another device by calling connectServiceExtensionAbility(). For example, in the distributed game scenario, a tablet is used as the remote control and a smart TV is used as the display.
Available APIs
Table 3 APIs for cross-device connection
| API | Description |
|---|---|
| connectServiceExtensionAbility(want: Want, options: ConnectOptions): number; | Connects to a ServiceExtensionAbility. |
| disconnectServiceExtensionAbility(connection: number, callback: AsyncCallback<void>): void; | Disconnects a connection. This API uses an asynchronous callback to return the result. |
| disconnectServiceExtensionAbility(connection: number): Promise<void>; | Disconnects a connection. This API uses a promise to return the result. |
How to Develop
-
Configure the data synchronization permission in the module.json5 file. The sample code is as follows:
{ "module": { "requestPermissions":[ { "name" : "ohos.permission.DISTRIBUTED_DATASYNC", } ] } } -
Request the data synchronization permission. The sample code for displaying a dialog box to request the permission is as follows:
requestPermission() { let context = this.context let permissions: Array<string> = ['ohos.permission.DISTRIBUTED_DATASYNC'] context.requestPermissionsFromUser(permissions).then((data) => { console.info("Succeed to request permission from user with data: "+ JSON.stringify(data)) }).catch((error) => { console.info("Failed to request permission from user with error: "+ JSON.stringify(error)) }) } -
(Optional) Implement a background service. Perform this operation only if no background service is available.
-
Connect to the background service.
-
Implement the IAbilityConnection class. IAbilityConnection provides the following callbacks that you should implement: onConnect(), onDisconnect(), and onFailed(). The onConnect() callback is invoked when a service is connected, onDisconnect() is invoked when a service is unexpectedly disconnected, and onFailed() is invoked when the connection to a service fails.
-
Set the target component parameters, including the target device ID, bundle name, and ability name.
-
Call connectServiceExtensionAbility to initiate a connection.
-
Receive the service handle returned by the target device when the connection is successful.
-
Perform cross-device invoking and obtain the result returned by the target service.
import rpc from '@ohos.rpc';

const REQUEST_CODE = 99;
let want = {
    "deviceId": getRemoteDeviceId(),
    "bundleName": "com.example.myapplication",
    "abilityName": "ServiceExtAbility"
};
let options = {
    onConnect(elementName, remote) {
        console.info('onConnect callback');
        if (remote === null) {
            console.info(`onConnect remote is null`);
            return;
        }
        let option = new rpc.MessageOption();
        let data = new rpc.MessageParcel();
        let reply = new rpc.MessageParcel();
        data.writeInt(1);
        data.writeInt(99); // You can send data to the target application for corresponding operations.

        // @param code Indicates the service request code sent by the client.
        // @param data Indicates the {@link MessageParcel} object sent by the client.
        // @param reply Indicates the response message object sent by the remote service.
        // @param options Specifies whether the operation is synchronous or asynchronous.
        //
        // @return Returns {@code true} if the operation is successful; returns {@code false} otherwise.
        remote.sendRequest(REQUEST_CODE, data, reply, option).then((ret) => {
            let msg = reply.readInt();   // Receive the information (100) returned by the target device if the connection is successful.
            console.info(`sendRequest ret:${ret} msg:${msg}`);
        }).catch((error) => {
            console.info('sendRequest failed');
        });
    },
    onDisconnect(elementName) {
        console.info('onDisconnect callback')
    },
    onFailed(code) {
        console.info('onFailed callback')
    }
}
// The ID returned after the connection is set up must be saved. The ID will be passed for service disconnection.
let connectionId = this.context.connectServiceExtensionAbility(want, options);
For details about how to implement getRemoteDeviceId(), see Starting UIAbility and ServiceExtensionAbility Across Devices (No Data Returned).
-
-
Disconnect the connection. Use disconnectServiceExtensionAbility() to disconnect from the background service.
let connectionId = 1 // ID returned when the service is connected through connectServiceExtensionAbility.
this.context.disconnectServiceExtensionAbility(connectionId).then((data) => {
    console.info('disconnectServiceExtensionAbility success');
}).catch((error) => {
    console.error('disconnectServiceExtensionAbility failed');
})
Using Cross-Device Call
The basic principle of cross-device call is the same as that of intra-device call. For details, see Using Call to Implement UIAbility Interaction (for System Applications Only).
The following describes how to implement multi-device collaboration through cross-device call.
Available APIs
Table 4 Call APIs
| API | Description |
|---|---|
| startAbilityByCall(want: Want): Promise<Caller>; | Starts a UIAbility in the foreground or background and obtains the caller object for communicating with the UIAbility. |
| on(method: string, callback: CalleeCallBack): void | Callback invoked when the CalleeAbility registers a method. |
| off(method: string): void | Callback invoked when the CalleeAbility deregisters a method. |
| call(method: string, data: rpc.Parcelable): Promise<void> | Sends agreed parcelable data to the CalleeAbility. |
| callWithResult(method: string, data: rpc.Parcelable): Promise<rpc.MessageSequence> | Sends agreed parcelable data to the CalleeAbility and obtains the agreed parcelable data returned by the CalleeAbility. |
| release(): void | Releases the caller object. |
| on(type: "release", callback: OnReleaseCallback): void | Callback invoked when the caller object is released. |
How to Develop
-
Configure the data synchronization permission in the module.json5 file. The sample code is as follows:
{ "module": { "requestPermissions":[ { "name" : "ohos.permission.DISTRIBUTED_DATASYNC", } ] } } -
Request the data synchronization permission. The sample code for displaying a dialog box to request the permission is as follows:
requestPermission() { let context = this.context let permissions: Array<string> = ['ohos.permission.DISTRIBUTED_DATASYNC'] context.requestPermissionsFromUser(permissions).then((data) => { console.info("Succeed to request permission from user with data: "+ JSON.stringify(data)) }).catch((error) => { console.info("Failed to request permission from user with error: "+ JSON.stringify(error)) }) } -
Create the CalleeAbility.
For the CalleeAbility, implement the callback to receive data and the methods to marshal and unmarshal data. When data needs to be received, use on() to register a listener. When data does not need to be received, use off() to deregister the listener.
-
Configure the launch type of the UIAbility.
Set launchType of the CalleeAbility to singleton in the module.json5 file.
-
| JSON Field | Description |
|---|---|
| "launchType" | UIAbility launch type. Set this parameter to singleton. |
  An example of the UIAbility configuration is as follows:

   ```json
   "abilities":[{
       "name": ".CalleeAbility",
       "srcEnty": "./ets/CalleeAbility/CalleeAbility.ts",
       "launchType": "singleton",
       "description": "$string:CalleeAbility_desc",
       "icon": "$media:icon",
       "label": "$string:CalleeAbility_label",
       "exported": true
   }]
   ```
-
Import the UIAbility module.
import Ability from '@ohos.app.ability.UIAbility' -
Define the agreed parcelable data.
The data formats sent and received by the CallerAbility and CalleeAbility must be consistent. In the following example, the data formats are number and string.
export default class MyParcelable { num: number = 0 str: string = "" constructor(num, string) { this.num = num this.str = string } marshalling(messageSequence) { messageSequence.writeInt(this.num) messageSequence.writeString(this.str) return true } unmarshalling(messageSequence) { this.num = messageSequence.readInt() this.str = messageSequence.readString() return true } } -
Implement Callee.on and Callee.off.
In the following example, the MSG_SEND_METHOD listener is registered in onCreate() of the ability and deregistered in onDestroy(). After receiving parcelable data, the application processes the data and returns the data result. You need to implement processing based on service requirements.
const TAG: string = '[CalleeAbility]' const MSG_SEND_METHOD: string = 'CallSendMsg' function sendMsgCallback(data) { console.info('CalleeSortFunc called') // Obtain the parcelable data sent by the CallerAbility. let receivedData = new MyParcelable(0, '') data.readParcelable(receivedData) console.info(`receiveData[${receivedData.num}, ${receivedData.str}]`) // Process the data. // Return the parcelable data result to the CallerAbility. return new MyParcelable(receivedData.num + 1, `send ${receivedData.str} succeed`) } export default class CalleeAbility extends Ability { onCreate(want, launchParam) { try { this.callee.on(MSG_SEND_METHOD, sendMsgCallback) } catch (error) { console.info(`${MSG_SEND_METHOD} register failed with error ${JSON.stringify(error)}`) } } onDestroy() { try { this.callee.off(MSG_SEND_METHOD) } catch (error) { console.error(TAG, `${MSG_SEND_METHOD} unregister failed with error ${JSON.stringify(error)}`) } } } -
Obtain the caller object and access the CalleeAbility.
-
Import the UIAbility module.
import Ability from '@ohos.app.ability.UIAbility' -
Obtain the caller object.
The context attribute of the UIAbility implements startAbilityByCall to obtain the caller object for communication. The following example uses this.context to obtain the context attribute of the UIAbility, uses startAbilityByCall to start the CalleeAbility, obtain the caller object, and register the onRelease listener of the CallerAbility. You need to implement processing based on service requirements.
async onButtonGetRemoteCaller() {
    var caller = undefined
    var context = this.context

    context.startAbilityByCall({
        deviceId: getRemoteDeviceId(),
        bundleName: 'com.samples.CallApplication',
        abilityName: 'CalleeAbility'
    }).then((data) => {
        if (data != null) {
            caller = data
            console.info('get remote caller success')
            // Register the onRelease() listener of the CallerAbility.
            caller.onRelease((msg) => {
                console.info(`remote caller onRelease is called ${msg}`)
            })
            console.info('remote caller register OnRelease succeed')
        }
    }).catch((error) => {
        console.error(`get remote caller failed with ${error}`)
    })
}
For details about how to implement getRemoteDeviceId(), see Starting UIAbility and ServiceExtensionAbility Across Devices (No Data Returned).
-
-
Sends agreed parcelable data to the CalleeAbility.
-
The parcelable data can be sent to the CalleeAbility with or without a return value. The method and parcelable data must be consistent with those of the CalleeAbility. The following example describes how to send data to the CalleeAbility.
const MSG_SEND_METHOD: string = 'CallSendMsg' async onButtonCall() { try { let msg = new MyParcelable(1, 'origin_Msg') await this.caller.call(MSG_SEND_METHOD, msg) } catch (error) { console.info(`caller call failed with ${error}`) } } -
In the following, CallWithResult is used to send data originMsg to the CalleeAbility and assign the data processed by the CallSendMsg method to backMsg.
const MSG_SEND_METHOD: string = 'CallSendMsg'
originMsg: string = ''
backMsg: string = ''
async onButtonCallWithResult(originMsg, backMsg) {
    try {
        let msg = new MyParcelable(1, originMsg)
        const data = await this.caller.callWithResult(MSG_SEND_METHOD, msg)
        console.info('caller callWithResult succeed')

        let result = new MyParcelable(0, '')
        data.readParcelable(result)
        backMsg(result.str)
        console.info(`caller result is [${result.num}, ${result.str}]`)
    } catch (error) {
        console.info(`caller callWithResult failed with ${error}`)
    }
}
-
-
Release the caller object.
When the caller object is no longer required, use release() to release it.
releaseCall() {
    try {
        this.caller.release()
        this.caller = undefined
        console.info('caller release succeed')
    } catch (error) {
        console.info(`caller release failed with ${error}`)
    }
}