Applying for Permissions
When to Use
The Ability Privilege Level (APL) of an application can be normal, system_basic, or system_core. The default APL is normal. The permission types include system_grant and user_grant. For details about the permissions for applications, see the Application Permission List.
This document describes the following operations:
- Declaring Permissions in the Configuration File
- Declaring the ACL
- Requesting User Authorization
- Pre-Authorizing user_grant Permissions
Declaring Permissions in the Configuration File
During the development, you need to declare the permissions required by your application one by one in the project configuration file. The application cannot obtain the permissions that are not declared in the configuration file. OpenHarmony provides two application models: FA model and stage model. For more information, see Application Models. The application bundle and configuration file vary with the application model.
NOTE
The default APL of an application is normal. When an application of the normal APL needs a permission of the system_basic or system_core level, you must declare the permission in the configuration file and the Access Control List (ACL).
The following table describes the fields in the configuration file.
| Field | Mandatory | Description |
|---|---|---|
| name | Yes | Name of the permission. |
| reason | No | Reason for requesting the permission. This parameter is mandatory when a user_grant permission is required. |
| usedScene | No | Application scenario of the permission. This parameter is mandatory when a user_grant permission is required. |
| abilities | No | Abilities that require the permission. The value is an array. Applicable model: stage |
| ability | No | Abilities that require the permission. The value is an array. Applicable model: FA |
| when | No | Time when the permission is used. Value: - inuse: The permission applies only to a foreground application. - always: The permission applies to both the foreground and background applications. |
Stage Model
If your application is developed based on the stage model, declare the required permissions in module.json5.
{
  "module" : {
    // ...
    "requestPermissions":[
      {
        "name" : "ohos.permission.PERMISSION1",
        "reason": "$string:reason",
        "usedScene": {
          "abilities": [
            "FormAbility"
          ],
          "when":"inuse"
        }
      },
      {
        "name" : "ohos.permission.PERMISSION2",
        "reason": "$string:reason",
        "usedScene": {
          "abilities": [
            "FormAbility"
          ],
          "when":"always"
        }
      }
    ]
  }
}
FA Model
If your application is developed based on the FA model, declare the required permissions in config.json.
{
  "module" : {
    // ...
    "reqPermissions":[
      {
        "name" : "ohos.permission.PERMISSION1",
        "reason": "$string:reason",
        "usedScene": {
          "ability": [
            "FormAbility"
          ],
          "when":"inuse"
        }
      },
      {
        "name" : "ohos.permission.PERMISSION2",
        "reason": "$string:reason",
        "usedScene": {
          "ability": [
            "FormAbility"
          ],
          "when":"always"
        }
      }
    ]
  }
}
Declaring the ACL
If an application of the normal APL requires permissions of the system_basic or system_core level, you must also declare the required permissions in the ACL.
For example, if an application needs to access audio clips of a user and capture screenshots, it requires the ohos.permission.WRITE_AUDIO permission (of the system_basic level) and the ohos.permission.CAPTURE_SCREEN permission (of the system_core level). In this case, you need to add the required permissions to the acls field in the HarmonyAppProvision configuration file.
{
	// ...
	"acls":{
		"allowed-acls":[
			"ohos.permission.WRITE_AUDIO",
            "ohos.permission.CAPTURE_SCREEN"
		]
	}
}
Requesting User Authorization
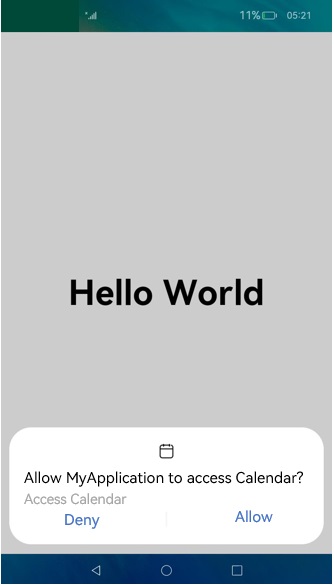
The permissions for accessing user privacy information or using system abilities (for example, accessing Location or Calendar information or using the camera to take photos or record videos) request user authorization. Before an application that requires a user_grant permission is called, a verification is performed to check whether the user has granted the permission to the application. If the user has not granted the permission, a dialog box will be displayed to request user authorization. The following figure shows an example.
Figure 1 Requesting authorization from a user
NOTE
Each time before an API protected by a user_grant permission is called, requestPermissionsFromUser() will be called to request user authorization. After the permission is granted, the user may revoke the authorization in Settings. Therefore, the previously granted authorization status cannot be persistent.
Stage Model
Example: Apply for the permission for an application to access the Calendar.
-
Declare the ohos.permission.READ_CALENDAR permission in the configuration file.
For details, see Declaring Permissions in the Configuration File. -
Check whether the user has granted the permission.
Use checkAccessToken() to check whether the user has granted the permission. If yes, the application can access the Calendar. Otherwise, request authorization from the user.
import bundleManager from '@ohos.bundle.bundleManager'; import abilityAccessCtrl, { Permissions } from '@ohos.abilityAccessCtrl'; async function checkAccessToken(permission: Permissions): Promise<abilityAccessCtrl.GrantStatus> { let atManager = abilityAccessCtrl.createAtManager(); let grantStatus: abilityAccessCtrl.GrantStatus; // Obtain the access token ID of the application. let tokenId: number; try { let bundleInfo: bundleManager.BundleInfo = await bundleManager.getBundleInfoForSelf(bundleManager.BundleFlag.GET_BUNDLE_INFO_WITH_APPLICATION); let appInfo: bundleManager.ApplicationInfo = bundleInfo.appInfo; tokenId = appInfo.accessTokenId; } catch (err) { console.error(`getBundleInfoForSelf failed, code is ${err.code}, message is ${err.message}`); } // Check whether the user has granted the permission. try { grantStatus = await atManager.checkAccessToken(tokenId, permission); } catch (err) { console.error(`checkAccessToken failed, code is ${err.code}, message is ${err.message}`); } return grantStatus; } async function checkPermissions(): Promise<void> { const permissions: Array<Permissions> = ['ohos.permission.READ_CALENDAR']; let grantStatus: abilityAccessCtrl.GrantStatus = await checkAccessToken(permissions[0]); if (grantStatus === abilityAccessCtrl.GrantStatus.PERMISSION_GRANTED) { // If the user has granted the permission, the application can access the Calendar. } else { // Apply for the permission to access the Calendar. } } -
Request user authorization dynamically.
Use requestPermissionsFromUser() to apply for permissions from the user when the application is running. A list of permissions, such as the permissions to access the Location, Calendar, camera, and microphone, can be passed in. The user can grant or deny the permissions.
You can have requestPermissionsFromUser() called in onWindowStageCreate() of the UIAbility to dynamically request user authorization, or request user authorization on the UI based on service requirements.
Sample code for requesting user authorization using UIAbility:
import UIAbility from '@ohos.app.ability.UIAbility';
import window from '@ohos.window';
import abilityAccessCtrl, { Permissions } from '@ohos.abilityAccessCtrl';

const permissions: Array<Permissions> = ['ohos.permission.READ_CALENDAR'];

export default class EntryAbility extends UIAbility {
  // ...

  onWindowStageCreate(windowStage: window.WindowStage) {
    // Main window is created. Set the main page for this ability.
    let context = this.context;
    let atManager = abilityAccessCtrl.createAtManager();
    // The return value of requestPermissionsFromUser determines whether to display a dialog box to request user authorization.

    atManager.requestPermissionsFromUser(context, permissions).then((data) => {
      let grantStatus: Array<number> = data.authResults;
      let length: number = grantStatus.length;
      for (let i = 0; i < length; i++) {
        if (grantStatus[i] === 0) {
          // If the user has granted the permission, the application can access the Calendar.
        } else {
          // If the user has not granted the permission, display a message indicating that user authorization is required, and direct the user to the Settings page to set the permission.
          return;
        }
      }
      // The authorization is successful.
    }).catch((err) => {
      console.error(`requestPermissionsFromUser failed, code is ${err.code}, message is ${err.message}`);
    })

    // ...
  }
}
Sample code for requesting user authorization on the UI:
import abilityAccessCtrl, { Permissions } from '@ohos.abilityAccessCtrl'; import common from '@ohos.app.ability.common'; const permissions: Array<Permissions> = ['ohos.permission.READ_CALENDAR']; @Entry @Component struct Index { reqPermissionsFromUser(permissions: Array<Permissions>): void { let context = getContext(this) as common.UIAbilityContext; let atManager = abilityAccessCtrl.createAtManager(); // The return value of requestPermissionsFromUser determines whether to display a dialog box to request user authorization. atManager.requestPermissionsFromUser(context, permissions).then((data) => { let grantStatus: Array<number> = data.authResults; let length: number = grantStatus.length; for (let i = 0; i < length; i++) { if (grantStatus[i] === 0) { // If the user has granted the permission, the application can access the Calendar. } else { // If the user has not granted the permission, display a message indicating that user authorization is required, and direct the user to the Settings page to set the permission. return; } } // The authorization is successful. }).catch((err) => { console.error(`requestPermissionsFromUser failed, code is ${err.code}, message is ${err.message}`); }) } // Page display. build() { // ... } } -
Perform subsequent operations based on the authorization result.
After requestPermissionsFromUser() is called, the application waits for the user authorization result. If the user has granted the permission, the application can access the Calendar. If the user has not granted the permission, a message will be displayed indicating that user authorization is required, and the user is directed to Settings to set the permission.
function openPermissionsInSystemSettings(): void {
  let context = getContext(this) as common.UIAbilityContext;
  let wantInfo = {
    action: 'action.settings.app.info',
    parameters: {
      settingsParamBundleName: 'com.example.myapplication' // Open the Details page of the application.
    }
  }
  context.startAbility(wantInfo).then(() => {
    // ...
  }).catch((err) => {
    // ...
  })
}
FA Model
Call requestPermissionsFromUser() to request user authorization.
import featureAbility from '@ohos.ability.featureAbility';

reqPermissions() {
    let context = featureAbility.getContext();
    let array:Array<string> = ["ohos.permission.PERMISSION2"];
    // The return value of requestPermissionsFromUser determines whether to display a dialog box to request user authorization.
    context.requestPermissionsFromUser(array, 1).then(function(data) {
        console.log("data:" + JSON.stringify(data));
        console.log("data permissions:" + JSON.stringify(data.permissions));
        console.log("data result:" + JSON.stringify(data.authResults));
    }, (err) => {
        console.error('Failed to start ability', err.code);
    });
}
Pre-Authorizing user_grant Permissions
By default, the user_grant permissions must be dynamically authorized by the user through a dialog box. However, if you do not want the user authorization dialog box to display for pre-installed applications, you can pre-authorize the permissions, for example, the ohos.permission.MICROPHONE permission, in the install_list_permission.json file. The install_list_permissions.json file is in the /system/etc/app/ directory on a device, and is loaded when the device starts. When the application is installed, the user_grant permissions in the file are granted.
The install_list_permissions.json file contains the following fields:
- bundleName: bundle name of the application.
- app_signature: fingerprint information of the application. For details, see Configuration in install_list_capability.json in the Application Privilege Configuration Guide.
- permissions: name specifies the name of the user_grant permission to pre-authorize. userCancellable specifies whether the user can revoke the pre-authorization. The value true means the user can revoke the pre-authorization; the value false means the opposite.
NOTE
This file is available only for preinstalled applications.
[
  // ...
  {
    "bundleName": "com.example.myapplication", // Bundle Name.
    "app_signature": ["****"], // Fingerprint information.
    "permissions":[
      {
        "name": "ohos.permission.PERMISSION_X", // Permission to pre-authorize.
        "userCancellable": false // The user cannot revoke the authorization.
      },
      {
        "name": "ohos.permission.PERMISSION_X", // Permission to pre-authorize.
        "userCancellable": true // The user can revoke the authorization.
      }
    ]
  }
]