@Link Decorator: Two-Way Synchronization Between Parent and Child Components
An @Link decorated variable creates two-way synchronization with a variable of its parent component.
NOTE
Since API version 9, this decorator is supported in ArkTS widgets.
Overview
An @Link decorated variable in a child component shares the same value with a variable in its parent component.
Restrictions
- The @Link decorator cannot be used in custom components decorated by @Entry.
Rules of Use
| @Link Decorator | Description |
|---|---|
| Decorator parameters | None. |
| Synchronization type | Two-way: from an @State, @StorageLink, or @Link decorated variable in the parent component to this variable; and the other way around. |
| Allowed variable types | Object, class, string, number, Boolean, enum, and array of these types. Date type. For details about the scenarios of supported types, see Observed Changes. The type must be specified and must be the same as that of the counterpart variable of the parent component. any is not supported. A combination of simple and complex types is not supported. The undefined and null values are not allowed. The Length, ResourceStr, and ResourceColor types are a combination of simple and complex types and therefore not supported. |
| Initial value for the decorated variable | Initialization of the decorated variables is forbidden. |
Variable Transfer/Access Rules
| Transfer/Access | Description |
|---|---|
| Initialization and update from the parent component | Mandatory. A two-way synchronization relationship can be established with the @State, @StorageLink, or @Link decorated variable in the parent component. An @Link decorated variable can be initialized from an @State, @Link, @Prop, @Provide, @Consume, @ObjectLink, @StorageLink, @StorageProp, @LocalStorageLink, or @LocalStorageProp decorated variable in the parent component. Since API version 9, the syntax is Comp({ aLink: this.aState }) for initializing an @Link decorated variable in the child component from an @State decorated variable in its parent component. The Comp({aLink: $aState}) syntax is also supported. |
| Child component initialization | Supported; can be used to initialize a regular variable or @State, @Link, @Prop, or @Provide decorated variable in the child component. |
| Access | Private, accessible only within the component. |
Figure 1 Initialization rule

Observed Changes and Behavior
Observed Changes
-
When the decorated variable is of the Boolean, string, or number type, its value change can be observed. For details, see Example for @Link with Simple and Class Types.
-
When the decorated variable is of the class or Object type, its value change and value changes of all its attributes, that is, the attributes that Object.keys(observedObject) returns, can be observed. For details, see Example for @Link with Simple and Class Types.
-
When the decorated variable is of the array type, the addition, deletion, and updates of array items can be observed. For details, see Array Type @Link.
-
When the decorated variable is of the Date type, the overall value assignment of the Date object can be observed, and the following APIs can be called to update Date attributes: setFullYear, setMonth, setDate, setHours, setMinutes, setSeconds, setMilliseconds, setTime, setUTCFullYear, setUTCMonth, setUTCDate, setUTCHours, setUTCMinutes, setUTCSeconds, and setUTCMilliseconds.
@Component
struct DateComponent {
  @Link selectedDate: Date;

  build() {
    Column() {
      Button(`child increase the year by 1`).onClick(() => {
        this.selectedDate.setFullYear(this.selectedDate.getFullYear() + 1)
      })
      Button('child update the new date')
        .margin(10)
        .onClick(() => {
          this.selectedDate = new Date('2023-09-09')
        })
      DatePicker({
        start: new Date('1970-1-1'),
        end: new Date('2100-1-1'),
        selected: this.selectedDate
      })
    }

  }
}

@Entry
@Component
struct ParentComponent {
  @State parentSelectedDate: Date = new Date('2021-08-08');

  build() {
    Column() {
      Button('parent increase the month by 1')
        .margin(10)
        .onClick(() => {
          this.parentSelectedDate.setMonth(this.parentSelectedDate.getMonth() + 1)
        })
      Button('parent update the new date')
        .margin(10)
        .onClick(() => {
          this.parentSelectedDate = new Date('2023-07-07')
        })
      DatePicker({
        start: new Date('1970-1-1'),
        end: new Date('2100-1-1'),
        selected: this.parentSelectedDate
      })

      DateComponent({ selectedDate:this.parentSelectedDate })
    }
  }
}
Framework Behavior
An @Link decorated variable shares the lifecycle of its owning component.
To understand the value initialization and update mechanism of the @Link decorated variable, it is necessary to consider the parent component and the initial render and update process of the child component that owns the @Link decorated variable (in this example, the @State decorated variable in the parent component is used).
-
Initial render: The execution of the parent component's build() function creates a new instance of the child component. The initialization process is as follows:
- An @State decorated variable of the parent component must be specified to initialize the child component's @Link decorated variable. The child component's @Link decorated variable value and its source variable are kept in sync (two-way data synchronization).
- The @State state variable wrapper class of the parent component is passed to the child component through the build function. After obtaining the @State state variable of the parent component, the @Link wrapper class of the child component registers the this pointer to the current @Link wrapper class with the @State variable of the parent component.
-
Update of the @Link source: When the state variable in the parent component is updated, the @Link decorated variable in the related child component is updated. Processing steps:
- As indicated in the initial rendering step, the child component's @Link wrapper class registers the current this pointer with the parent component. When the @State decorated variable in the parent component is changed, all system components (elementid) and state variables (such as the @Link wrapper class) that depend on the parent component are traversed and updated.
- After the @Link wrapper class is updated, all system components (elementId) that depend on the @Link decorated variable in the child component are notified of the update. In this way, the parent component has the state data of the child components synchronized.
-
Update of @Link: After the @Link decorated variable in the child component is updated, the following steps are performed (the @State decorated variable in the parent component is used):
- After the @Link decorated variable is updated, the set method of the @State wrapper class in the parent component is called to synchronize the updated value back to the parent component.
- The @Link in the child component and @State in the parent component traverse the dependent system components and update the corresponding UI. In this way, the @Link decorated variable in the child component is synchronized back to the @State decorated variable in the parent component.
Usage Scenarios
Example for @Link with Simple and Class Types
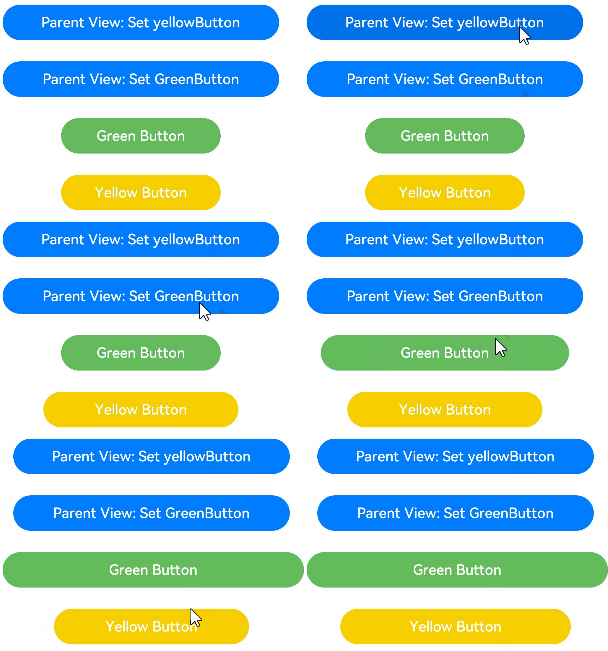
In the following example, after Parent View: Set yellowButton and Parent View: Set GreenButton of the parent component ShufflingContainer are clicked, the change in the parent component is synchronized to the child components.
-
After buttons of the child components GreenButton and YellowButton are clicked, the child components (@Link decorated variables) change accordingly. Due to the two-way synchronization relationship between @Link and @State, the changes are synchronized to the parent component.
-
When a button in the parent component ShufflingContainer is clicked, the parent component (@State decorated variable) changes, and the changes are synchronized to the child components, which are then updated accordingly.
class GreenButtonState {
  width: number = 0;

  constructor(width: number) {
    this.width = width;
  }
}

@Component
struct GreenButton {
  @Link greenButtonState: GreenButtonState;

  build() {
    Button('Green Button')
      .width(this.greenButtonState.width)
      .height(40)
      .backgroundColor('#64bb5c')
      .fontColor('#FFFFFF, 90%')
      .onClick(() => {
        if (this.greenButtonState.width < 700) {
          // Update the attribute of the class. The change can be observed and synchronized back to the parent component.
          this.greenButtonState.width += 60;
        } else {
          // Update the class. The change can be observed and synchronized back to the parent component.
          this.greenButtonState = new GreenButtonState(180);
        }
      })
  }
}

@Component
struct YellowButton {
  @Link yellowButtonState: number;

  build() {
    Button('Yellow Button')
      .width(this.yellowButtonState)
      .height(40)
      .backgroundColor('#f7ce00')
      .fontColor('#FFFFFF, 90%')
      .onClick(() => {
        // The change of the decorated variable of a simple type in the child component can be synchronized back to the parent component.
        this.yellowButtonState += 40.0;
      })
  }
}

@Entry
@Component
struct ShufflingContainer {
  @State greenButtonState: GreenButtonState = new GreenButtonState(180);
  @State yellowButtonProp: number = 180;

  build() {
    Column() {
      Flex({ direction: FlexDirection.Column, alignItems: ItemAlign.Center }) {
        // Simple type @Link in the child component synchronized from @State in the parent component.
        Button('Parent View: Set yellowButton')
          .width(312)
          .height(40)
          .margin(12)
          .fontColor('#FFFFFF, 90%')
          .onClick(() => {
            this.yellowButtonProp = (this.yellowButtonProp < 700) ? this.yellowButtonProp + 40 : 100;
          })
        // Class type @Link in the child component synchronized from @State in the parent component.
        Button('Parent View: Set GreenButton')
          .width(312)
          .height(40)
          .margin(12)
          .fontColor('#FFFFFF, 90%')
          .onClick(() => {
            this.greenButtonState.width = (this.greenButtonState.width < 700) ? this.greenButtonState.width + 100 : 100;
          })
        // Initialize the class type @Link.
        GreenButton({ greenButtonState: $greenButtonState }).margin(12)
        // Initialize the simple type @Link.
        YellowButton({ yellowButtonState: $yellowButtonProp }).margin(12)
      }
    }
  }
}

Array Type @Link
@Component
struct Child {
  @Link items: number[];

  build() {
    Column() {
      Button(`Button1: push`)
        .margin(12)
        .width(312)
        .height(40)
        .fontColor('#FFFFFF, 90%')
        .onClick(() => {
          this.items.push(this.items.length + 1);
        })
      Button(`Button2: replace whole item`)
        .margin(12)
        .width(312)
        .height(40)
        .fontColor('#FFFFFF, 90%')
        .onClick(() => {
          this.items = [100, 200, 300];
        })
    }
  }
}

@Entry
@Component
struct Parent {
  @State arr: number[] = [1, 2, 3];

  build() {
    Column() {
      Child({ items: $arr })
        .margin(12)
      ForEach(this.arr,
        (item: number) => {
          Button(`${item}`)
            .margin(12)
            .width(312)
            .height(40)
            .backgroundColor('#11a2a2a2')
            .fontColor('#e6000000')
        },
        (item: ForEachInterface) => item.toString()
      )
    }
  }
}

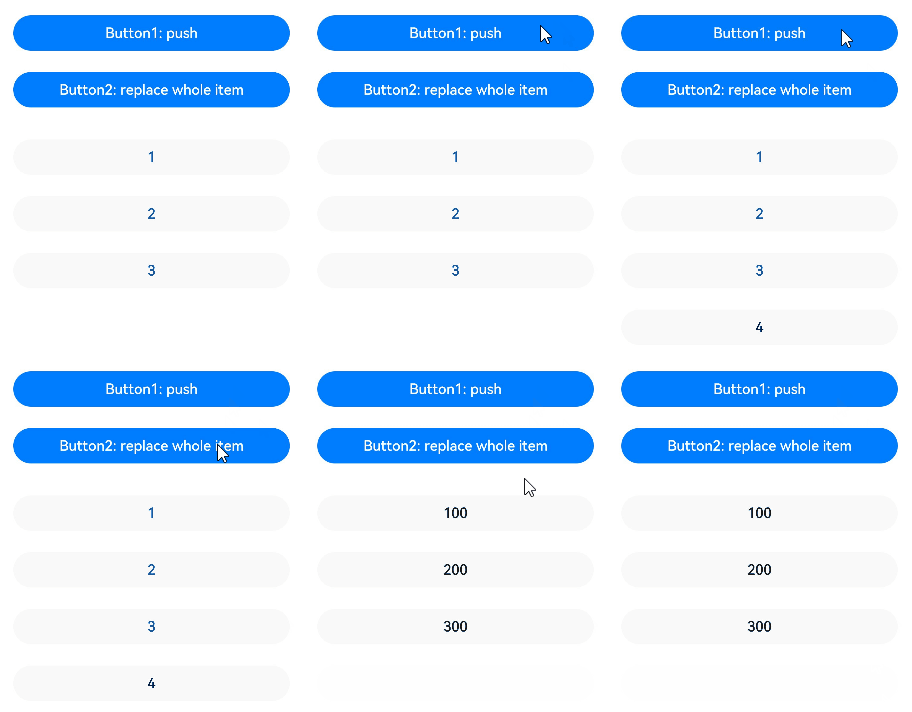
As described above, the ArkUI framework can observe the addition, deletion, and replacement of array items. It should be noted that, in the preceding example, the type of the @Link and @State decorated variables is the same: number[]. It is not allowed to define the @Link decorated variable in the child component as type number (@Link item: number), and create child components for each array item in the @State decorated array in the parent component. @Prop or @Observed should be used depending on application semantics.
FAQs
Incorrect Type of @Link Decorated State Variable
When using @Link to decorate a state variable in a child component, ensure that the variable type is the same as the source type, and the source is a state variable decorated by a decorator such as @State.
[Nonexample]
@Observed
class ClassA {
  public c: number = 0;

  constructor(c: number) {
    this.c = c;
  }
}

@Component
struct LinkChild {
  @Link testNum: number;

  build() {
    Text(`LinkChild testNum ${this.testNum}`)
  }
}

@Entry
@Component
struct Parent {
  @State testNum: ClassA[] = [new ClassA(1)];

  build() {
    Column() {
      Text(`Parent testNum ${this.testNum[0].c}`)
        .onClick(() => {
          this.testNum[0].c += 1;
        })
      // The type of the @Link decorated variable must be the same as that of the @State decorated data source.
      LinkChild({ testNum: this.testNum[0].c })
    }
  }
}
In the example, the type of @Link testNum: number and the initialization from the parent component LinkChild ({testNum:this.testNum.c}) are incorrect. The data source of @Link must be a decorated state variable. The @Link decorated variables must be of the same type as the data source, for example, @Link: T and @State: T. Therefore, the value should be changed to @Link testNum: ClassA, and the initialization from the parent component should be LinkChild({testNum: $testNum}).
[Example]
@Observed
class ClassA {
  public c: number = 0;

  constructor(c: number) {
    this.c = c;
  }
}

@Component
struct LinkChild {
  @Link testNum: ClassA[];

  build() {
    Text(`LinkChild testNum ${this.testNum[0]?.c}`)
  }
}

@Entry
@Component
struct Parent {
  @State testNum: ClassA[] = [new ClassA(1)];

  build() {
    Column() {
      Text(`Parent testNum ${this.testNum[0].c}`)
        .onClick(() => {
          this.testNum[0].c += 1;
        })
      // The type of the @Link decorated variable must be the same as that of the @State decorated data source.
      LinkChild({ testNum: $testNum })
    }
  }
}