@Observed and @ObjectLink Decorators: Observing Attribute Changes in Nested Class Objects
The aforementioned decorators can observe only the changes of the first layer. However, in real-world application development, an application may encapsulate its own data model. In this case, for multi-layer nesting, for example, a two-dimensional array, an array item class, or a class inside another class as an attribute, the attribute changes at the second layer cannot be observed. This is where the @Observed and @ObjectLink decorators come in handy.
NOTE
Since API version 9, these two decorators are supported in ArkTS widgets.
Overview
@ObjectLink and @Observed class decorators are used for two-way data synchronization in scenarios involving nested objects or arrays:
-
Regarding classes decorated by @Observed, the attribute changes can be observed.
-
The @ObjectLink decorated state variable in the child component is used to accept the instance of the @Observed decorated class and establish two-way data binding with the corresponding state variable in the parent component. The instance can be an @Observed decorated item in the array or an @Observed decorated attribute in the class object.
-
Using @Observed alone has no effect. It needs to be used with @ObjectLink for two-way synchronization or with @Prop for one-way synchronization.
Constraints
-
Using @Observed to decorate a class changes the original prototype chain of the class. Using @Observed and other class decorators to decorate the same class may cause problems.
-
The @ObjectLink decorator cannot be used in custom components decorated by @Entry.
Decorator Description
| @Observed Decorator | Description |
|---|---|
| Decorator parameters | None. |
| Class decorator | Decorates a class. You must use new to create a class object before defining the class. |
| @ObjectLink Decorator | Description |
| ----------------- | ---------------------------------------- |
| Decorator parameters | None. |
| Synchronization type | No synchronization with the parent component. |
| Allowed variable types | Objects of @Observed decorated classes. The type must be specified. Simple type variables are not supported. Use @Prop instead. Instances of classes that inherit Date or Array are supported. For details, see Observed Changes. An @ObjectLink decorated variable accepts changes to its attributes, but assignment is not allowed. In other words, an @ObjectLink decorated variable is read-only and cannot be changed. |
| Initial value for the decorated variable | Not allowed. |
Example of a read-only @ObjectLink decorated variable:
// The \@ObjectLink decorated variable accepts changes to its attribute.
this.objLink.a= ...
// Value assignment is not allowed for the \@ObjectLink decorated variable.
this.objLink= ...
NOTE
Value assignment is not allowed for the @ObjectLink decorated variable. To assign a value, use @Prop instead.
@Prop creates a one-way synchronization from the data source to the decorated variable. It takes a copy of its source to enable changes to remain local. When @Prop observes a change to its source, the local value of the @Prop decorated variable is overwritten.
@ObjectLink creates a two-way synchronization between the data source and the decorated variable. An @ObjectLink decorated variable can be considered as a pointer to the source object inside the parent component. Do not assign values to @ObjectLink decorated variables, as doing so will interrupt the synchronization chain. @ObjectLink decorated variables are initialized through data source (Object) references. Assigning a value to them is equivalent to updating the array items or class attributes in the parent component, which is not supported in TypeScript/JavaScript and will result in a runtime error.
Variable Transfer/Access Rules
| @ObjectLink Transfer/Access | Description |
|---|---|
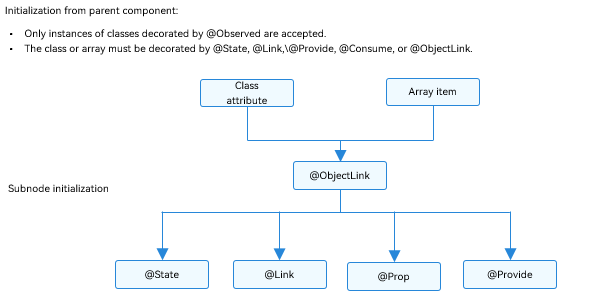
| Initialization from the parent component | Mandatory. To initialize an @ObjectLink decorated variable, a variable in the parent component must meet all the following conditions: - The variable type is an @Observed decorated class. - The initialized value must be an array item or a class attribute. - The class or array of the synchronization source must be decorated by @State, @Link, @Provide, @Consume, or @ObjectLink. For an example where the synchronization source is an array item, see Object Array. For an example of the initialized class, see Nested Object. |
| Synchronization with the source | Two-way. |
| Subnode initialization | Supported; can be used to initialize a regular variable or @State, @Link, @Prop, or @Provide decorated variable in the child component. |
Figure 1 Initialization rule
Observed Changes and Behavior
Observed Changes
If the attribute of an @Observed decorated class is not of the simple type, such as class, object, or array, it must be decorated by @Observed. Otherwise, the attribute changes cannot be observed.
class ClassA {
  public c: number;

  constructor(c: number) {
    this.c = c;
  }
}

@Observed
class ClassB {
  public a: ClassA;
  public b: number;

  constructor(a: ClassA, b: number) {
    this.a = a;
    this.b = b;
  }
}
In the preceding example, ClassB is decorated by @Observed, and the value changes of its member variables can be observed. In contrast, ClassA is not decorated by @Observed, and therefore its attribute changes cannot be observed.
@ObjectLink b: ClassB

// Value changes can be observed.
this.b.a = new ClassA(5)
this.b.b = 5

// ClassA is not decorated by @Observed, and its attribute changes cannot be observed.
this.b.a.c = 5
@ObjectLink: @ObjectLink can only accept instances of classes decorated by @Observed. The following can be observed:
-
Value changes of the attributes that Object.keys(observedObject) returns. For details, see Nested Object.
-
Replacement of array items for the data source of an array and changes of class attributes for the data source of a class. For details, see Object Array.
For an instance of the class that extends Date, the value changes of Date attributes can be observed. In addition, you can call the following APIs to update Date attributes: setFullYear, setMonth, setDate, setHours, setMinutes, setSeconds, setMilliseconds, setTime, setUTCFullYear, setUTCMonth, setUTCDate, setUTCHours, setUTCMinutes, setUTCSeconds, and setUTCMilliseconds.
@Observed
class DateClass extends Date {
  constructor(args: number | string) {
    super(args)
  }
}

@Observed
class ClassB {
  public a: DateClass;

  constructor(a: DateClass) {
    this.a = a;
  }
}

@Component
struct ViewA {
  label: string = 'date';
  @ObjectLink a: DateClass;

  build() {
    Column() {
      Button(`child increase the day by 1`)
        .onClick(() => {
          this.a.setDate(this.a.getDate() + 1);
        })
      DatePicker({
        start: new Date('1970-1-1'),
        end: new Date('2100-1-1'),
        selected: this.a
      })
    }
  }
}

@Entry
@Component
struct ViewB {
  @State b: ClassB = new ClassB(new DateClass('2023-1-1'));

  build() {
    Column() {
      ViewA({ label: 'date', a: this.b.a })

      Button(`parent update the new date`)
        .onClick(() => {
          this.b.a = new DateClass('2023-07-07');
        })
      Button(`ViewB: this.b = new ClassB(new DateClass('2023-08-20'))`)
        .onClick(() => {
          this.b = new ClassB(new DateClass('2023-08-20'));
        })
    }
  }
}
Framework Behavior
-
Initial rendering:
- @Observed causes all instances of the decorated class to be wrapped with an opaque proxy object, which takes over the setter and getter methods of the attributes of the class.
- The @ObjectLink decorated variable in the child component is initialized from the parent component and accepts the instance of the @Observed decorated class. The @ObjectLink decorated wrapped object registers itself with the @Observed decorated class.
-
Attribute update: When the attribute of the @Observed decorated class is updated, the system uses the setter and getter of the proxy, traverses the @ObjectLink decorated wrapped objects that depend on it, and notifies the data update.
Use Scenarios
Nested Object
The following is the data structure of a nested class object.
NOTE
NextID is used to generate a unique, persistent key for each array item during ForEach rendering, so as to identify the corresponding component.
// objectLinkNestedObjects.ets
let NextID: number = 1;

@Observed
class ClassA {
  public id: number;
  public c: number;

  constructor(c: number) {
    this.id = NextID++;
    this.c = c;
  }
}

@Observed
class ClassB {
  public a: ClassA;

  constructor(a: ClassA) {
    this.a = a;
  }
}

@Observed
class ClassD {
  public c: ClassC;

  constructor(c: ClassC) {
    this.c = c;
  }
}

@Observed
class ClassC extends ClassA {
  public k: number;

  constructor(k: number) {
    // Invoke the parent class method to process k.
    super(k);
    this.k = k;
  }
}
The following component hierarchy presents the data structure of a nested class object.
@Component
struct ViewC {
  label: string = 'ViewC1';
  @ObjectLink c: ClassC;

  build() {
    Row() {
      Column() {
        Text(`ViewC [${this.label}] this.a.c = ${this.c.c}`)
          .fontColor('#ffffffff')
          .backgroundColor('#ff3fc4c4')
          .height(50)
          .borderRadius(25)
        Button(`ViewC: this.c.c add 1`)
          .backgroundColor('#ff7fcf58')
          .onClick(() => {
            this.c.c += 1;
            console.log('this.c.c:' + this.c.c)
          })
      }
      .width(300)
    }
  }
}

@Entry
@Component
struct ViewB {
  @State b: ClassB = new ClassB(new ClassA(0));
  @State child: ClassD = new ClassD(new ClassC(0));

  build() {
    Column() {
      ViewC({ label: 'ViewC #3',
        c: this.child.c })
      Button(`ViewC: this.child.c.c add 10`)
        .backgroundColor('#ff7fcf58')
        .onClick(() => {
          this.child.c.c += 10
          console.log('this.child.c.c:' + this.child.c.c)
        })
    }
  }
}
The @Observed decorated ClassC class can observe changes in the attributes inherited from the base class.
Event handles in ViewB:
-
this.child.c = new ClassA(0) and this.b = new ClassB(new ClassA(0)): Change to the @State decorated variable b and its attributes.
-
this.child.c.c = ...: Change at the second layer. Though @State cannot observe changes at the second layer, the change of an attribute of @Observed decorated ClassA, which is attribute c in this example, can be observed by @ObjectLink.
Event handle in ViewC:
-
this.c.c += 1: A change to the @ObjectLink decorated variable a causes the button label to be updated. Unlike @Prop, @ObjectLink does not have a copy of its source. Instead, @ObjectLink creates a reference to its source.
-
The @ObjectLink decorated variable is read-only. Assigning this.a = new ClassA(...) is not allowed. Once value assignment occurs, the reference to the data source is reset and the synchronization is interrupted.
Object Array
An object array is a frequently used data structure. The following example shows the usage of array objects.
let NextID: number = 1;

@Observed
class ClassA {
  public id: number;
  public c: number;

  constructor(c: number) {
    this.id = NextID++;
    this.c = c;
  }
}

@Component
struct ViewA {
  // The type of @ObjectLink of the child component ViewA is ClassA.
  @ObjectLink a: ClassA;
  label: string = 'ViewA1';

  build() {
    Row() {
      Button(`ViewA [${this.label}] this.a.c = ${this.a ? this.a.c : "undefined"}`)
        .onClick(() => {
          this.a.c += 1;
        })
    }
  }
}

@Entry
@Component
struct ViewB {
  // ViewB has the @State decorated ClassA[].
  @State arrA: ClassA[] = [new ClassA(0), new ClassA(0)];

  build() {
    Column() {
      ForEach(this.arrA,
        (item: ClassA) => {
          ViewA({ label: `#${item.id}`, a: item })
        },
        (item: ClassA): string => item.id.toString()
      )
      // Initialize the @ObjectLink decorated variable using the array item in the @State decorated array, which is an instance of ClassA decorated by @Observed.
      ViewA({ label: `ViewA this.arrA[first]`, a: this.arrA[0] })
      ViewA({ label: `ViewA this.arrA[last]`, a: this.arrA[this.arrA.length-1] })

      Button(`ViewB: reset array`)
        .onClick(() => {
          this.arrA = [new ClassA(0), new ClassA(0)];
        })
      Button(`ViewB: push`)
        .onClick(() => {
          this.arrA.push(new ClassA(0))
        })
      Button(`ViewB: shift`)
        .onClick(() => {
          if (this.arrA.length > 0) {
            this.arrA.shift()
          } else {
            console.log("length <= 0")
          }
        })
      Button(`ViewB: chg item property in middle`)
        .onClick(() => {
          this.arrA[Math.floor(this.arrA.length / 2)].c = 10;
        })
      Button(`ViewB: chg item property in middle`)
        .onClick(() => {
          this.arrA[Math.floor(this.arrA.length / 2)] = new ClassA(11);
        })
    }
  }
}
-
this.arrA[Math.floor(this.arrA.length/2)] = new ClassA(..): The change of this state variable triggers two updates.
- ForEach: The value assignment of the array item causes the change of itemGenerator of ForEach. Therefore, the array item is identified as changed, and the item builder of ForEach is executed to create a ViewA component instance.
- ViewA({ label:
ViewA this.arrA[last], a: this.arrA[this.arrA.length-1] }): The preceding update changes the second element in the array. Therefore, the ViewA component instance bound to this.arrA[1] is updated.
-
this.arrA.push(new ClassA(0)): The change of this state variable triggers two updates with different effects.
- ForEach: The newly added ClassA object is unknown to the ForEach itemGenerator. The item builder of ForEach will be executed to create a ViewA component instance.
- ViewA({ label: ViewA this.arrA[last], a: this.arrA[this.arrA.length-1] }): The last item of the array is changed. As a result, the second View A component instance is changed. For ViewA({ label: ViewA this.arrA[first], a: this.arrA[0] }), a change to the array does not trigger a change to the array item, so the first View A component instance is not refreshed.
-
this.arrA[Math.floor(this.arrA.length/2)].c: @State cannot observe changes at the second layer. However, as ClassA is decorated by @Observed, the change of its attributes will be observed by @ObjectLink.
Two-Dimensional Array
@Observed class decoration is required for a two-dimensional array. You can declare an @Observed decorated class that extends from Array.
@Observed
class StringArray extends Array<String> {
}
Use new StringArray() to create an instance of StringArray. The new operator makes @Observed take effect, which can observe the attribute changes of StringArray.
Declare a class that extends from Array: class StringArray extends Array<String> {} and create an instance of StringArray. The use of the new operator is required for the @Observed class decorator to work properly.
@Observed
class StringArray extends Array<String> {
}

@Component
struct ItemPage {
  @ObjectLink itemArr: StringArray;

  build() {
    Row() {
      Text('ItemPage')
        .width(100).height(100)

      ForEach(this.itemArr,
        (item: string | Resource) => {
          Text(item)
            .width(100).height(100)
        },
        (item: string) => item
      )
    }
  }
}

@Entry
@Component
struct IndexPage {
  @State arr: Array<StringArray> = [new StringArray(), new StringArray(), new StringArray()];

  build() {
    Column() {
      ItemPage({ itemArr: this.arr[0] })
      ItemPage({ itemArr: this.arr[1] })
      ItemPage({ itemArr: this.arr[2] })
      Divider()


      ForEach(this.arr,
        (itemArr: StringArray) => {
          ItemPage({ itemArr: itemArr })
        },
        (itemArr: string) => itemArr[0]
      )

      Divider()

      Button('update')
        .onClick(() => {
          console.error('Update all items in arr');
          if ((this.arr[0] as Array<String>)[0] !== undefined) {
            // We should have a real ID to use with ForEach, but we do no.
            // Therefore, we need to make sure the pushed strings are unique.
            this.arr[0].push(`${this.arr[0].slice(-1).pop()}${this.arr[0].slice(-1).pop()}`);
            this.arr[1].push(`${this.arr[1].slice(-1).pop()}${this.arr[1].slice(-1).pop()}`);
            this.arr[2].push(`${this.arr[2].slice(-1).pop()}${this.arr[2].slice(-1).pop()}`);
          } else {
            this.arr[0].push('Hello');
            this.arr[1].push('World');
            this.arr[2].push('!');
          }
        })
    }
  }
}
FAQs
Assigning Value to @ObjectLink Decorated Variable in Child Component
It is not allowed to assign a value to an @ObjectLink decorated variable in the child component.
[Nonexample]
@Observed
class ClassA {
  public c: number = 0;

  constructor(c: number) {
    this.c = c;
  }
}

@Component
struct ObjectLinkChild {
  @ObjectLink testNum: ClassA;

  build() {
    Text(`ObjectLinkChild testNum ${this.testNum.c}`)
      .onClick(() => {
        // The @ObjectLink decorated variable cannot be assigned a value here.
        this.testNum = new ClassA(47);
      })
  }
}

@Entry
@Component
struct Parent {
  @State testNum: ClassA[] = [new ClassA(1)];

  build() {
    Column() {
      Text(`Parent testNum ${this.testNum[0].c}`)
        .onClick(() => {
          this.testNum[0].c += 1;
        })

      ObjectLinkChild({ testNum: this.testNum[0] })
    }
  }
}
In this example, an attempt is made to assign a value to the @ObjectLink decorated variable by clicking ObjectLinkChild.
this.testNum = new ClassA(47);
This is not allowed. For @ObjectLink that implements two-way data synchronization, assigning a value is equivalent to updating the array item or class attribute in the parent component, which is not supported in TypeScript/JavaScript and will result in a runtime error.
[Example]
@Observed
class ClassA {
  public c: number = 0;

  constructor(c: number) {
    this.c = c;
  }
}

@Component
struct ObjectLinkChild {
  @ObjectLink testNum: ClassA;

  build() {
    Text(`ObjectLinkChild testNum ${this.testNum.c}`)
      .onClick(() => {
        // You can assign values to the attributes of the ObjectLink decorated object.
        this.testNum.c = 47;
      })
  }
}

@Entry
@Component
struct Parent {
  @State testNum: ClassA[] = [new ClassA(1)];

  build() {
    Column() {
      Text(`Parent testNum ${this.testNum[0].c}`)
        .onClick(() => {
          this.testNum[0].c += 1;
        })

      ObjectLinkChild({ testNum: this.testNum[0] })
    }
  }
}
UI Not Updated on Attribute Changes in Simple Nested Objects
If you find your application UI not updating after an attribute in a nested object is changed, you may want to check the decorators in use.
Each decorator has its scope of observable changes, and only those observed changes can cause the UI to update. The @Observed decorator can observe the attribute changes of nested objects, while other decorators can observe only the changes at the second layer.
[Nonexample]
In the following example, some UI components are not updated.
class ClassA {
  a: number;

  constructor(a: number) {
    this.a = a;
  }

  getA(): number {
    return this.a;
  }

  setA(a: number): void {
    this.a = a;
  }
}

class ClassC {
  c: number;

  constructor(c: number) {
    this.c = c;
  }

  getC(): number {
    return this.c;
  }

  setC(c: number): void {
    this.c = c;
  }
}

class ClassB extends ClassA {
  b: number = 47;
  c: ClassC;

  constructor(a: number, b: number, c: number) {
    super(a);
    this.b = b;
    this.c = new ClassC(c);
  }

  getB(): number {
    return this.b;
  }

  setB(b: number): void {
    this.b = b;
  }

  getC(): number {
    return this.c.getC();
  }

  setC(c: number): void {
    return this.c.setC(c);
  }
}


@Entry
@Component
struct MyView {
  @State b: ClassB = new ClassB(10, 20, 30);

  build() {
    Column({ space: 10 }) {
      Text(`a: ${this.b.a}`)
      Button("Change ClassA.a")
        .onClick(() => {
          this.b.a += 1;
        })

      Text(`b: ${this.b.b}`)
      Button("Change ClassB.b")
        .onClick(() => {
          this.b.b += 1;
        })

      Text(`c: ${this.b.c.c}`)
      Button("Change ClassB.ClassC.c")
        .onClick(() => {
          // The <Text> component is not updated when clicked.
          this.b.c.c += 1;
        })
    }
  }
}
-
The UI is not updated when the last <Text> component Text('c: ${this.b.c.c}') is clicked. This is because, @State b: ClassB can observe only the changes of the this.b attribute, such as this.b.a, this.b.b, and this.b.c, but cannot observe the attributes nested in the attribute, that is, this.b.c.c (attribute c is an attribute of the ClassC object nested in b).
-
To observe the attributes of nested object ClassC, you need to make the following changes:
- Construct a child component for separate rendering of the ClassC instance. Then, in this child component, you can use @ObjectLink or @Prop to decorate c : ClassC. In general cases, use @ObjectLink, unless local changes to the ClassC object are required.
- The nested ClassC object must be decorated by @Observed. When a ClassC object is created in ClassB (ClassB(10, 20, 30) in this example), it is wrapped in the ES6 proxy. When the ClassC attribute changes (this.b.c.c += 1), the @ObjectLink decorated variable is notified of the change.
[Example]
The following example uses @Observed/@ObjectLink to observe property changes for nested objects.
class ClassA {
  a: number;

  constructor(a: number) {
    this.a = a;
  }

  getA(): number {
    return this.a;
  }

  setA(a: number): void {
    this.a = a;
  }
}

@Observed
class ClassC {
  c: number;

  constructor(c: number) {
    this.c = c;
  }

  getC(): number {
    return this.c;
  }

  setC(c: number): void {
    this.c = c;
  }
}

class ClassB extends ClassA {
  b: number = 47;
  c: ClassC;

  constructor(a: number, b: number, c: number) {
    super(a);
    this.b = b;
    this.c = new ClassC(c);
  }

  getB(): number {
    return this.b;
  }

  setB(b: number): void {
    this.b = b;
  }

  getC(): number {
    return this.c.getC();
  }

  setC(c: number): void {
    return this.c.setC(c);
  }
}

@Component
struct ViewClassC {
  @ObjectLink c: ClassC;

  build() {
    Column({ space: 10 }) {
      Text(`c: ${this.c.getC()}`)
      Button("Change C")
        .onClick(() => {
          this.c.setC(this.c.getC() + 1);
        })
    }
  }
}

@Entry
@Component
struct MyView {
  @State b: ClassB = new ClassB(10, 20, 30);

  build() {
    Column({ space: 10 }) {
      Text(`a: ${this.b.a}`)
      Button("Change ClassA.a")
        .onClick(() => {
          this.b.a += 1;
        })

      Text(`b: ${this.b.b}`)
      Button("Change ClassB.b")
        .onClick(() => {
          this.b.b += 1;
        })

      ViewClassC({ c: this.b.c }) // Equivalent to Text(`c: ${this.b.c.c}`)
      Button("Change ClassB.ClassC.c")
        .onClick(() => {
          this.b.c.c += 1;
        })
    }
  }
}
UI Not Updated on Attribute Changes in Complex Nested Objects
[Nonexample]
The following example creates a child component with an @ObjectLink decorated variable to render ParentCounter with nested attributes. Specifically, SubCounter nested in ParentCounter is decorated with @Observed.
let nextId = 1;
@Observed
class SubCounter {
  counter: number;
  constructor(c: number) {
    this.counter = c;
  }
}
@Observed
class ParentCounter {
  id: number;
  counter: number;
  subCounter: SubCounter;
  incrCounter() {
    this.counter++;
  }
  incrSubCounter(c: number) {
    this.subCounter.counter += c;
  }
  setSubCounter(c: number): void {
    this.subCounter.counter = c;
  }
  constructor(c: number) {
    this.id = nextId++;
    this.counter = c;
    this.subCounter = new SubCounter(c);
  }
}
@Component
struct CounterComp {
  @ObjectLink value: ParentCounter;
  build() {
    Column({ space: 10 }) {
      Text(`${this.value.counter}`)
        .fontSize(25)
        .onClick(() => {
          this.value.incrCounter();
        })
      Text(`${this.value.subCounter.counter}`)
        .onClick(() => {
          this.value.incrSubCounter(1);
        })
      Divider().height(2)
    }
  }
}
@Entry
@Component
struct ParentComp {
  @State counter: ParentCounter[] = [new ParentCounter(1), new ParentCounter(2), new ParentCounter(3)];
  build() {
    Row() {
      Column() {
        CounterComp({ value: this.counter[0] })
        CounterComp({ value: this.counter[1] })
        CounterComp({ value: this.counter[2] })
        Divider().height(5)
        ForEach(this.counter,
          (item: ParentCounter) => {
            CounterComp({ value: item })
          },
          (item: ParentCounter) => item.id.toString()
        )
        Divider().height(5)
        // First click event
        Text('Parent: incr counter[0].counter')
          .fontSize(20).height(50)
          .onClick(() => {
            this.counter[0].incrCounter();
            // The value increases by 10 each time the event is triggered.
            this.counter[0].incrSubCounter(10);
          })
        // Second click event
        Text('Parent: set.counter to 10')
          .fontSize(20).height(50)
          .onClick(() => {
            // The value cannot be set to 10, and the UI is not updated.
            this.counter[0].setSubCounter(10);
          })
        Text('Parent: reset entire counter')
          .fontSize(20).height(50)
          .onClick(() => {
            this.counter = [new ParentCounter(1), new ParentCounter(2), new ParentCounter(3)];
          })
      }
    }
  }
}
For the onClick event of Text('Parent: incr counter[0].counter'), this.counter[0].incrSubCounter(10) calls the incrSubCounter method to increase the counter value of SubCounter by 10. The UI is updated to reflect the change.
However, when this.counter[0].setSubCounter(10) is called in onClick of Text('Parent: set.counter to 10'), the counter value of SubCounter cannot be reset to 10.
incrSubCounter and setSubCounter are functions of the same SubCounter. The UI can be correctly updated when incrSubCounter is called for the first click event. However, the UI is not updated when setSubCounter is called for the second click event. Actually neither incrSubCounter nor setSubCounter can trigger an update of Text('${this.value.subCounter.counter}'). This is because @ObjectLink value: ParentCounter can only observe the attributes of ParentCounter. this.value.subCounter.counter is an attribute of SubCounter and therefore cannot be observed.
However, when this.counter[0].incrCounter() is called for the first click event, it marks @ObjectLink value: ParentCounter in the CounterComp component as changed. In this case, an update of Text('${this.value.subCounter.counter}') is triggered. If this.counter[0].incrCounter() is deleted from the first click event, the UI cannot be updated.
[Example]
To solve the preceding problem, you can use the following method to directly observe the attributes in SubCounter so that the this.counter[0].setSubCounter(10) API works:
@ObjectLink value: ParentCounter = new ParentCounter(0);
@ObjectLink subValue: SubCounter = new SubCounter(0);
This approach enables @ObjectLink to serve as a proxy for the attributes of the ParentCounter and SubCounter classes. In this way, the attribute changes of the two classes can be observed and trigger UI update. Even if this.counter[0].incrCounter() is deleted, the UI can be updated correctly.
This approach can be used to implement "two-layer" observation, that is, observation of external objects and internal nested objects. However, it is only applicable to the @ObjectLink decorator, but not to @Prop (@Prop passes objects through deep copy). For details, see the differences between @Prop and @ObjectLink.
let nextId = 1;

@Observed
class SubCounter {
  counter: number;

  constructor(c: number) {
    this.counter = c;
  }
}

@Observed
class ParentCounter {
  id: number;
  counter: number;
  subCounter: SubCounter;

  incrCounter() {
    this.counter++;
  }

  incrSubCounter(c: number) {
    this.subCounter.counter += c;
  }

  setSubCounter(c: number): void {
    this.subCounter.counter = c;
  }

  constructor(c: number) {
    this.id = nextId++;
    this.counter = c;
    this.subCounter = new SubCounter(c);
  }
}

@Component
struct CounterComp {
  @ObjectLink value: ParentCounter;

  build() {
    Column({ space: 10 }) {
      Text(`${this.value.counter}`)
        .fontSize(25)
        .onClick(() => {
          this.value.incrCounter();
        })
      CounterChild({ subValue: this.value.subCounter })
      Divider().height(2)
    }
  }
}

@Component
struct CounterChild {
  @ObjectLink subValue: SubCounter;

  build() {
    Text(`${this.subValue.counter}`)
      .onClick(() => {
        this.subValue.counter += 1;
      })
  }
}

@Entry
@Component
struct ParentComp {
  @State counter: ParentCounter[] = [new ParentCounter(1), new ParentCounter(2), new ParentCounter(3)];

  build() {
    Row() {
      Column() {
        CounterComp({ value: this.counter[0] })
        CounterComp({ value: this.counter[1] })
        CounterComp({ value: this.counter[2] })
        Divider().height(5)
        ForEach(this.counter,
          (item: ParentCounter) => {
            CounterComp({ value: item })
          },
          (item: ParentCounter) => item.id.toString()
        )
        Divider().height(5)
        Text('Parent: reset entire counter')
          .fontSize(20).height(50)
          .onClick(() => {
            this.counter = [new ParentCounter(1), new ParentCounter(2), new ParentCounter(3)];
          })
        Text('Parent: incr counter[0].counter')
          .fontSize(20).height(50)
          .onClick(() => {
            this.counter[0].incrCounter();
            this.counter[0].incrSubCounter(10);
          })
        Text('Parent: set.counter to 10')
          .fontSize(20).height(50)
          .onClick(() => {
            this.counter[0].setSubCounter(10);
          })
      }
    }
  }
}
Differences Between @Prop and @ObjectLink
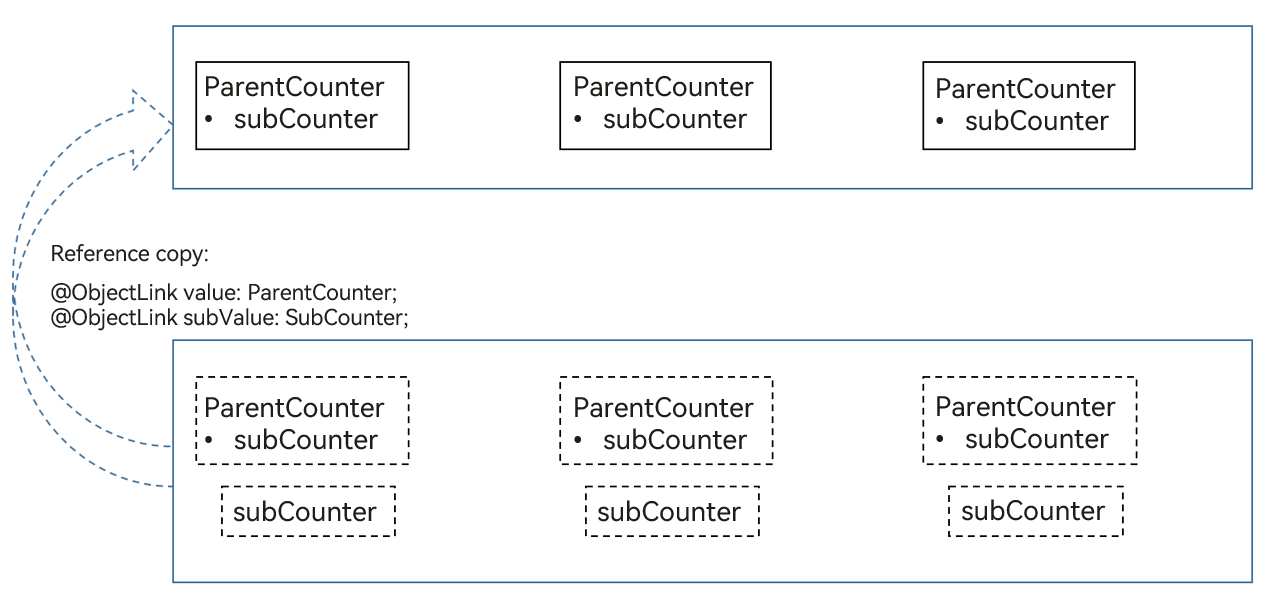
In the following example, the @ObjectLink decorated variable is a reference to the data source. That is, this.value.subValue and this.subValue are different references to the same object. Therefore, when the click handler of CounterComp is clicked, both this.value.subCounter.counter and this.subValue.counter change, and the corresponding component Text (this.subValue.counter: ${this.subValue.counter}) is re-rendered.
let nextId = 1;

@Observed
class SubCounter {
  counter: number;

  constructor(c: number) {
    this.counter = c;
  }
}

@Observed
class ParentCounter {
  id: number;
  counter: number;
  subCounter: SubCounter;

  incrCounter() {
    this.counter++;
  }

  incrSubCounter(c: number) {
    this.subCounter.counter += c;
  }

  setSubCounter(c: number): void {
    this.subCounter.counter = c;
  }

  constructor(c: number) {
    this.id = nextId++;
    this.counter = c;
    this.subCounter = new SubCounter(c);
  }
}

@Component
struct CounterComp {
  @ObjectLink value: ParentCounter;

  build() {
    Column({ space: 10 }) {
      CountChild({ subValue: this.value.subCounter })
      Text(`this.value.counter: increase 7 `)
        .fontSize(30)
        .onClick(() => {
          // click handler, Text(`this.subValue.counter: ${this.subValue.counter}`) will update
          this.value.incrSubCounter(7);
        })
      Divider().height(2)
    }
  }
}

@Component
struct CountChild {
  @ObjectLink subValue: SubCounter;

  build() {
    Text(`this.subValue.counter: ${this.subValue.counter}`)
      .fontSize(30)
  }
}

@Entry
@Component
struct ParentComp {
  @State counter: ParentCounter[] = [new ParentCounter(1), new ParentCounter(2), new ParentCounter(3)];

  build() {
    Row() {
      Column() {
        CounterComp({ value: this.counter[0] })
        CounterComp({ value: this.counter[1] })
        CounterComp({ value: this.counter[2] })
        Divider().height(5)
        ForEach(this.counter,
          (item: ParentCounter) => {
            CounterComp({ value: item })
          },
          (item: ParentCounter) => item.id.toString()
        )
        Divider().height(5)
        Text('Parent: reset entire counter')
          .fontSize(20).height(50)
          .onClick(() => {
            this.counter = [new ParentCounter(1), new ParentCounter(2), new ParentCounter(3)];
          })
        Text('Parent: incr counter[0].counter')
          .fontSize(20).height(50)
          .onClick(() => {
            this.counter[0].incrCounter();
            this.counter[0].incrSubCounter(10);
          })
        Text('Parent: set.counter to 10')
          .fontSize(20).height(50)
          .onClick(() => {
            this.counter[0].setSubCounter(10);
          })
      }
    }
  }
}
The following figure shows how @ObjectLink works.
[Nonexample]
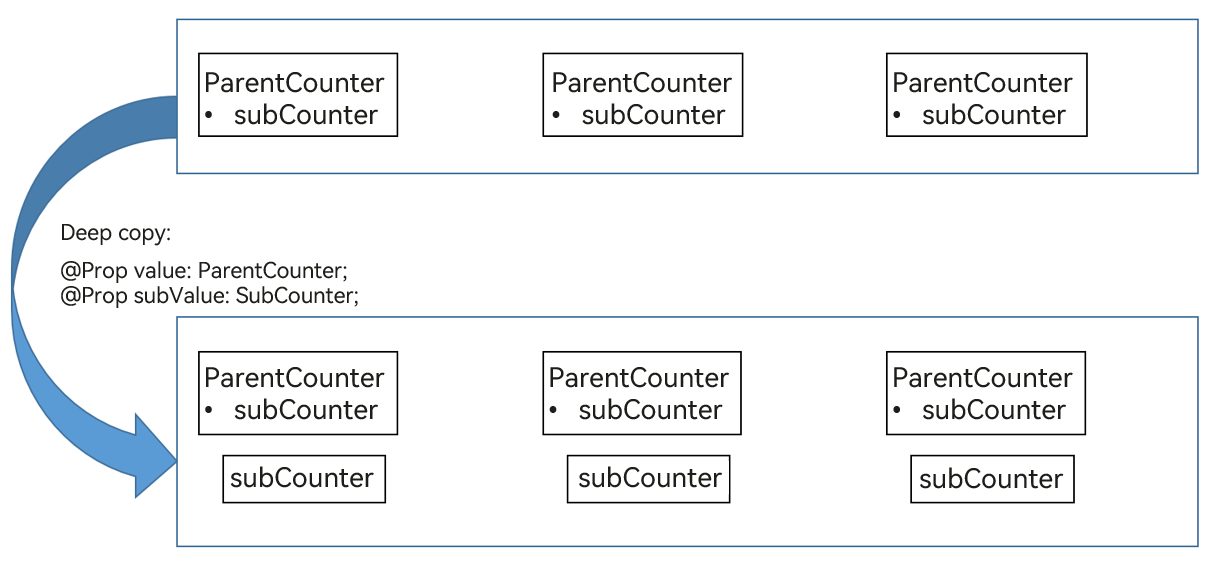
If @Prop is used instead of @ObjectLink, then: When the first click handler is clicked, the UI is updated properly; However, when the second onClick event occurs, the first Text component of CounterComp is not re-rendered, because @Prop makes a local copy of the variable.
this.value.subCounter and this.subValue are not the same object. Therefore, the change of this.value.subCounter does not change the copy object of this.subValue, and Text(this.subValue.counter: ${this.subValue.counter}) is not re-rendered.
@Component
struct CounterComp {
  @Prop value: ParentCounter = new ParentCounter(0);
  @Prop subValue: SubCounter = new SubCounter(0);
  build() {
    Column({ space: 10 }) {
      Text(`this.subValue.counter: ${this.subValue.counter}`)
        .fontSize(20)
        .onClick(() => {
          // 1st click handler
          this.subValue.counter += 7;
        })
      Text(`this.value.counter: increase 7 `)
        .fontSize(20)
        .onClick(() => {
          // 2nd click handler
          this.value.incrSubCounter(7);
        })
      Divider().height(2)
    }
  }
}
The following figure shows how @Prop works.
[Example]
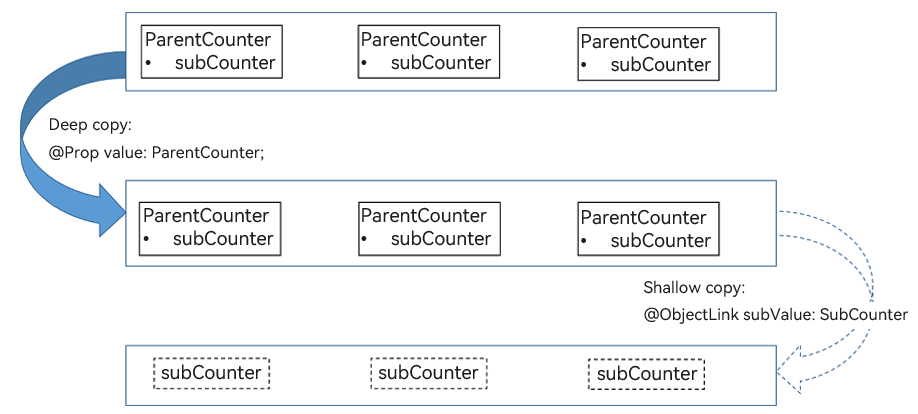
Make only one copy of @Prop value: ParentCounter from ParentComp to CounterComp. Do not make another copy of SubCounter.
-
Use only one @Prop counter: Counter in the CounterComp component.
-
Add another child component SubCounterComp that contains @ObjectLink subCounter: SubCounter. This @ObjectLink ensures that changes to the SubCounter object attributes are observed and the UI is updated properly.
-
@ObjectLink subCounter: SubCounter shares the same SubCounter object with this.counter.subCounter of CounterComp.
let nextId = 1;

@Observed
class SubCounter {
  counter: number;
  constructor(c: number) {
    this.counter = c;
  }
}

@Observed
class ParentCounter {
  id: number;
  counter: number;
  subCounter: SubCounter;
  incrCounter() {
    this.counter++;
  }
  incrSubCounter(c: number) {
    this.subCounter.counter += c;
  }
  setSubCounter(c: number): void {
    this.subCounter.counter = c;
  }
  constructor(c: number) {
    this.id = nextId++;
    this.counter = c;
    this.subCounter = new SubCounter(c);
  }
}

@Component
struct SubCounterComp {
  @ObjectLink subValue: SubCounter;
  build() {
    Text(`SubCounterComp: this.subValue.counter: ${this.subValue.counter}`)
      .onClick(() => {
        // 2nd click handler
        this.subValue.counter = 7;
      })
  }
}
@Component
struct CounterComp {
  @Prop value: ParentCounter;
  build() {
    Column({ space: 10 }) {
      Text(`this.value.incrCounter(): this.value.counter: ${this.value.counter}`)
        .fontSize(20)
        .onClick(() => {
          // 1st click handler
          this.value.incrCounter();
        })
      SubCounterComp({ subValue: this.value.subCounter })
      Text(`this.value.incrSubCounter()`)
        .onClick(() => {
          // 3rd click handler
          this.value.incrSubCounter(77);
        })
      Divider().height(2)
    }
  }
}
@Entry
@Component
struct ParentComp {
  @State counter: ParentCounter[] = [new ParentCounter(1), new ParentCounter(2), new ParentCounter(3)];
  build() {
    Row() {
      Column() {
        CounterComp({ value: this.counter[0] })
        CounterComp({ value: this.counter[1] })
        CounterComp({ value: this.counter[2] })
        Divider().height(5)
        ForEach(this.counter,
          (item: ParentCounter) => {
            CounterComp({ value: item })
          },
          (item: ParentCounter) => item.id.toString()
        )
        Divider().height(5)
        Text('Parent: reset entire counter')
          .fontSize(20).height(50)
          .onClick(() => {
            this.counter = [new ParentCounter(1), new ParentCounter(2), new ParentCounter(3)];
          })
        Text('Parent: incr counter[0].counter')
          .fontSize(20).height(50)
          .onClick(() => {
            this.counter[0].incrCounter();
            this.counter[0].incrSubCounter(10);
          })
        Text('Parent: set.counter to 10')
          .fontSize(20).height(50)
          .onClick(() => {
            this.counter[0].setSubCounter(10);
          })
      }
    }
  }
}
The following figure shows the copy relationship.
Member Variable Changes in the @Observed Decorated Class Constructor Not Taking Effect
In state management, @Observed decorated classes are wrapped with a proxy. When a member variable of a class is changed in a component, the proxy intercepts the change. When the value in the data source is changed, the proxy notifies the bound component of the change. In this way, the change can be observed and trigger UI re-rendering. If the value change of a member variable occurs in the class constructor, the change does not pass through the proxy (because the change occurs in the data source). Therefore, even if the change is successful with a timer in the class constructor, the UI cannot be re-rendered.
[Nonexample]
@Observed
class RenderClass {
  waitToRender: boolean = false;

  constructor() {
    setTimeout(() => {
      this.waitToRender = true;
      console.log("change waitToRender to " + this.waitToRender);
    }, 1000)
  }
}

@Entry
@Component
struct Index {
  @State @Watch('renderClassChange') renderClass: RenderClass = new RenderClass();
  @State textColor: Color = Color.Black;

  renderClassChange() {
    console.log("Render Class Change waitToRender is " + this.renderClass.waitToRender);
  }

  build() {
    Row() {
      Column() {
        Text("Render Class waitToRender is " + this.renderClass.waitToRender)
          .fontSize(20)
          .fontColor(this.textColor)
        Button("Show")
          .onClick(() => {
            // It is not recommended to use other state variables to forcibly re-render the UI. This example is used to check whether the value of waitToRender is updated.
            this.textColor = Color.Red;
          })
      }
      .width('100%')
    }
    .height('100%')
  }
}
In the preceding example, a timer is used in the constructor of RenderClass. Though the value of waitToRender changes 1 second later, the UI is not re-rendered. After the button is clicked to forcibly refresh the <Text> component, you can see that the value of waitToRender is changed to true.
[Example]
@Observed
class RenderClass {
  waitToRender: boolean = false;

  constructor() {
  }
}

@Entry
@Component
struct Index {
  @State @Watch('renderClassChange') renderClass: RenderClass = new RenderClass();

  renderClassChange() {
    console.log("Render Class Change waitToRender is " + this.renderClass.waitToRender);
  }

  onPageShow() {
    setTimeout(() => {
      this.renderClass.waitToRender = true;
      console.log("change waitToRender to " + this.renderClass.waitToRender);
    }, 1000)
  }

  build() {
    Row() {
      Column() {
        Text("Render Class Wait To Render is " + this.renderClass.waitToRender)
          .fontSize(20)
      }
      .width('100%')
    }
    .height('100%')
  }
}
In the preceding example, the timer is moved to the component. In this case, the page content changes from "Render Class Change waitToRender is false" to "Render Class Change waitToRender is true" when the timer is triggered.
In sum, it is recommended that you change the class members decorated by @Observed in components to implement UI re-rendering.
Using the static Method for Initialization in an @Observed Decorated Class
In an @Observed decorated class, avoid using the static method for initialization, because it will cause the @Observed implementation to be bypassed, as a result of which, the class object cannot be wrapped in a proxy and the UI is not re-rendered.
@Entry
@Component
struct MainPage {
  @State viewModel: ViewModel = ViewModel.build();

  build() {
    Column() {
      Button("Click")
        .onClick((event) => {
          this.viewModel.subViewModel.isShow = !this.viewModel.subViewModel.isShow;
        })
      SubComponent({ viewModel: this.viewModel.subViewModel })
    }
    .padding({ top: 60 })
    .width('100%')
    .alignItems(HorizontalAlign.Center)
  }
}

@Component
struct SubComponent {
  @ObjectLink viewModel: SubViewModel;

  build() {
    Column() {
      if (this.viewModel.isShow) {
        Text("click to take effect");
      }
    }
  }
}

class ViewModel {
  subViewModel: SubViewModel = SubViewModel.build(); // Create a static method.

  static build() {
    console.log("ViewModel build()")
    return new ViewModel();
  }
}

@Observed
class SubViewModel {
  isShow?: boolean = false;

  static build() {
    // Only the static method in SubViewModel can be used to create objects, which affects linkage.
    console.log("SubViewModel build()")
    let viewModel = new SubViewModel();
    return viewModel;
  }
}
In the preceding example, the static method is used for initialization in the custom component ViewModel. In this case, when you click Click, click to take effect is not displayed on the page.
In conclusion, avoid using the static method for initialization in an @Observed decorated class.