Reference
deps and external_deps
When adding a module, you must declare its dependencies in BUILD.gn. deps specifies dependent modules in the same component, and external_deps specifies dependent modules between components.
Dependency Types
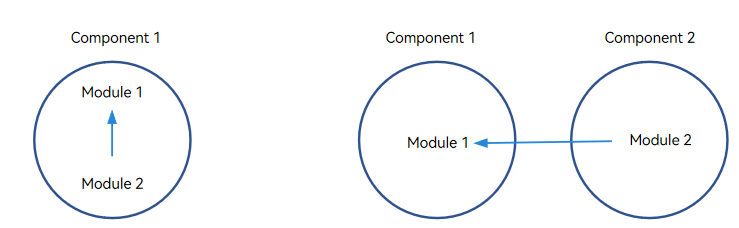
The dependency between modules can be classified into deps (left in the figure above) and external_deps (right in the figure above).
-
deps: The dependent module to be added belongs to the same part with the current module. For example, module 2 depends on module 1, and both modules 1 and 2 belong to the same component.
-
external_deps: The dependent module to be added belongs to another component. For example, module 2 depends on module 1, and modules 1 and 2 belong to different components.
-
Example of deps:
import("//build/ohos.gni")
ohos_shared_library("module1") {
  ...
  part_name = "part1"   # (Mandatory) Name of the component to which the module belongs.
  ...
}
import("//build/ohos.gni") ohos_shared_library("module2") { ... deps = [ "GN target of module 1", ... ] # Intra-component dependency part_name = "part1" # (Mandatory) Name of the component to which the module belongs. } -
Example of external_deps:
import("//build/ohos.gni")
ohos_shared_library("module1") {
  ...
  part_name = "part1"   # (Mandatory) Name of the component to which the module belongs.
  ...
}
import("//build/ohos.gni") ohos_shared_library("module2") { ... external_deps = [ "part1:module1", ... ] # Inter-component dependency. The dependent module must be declared in inner_kits by the dependent component. part_name = "part2" # (Mandatory) Name of the component to which the module belongs. }
NOTE
The dependency between components must be written in the format of Component name:Module name in external_deps. The dependent module must be declared in inner_kits.
Using Sanitizer
When adding a module, you can enable the Sanitizer, such as the integer overflow check and control-flow integrity (CFI), provided by the compiler as required. You can also enable the debug or release mode and configure a blocklist. Each configuration item is optional and false by default. You can also leave it empty.
Sanitizer configuration example:
  ohos_shared_library("example") {
    sanitize = {
      cfi = true                            # Enable the CFI check.
      cfi_cross_dso = true                  # Enable the cross-DSO CFI check.
      integer_overflow = true               # Enable the integer overflow check.
      boundary_sanitize = true              # Enable the bounds check.
      ubsan = true                          # Enable some UBSAN options.
      all_ubsan = true                      # Enable all UBSAN options.
      debug = true                          # Enable the debug mode, which is disabled by default.
      blocklist = "./blocklist.txt"         # Path of the blocklist.
    }
    ...
  }
Supported Sanitizer Types
Currently, Sanitizers provides the following functions:
- integer_overflow: provides check of unsigned integer overflow (unsigned_integer_overflow), check of signed integer overflow (signed_integer_overflow), or both (integer_overflow).
- CFI: provides CFI and cross-DSO CFI checks.
- boundary_sanitize: provides the bounds check.
- ubsan: checks some Undefined Behavior Sanitizer (UBSAN) options, including bool, integer-divide-by-zero, return, returns-nonnull-attribute, shift-exponent, unreachable, and vla-bound.
- all_ubsan: checks all UBSAN options.
Release and Debug Modes
Debug specifies whether the debug mode or the release mode is used. The default value false indicates that the release mode is used. The value true explicitly declares the debug mode. The debug option takes effect only for the Sanitizer and does not determine whether a module is debuggable. In the build configuration for a module in release version, you are advised to set debug to false (enable the release mode) or leave it unspecified.
-
Debug mode: If debug mode is enabled, abundant error-related information is provided to help locate faults. When an error occurs, the application will be resumed instead of being interrupted to further identify subsequent errors.
-
Release mode: If release mode is enabled, the application will be directly interrupted when an error occurs. This can protect the system against errors or maliciously attacks.
Blocklist
The blocklist specifies the functions or source programs that are not affected by Sanitizer in the module. It prevents benign behavior from being identified as errors or prevents hotspot functions from generating unreasonable and unacceptable overheads. Exercise caution when using this function.
Blocklist example:
[cfi]
fun:*([Tt]est|TEST)*
fun: main

[integer]
src:example/*.cpp
Information Collected by the Open Source Software Notice
An open source software notice is a file related to the project open source. It collects license information to comply with open source specifications.
Information to Collect
The notice collects only the licenses of the modules packaged in the image. For example, the licenses of the tools (such as Clang, Python, and Ninja) used during the build process are not collected.
A static library itself is not packaged. However, if it is packaged into the system as part of a dynamic library or an executable file, the license of the static library will be collected for completeness.
The final Notice.txt file must include all licenses used by the files in the image and the mapping between modules and licenses.
The Notice.txt file is located in the /system/etc/ directory.
Rules for Collecting Information
Licenses are collected by priority, which ranges from 1 to 4 in descending order of seniority.
-
Licenses that are directly declared in a module's BUILD.gn are given the top priority. The following is an example:
ohos_shared_library("example") { ... license_file = "path-to-license-file" ... } -
If there is no explicitly declared license, the build script searches for the Readme.OpenSource file in the directory of BUILD.gn, parses the file, and collects the obtained licenses. If the Readme.OpenSource file does not contain license information, an error will be reported.
-
If the Readme.OpenSource file does not exist, the build script searches for the License, Copyright, and Notice files from the current directory to the root directory of the source code by default. The obtained license information will be used as the licenses of the module.
-
If no license is found, the default license (Apache License 2.0) will be used.
Pay attention to the following:
- For third-party open-source software, such as OpenSSL and ICU, Readme.OpenSource must be configured in the source code directory. Check whether Readme.OpenSource is in the same directory as BUILD.gn and whether the licenses configured in Readme.OpenSource are valid.
- If the source code is not licensed under Apache License 2.0, the corresponding license file must be provided in the source code directory or declared in license_file for the module.
- If the source code file added to BUILD.gn is not from the current directory, check whether the license in the repository where the source code file is located is the same as that in the repository of BUILD.gn.
Parameters for Accelerating Local Build
The following parameters can be added to the build command to speed up the build process:
- --ccache
- Ccache caches the output of C/C++ compilation. If the compilation input remains unchanged the next time, the compilation can be skipped and the output can be taken from the cache.
- Installing ccache:
- Quick installation: Run the sudo apt-get install ccache command.
- Download the binary file from the official website and configure the ccache path to the environment variable.
- Usage: Run the ./build.sh --product-name Product_name --ccache command.
- --fast-rebuild
- The compilation process includes preloader -> loader -> GN -> Ninja. If the GN and product configuration files are not modified locally, adding --fast-rebuild will start from Ninja directly.
- Usage: Run the ./build.sh --product-name Product_name --fast-rebuild command.
- enable_notice_collection=false
- Adding this parameter can skip the process of collecting the module licenses of the open-source software.
- Usage: Run the ./build.sh --product-name Product_name --gn-args --enable_notice_collection=false --ccache command.
- --build-target
- This parameter specifies the module to compile. You can obtain the module name as follows:
- Pay attention to keywords such as group, ohos_shared_library, and ohos_executable in BUILD.gn.
- Run ./build.sh --product-name Product_name --build-target Module_name --build-only-gn to generate build.ninja and locate the related module name in the file.
- Usage: Run the ./build.sh --product-name Product_name --build-target ark_js_host_linux_tools_packages command.
- This parameter specifies the module to compile. You can obtain the module name as follows:
Viewing Ninja Build Information
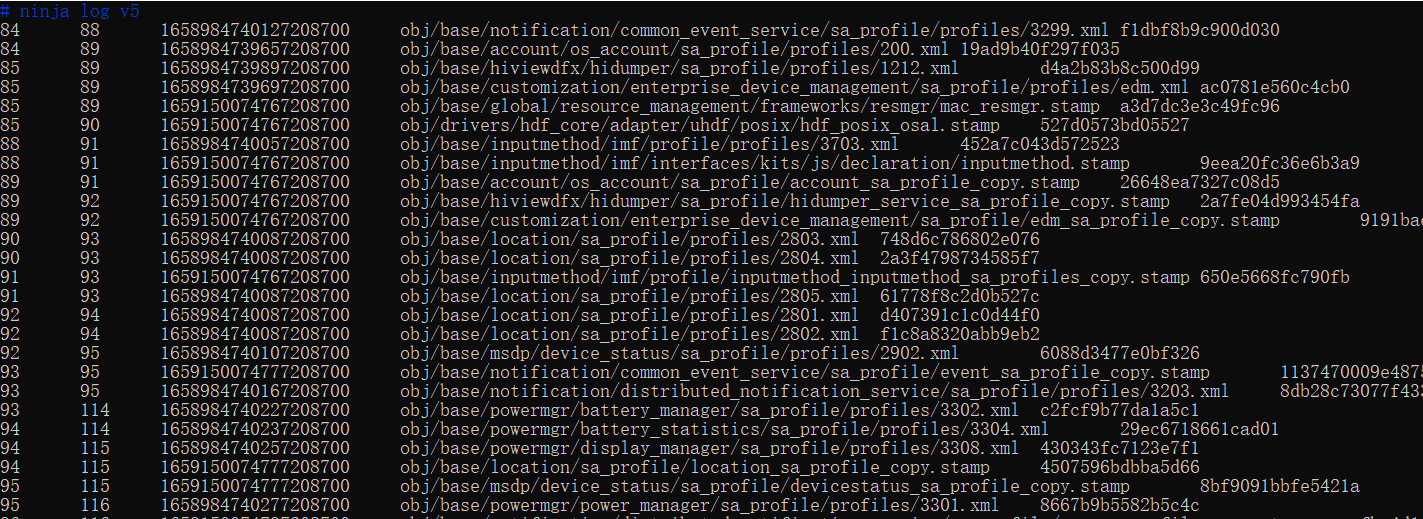
The out/rk3568/.ninja_log file records the build start time and end time (ms) of each module. A shorter interval indicates a faster build and higher compilation performance.
The four columns are start time, end time, modified timestamp (mtime), and command hash from left to right.
You can graphically display the build time as follows:
- Open build.trace locally. Decompress out/rk3568/build.trace.gz and drag build.trace to chrome://tracing/.
- Open build.trace at ci.openharmony.cn/events.
You can open the build.trace.html file in each compilation output as follows:
-
Click Success under Static Check.
-
Click Output in the Output column. The build.trace.html file is displayed in the build_trace column on the left. Click the file to open it.
-
Customizing the chip_prod Image
When to Use
The different capabilities for the products in the same chip solution are placed in the chip_prod partition. You need to generate the chip_prod.img specific to the product.
Procedure
-
Configure the config.json file.
In the config.json file, add chipprod_config_path, which specifies the path of the product definition file. The file is named chip_product_list.gni, and in the chip_product_list = ["productA", "productB", ...] format.
Example:
To customize chip_prod.img for MyProduct, modify the //vendor/Product vendor/MyProduct/config.json as follows:
{ "product_name": "MyProduct", # Product name. "version": "3.0", # config.json version, which is 3.0. "chipprod_config_path": "", # (Optional) Path of the chipprod configuration file. "subsystems": [ { "subsystem": "arkui", # Subsystem of the product. "components": [ { "component": "ace_engine", "features":[ "ace_engine_feature_enable_web = true", "ace_engine_feature_enable_accessibility = true" ] } ] }, { ... } ... More subsystems and components. } } -
Configure the module.
If the configuration file has different product configurations, for example, to generate chip_prod.img for product A, you need to configure install_images and module_install_dir for module compilation.
The following uses ohos_prebuilt_executable as an example:
ohos_prebuilt_executable("moduleXXX"){ install_images = [ "chip_prod" ] module_install_dir = "productA/etc/***" # The path must start with productA. } -
Run the build command.
./build.sh --product-name {product_name} --build-target chip_prod_image
-
Generate the images. If products A and B are defined (chip_product_list = ["productA", "productB"]) and a module is installed in the products, the following images are generated:
images/productA/chip_prod.img
images/productB/chip_prod.img