Bundle Manager
The Bundle Manager enables you to install, uninstall, update, and query a bundle (application). It provides the bundle debugging capabilities, for example, installing and uninstalling a bundle and querying bundle information.
NOTE
Before using this tool, you must obtain the hdc tool and run the hdc shell command.
Table 1 bm commands
| Name | Description |
|---|---|
| help | Displays the commands supported by the Bundle Manager tool. |
| install | Installs a bundle. |
| uninstall | Uninstalls a bundle. |
| dump | Displays bundle information. |
| clean | Clears the cache and data of a bundle. |
| enable | Enables a bundle. A bundle can be used after being enabled. |
| disable | Disables a bundle. A bundle cannot be used after being disabled. |
| get | Obtains the UDID of a device. |
| quickfix | Performs patch-related operations, such as installing or querying a patch. |
Help Command
Table 2 Help command
| Name | Description |
|---|---|
| bm help | Displays the commands supported by the bm tool. |
Example
# Display the help information.
bm help
Installation Command
bm install [-h] [-p path] [-u userId] [-r] [-w waitting-time]
Table 3 Installation command parameters
| Name | Mandatory | Description |
|---|---|---|
| -h | No | Used to display the parameters supported by the install command. By default, the help information is displayed. |
| -p | Yes | Path of the HAP to install. You can specify a path to install one or more HAPs at the same time. |
| -u | No | User whose HAP is to be installed. By default, the current user's HAP is installed. |
| -r | No | Whether to install the HAP in overwrite mode. By default, the HAP is installed in overwrite mode. |
| -w | No | Time that the Bundle Manager tool waits before installing the HAP. The minimum waiting time is 5s, and the maximum waiting time is 600s. The default waiting time is 5s. |
Example
bm install -p /data/app/ohosapp.hap -u 100 -w 5s -r
// The execution result is as follows:
install bundle successfully.
Uninstall Command
bm uninstall [-h help] [-n bundleName] [-m moduleName] [-u userId] [-k]
Table 4 Uninstall command parameters
| Name | Mandatory | Description |
|---|---|---|
| -h | No | Used to display the parameters supported by the uninstall command. By default, the help information is displayed. |
| -n | Yes | Name of the bundle to uninstall. |
| -m | No | Module of the bundle to uninstall. By default, all modules are uninstalled. |
| -u | No | User whose bundle is to be uninstalled. By default, the current user's bundle is uninstalled. |
| -k | No | Whether the application data is retained when the bundle is uninstalled. By default, the application data is deleted along the uninstall. |
| -v | No | Version number of the shared bundle. By default, all shared bundles with the specified bundle name are uninstalled. |
Example
bm uninstall -n com.ohos.app -m com.ohos.app.EntryAbility -u 100 -k
// The execution result is as follows:
uninstall bundle successfully.
Dump Command
bm dump [-h help] [-a] [-n bundleName] [-s shortcutInfo] [-u userId] [-d deviceId]
If -u is not specified, the command applies to all users.
Table 5 Dump command parameters
| Name | Mandatory | Description |
|---|---|---|
| -h | No | Used to display the parameters supported by the dump command. By default, the help information is displayed. |
| -a | Yes | Used to display all bundles installed in the system. |
| -n | Yes | Used to display the details of a bundle. |
| -s | Yes | Used to display the shortcut information of a bundle. |
| -d | No | Used to display the bundle information on a given device. By default, the bundle information on the current device is queried. |
| -u | No | Used to display the bundle information for a given user. By default, the bundle information of the current user is queried. |
Example
# Display the names of all bundles installed in the system.
bm dump -a
# Display the details of a bundle.
bm dump -n com.ohos.app -u 100
# Display the shortcut information of a bundle.
bm dump -s com.ohos.app -u 100
# Display cross-device bundle information.
bm dump -n com.ohos.app -d xxxxx
Clean Command
bm clean [-h] [-c] [-n bundleName] [-d] [-u userId]
If -u is not specified, the command applies to all active users.
Table 6 Clean command parameters
| Name | Description |
|---|---|
| -h | Used to display the parameters supported by the clean command. |
| -c -n | Used to clear the cache data of a bundle. |
| -d -n | Used to clear the data directory of a bundle. |
| -u | Used to clear the cache data of a bundle for a given user. |
Example
# Clear the cache data of a bundle.
bm clean -c -n com.ohos.app -u 100
// The execution result is as follows:
clean bundle cache files successfully.
# Clear the user data of a bundle.
bm clean -d -n com.ohos.app -u 100
// The execution result is as follows:
clean bundle data files successfully.
Enable Command
bm enable [-h] [-n bundleName] [-a abilityName] [-u userId]
If -u is not specified, the command applies to all active users.
Table 7 Enable command parameters
| Name | Description |
|---|---|
| -h | Used to display the parameters supported by the enable command. |
| -n | Used to enable a bundle. |
| -a | Used to enable an ability with a specified bundle name. |
| -u | Used to enable a bundle for a given user. |
Example
# Enable a bundle.
bm enable -n com.ohos.app -a com.ohos.app.EntryAbility -u 100
// The execution result is as follows:
enable bundle successfully.
Disable Command
bm disable [-h] [-n bundleName] [-a abilityName] [-u userId]
If -u is not specified, the command applies to all active users.
Table 8 Disabled command parameters
| Name | Description |
|---|---|
| -h | Used to display the parameters supported by the disable command. |
| -n | Used to disable a bundle. |
| -a | Used to disable an ability with a specified bundle name. |
| -u | Used to disable a bundle for a given user. |
Example
# Disable a bundle.
bm disable -n com.ohos.app -a com.ohos.app.EntryAbility -u 100
// The execution result is as follows:
disable bundle successfully.
Obtaining UDID
bm get [-h] [-u]
Table 9 Parameters used in the command for obtaining the UDID
| Name | Description |
|---|---|
| -h | Used to display the parameters supported by the get command. |
| -u | Used to obtain the UDID of a device. |
Example
# Obtain the UDID of a device.
bm get -u
// The execution result is as follows:
udid of current device is :
23CADE0C
Quick Fix
bm quickfix [-h] [-a -f filePath] [-q -b bundleName]
Table 10 Parameters used in the command for quick fix
| Name | Description |
|---|---|
| -h | Used to display the commands supported by quickfix. |
| -a -f | Used to run the quick fix patch installation command. file-path corresponds to the hqf file. You can pass in one or more hqf files or the directory where the hqf file is located. |
| -q -b | Used to display the patch information based on the bundle name. bundle-name indicates the bundle name. |
Example
# Display patch package information by the bundle name.
bm quickfix -q -b com.ohos.app
// The execution result is as follows:
// Information as follows:
// ApplicationQuickFixInfo:
//  bundle name: com.ohos.app
//  bundle version code: xxx
//  bundle version name: xxx
//  patch version code: x
//  patch version name:
//  cpu abi:
//  native library path:
//  type:
# Patch installation in the quick fix:
bm quickfix -a -f /data/app/
// The execution result is as follows:
apply quickfix succeed.
Commands for Querying the Shared Library
bm dump-shared [-h help] [-a] [-n bundleName] [-m moudleName]
Table 11 Commands for querying the shared library
| Name | Description |
|---|---|
| bm dump-shared -h | Displays the parameters supported by the dump-shared command. |
| bm dump-shared -a | Displays all shared libraries installed in the system. |
| bm dump-shared -n | Displays details about a shared library. |
| bm dump-dependencies -h | Displays the parameters supported by the bm dump-dependencies command. |
| bm dump-dependencies -n bundleName -m moudleName | Displays information about the shared library on which a specified module of an application depends. |
Example
# Display the bundle names of all shared libraries installed in the system.
bm dump-shared -a
# Display the details about the specified shared library.
bm dump-shared -n com.ohos.lib
# Display information about the shared library on which a specified module of an application depends.
bm dump-dependencies -n com.ohos.app -m entry
FAQs
Error Message "code:9568320 error: no signature file" Is Displayed During HAP Installation
Symptom
When you run a signed HAP, the error message "failed to install bundle. error: install no signature info" or "failed to install bundle. error: no signature file" is displayed.
Solution
Manually update the device image so that it matches the signing tool. To do so, perform the following steps:
- Download the image files of the development board based on the latest OpenHarmony image files.
- Burn the downloaded image files to the development board. You can use DevEco Device Tool for burning. For details, see DevEco Device Tool User Guide.
- Run the application or service again.
Error Message "code:9568347 error: install parse native so failed" Is Displayed During HAP Installation
Symptom
When you start debugging or run a C++ application, the error message "error: install parse native so failed" is displayed during the installation of the HAP.
Solution
The ABI type configured for the C++ project does not match that supported by the device. To solve this problem, perform the following steps:
-
Connect the device to DevEco Studio.
-
Open the command line tool and go to the toolchains{Version} directory in the OpenHarmony SDK installation directory.
To check the OpenHarmony SDK installation directory, choose File > Settings > SDK.
-
Run the following command to obtain the list of ABI types supported by the device, which include one or more of the following: default, armeabi-v7a, armeabi, arm64-v8a, x86, and x86_64.
hdc shell param get const.product.cpu.abilist -
Depending on the obtained list, modify the abiFilters settings in the module-level build-profile.json5 file. The rules are as follows:
-
If the list includes only default, run the following command to check whether the lib64 folder exists:
cd /system/
ls
- If the lib64 folder exists, add the arm64-v8a type to abiFilters.
- If the lib64 folder does not exist, add armeabi, armeabi-v7a, or both types to abiFilters.
-
If the list includes one or more of the following, add at least one of them to abiFilters: armeabi-v7a, armeabi, arm64-v8a, x86, and x86_64.
-
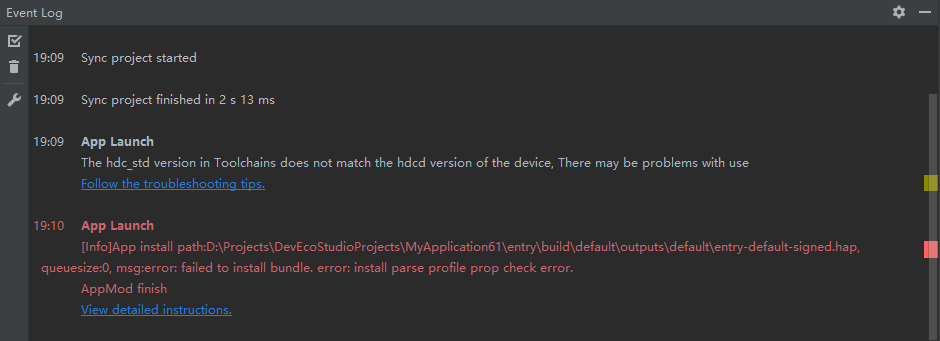
Error Message "code:9568344 error: install parse profile prop check error" Is Displayed During HAP Installation
Symptom
When you start debugging or run an application, the error message "error: install parse profile prop check error" is displayed during the installation of the HAP.

Solution
The signature file of the application is changed, but the new signature fingerprint is not reconfigured in the install_list_capability.json file of the device. To solve this problem, perform the following steps:
-
Obtain the new signature fingerprint.
a. Obtain the storage path of the signature file, which is the value of profile in the signingConfigs field in the project-level build-profile.json5 file.
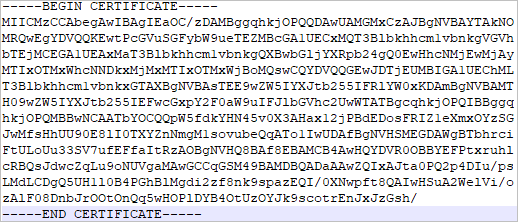
b. Open the signature file (with the file name extension .p7b), search for development-certificate in the file, copy -----BEGIN CERTIFICATE-----, -----END CERTIFICATE-----, and the information between them to a new text file, delete the newline characters, and save the file as a new .cer file.
The format of the new .cer file is shown below. (The file content is an example.)
c. Use the keytool (available in the jbr/bin folder of the DevEco Studio installation directory) to obtain the SHA-256 value of the certificate fingerprint from the .cer file:
keytool -printcert -file xxx.cerd. Remove the colon (:) from the SHA-256 content in the certificate fingerprint. What you get is the signature fingerprint.
An example SHA-256 value is shown below.

The signature fingerprint obtained by removing the colon is 5753DDBC1A8EF88A62058A9FC4B6AFAFC1C5D8D1A1B86FB3532739B625F8F3DB.
-
Obtain the install_list_capability.json file of the device.
a. Connect the device.
b. Run the following command to view the install_list_capability.json file of the device:
find /system -name install_list_capability.jsonThe install_list_capability.json file of the device is stored in the following directory. Find the corresponding configuration file based on the bundle name.
/system/etc/app/install_list_capability.jsonc. Run the following command to obtain the install_list_capability.json file:
hdc shell mount -o rw,remount / hdc file recv /system/etc/app/install_list_capability.json -
Add the signature fingerprint obtained to app_signature in the install_list_capability.json file. Note that the signature fingerprint must be configured under the corresponding bundle name.

-
Push the modified install_list_capability.json file to the device and restart the device.
hdc shell mount -o rw,remount / hdc file send install_list_capability.json /system/etc/app/install_list_capability.json hdc shell chmod 777 /system/etc/app/install_list_capability.json hdc shell reboot -
Reinstall the application.
Error Message "code:9568305 error: dependent module does not exist" Is Displayed During HAP Installation
Symptom
When you start debugging or run an application, the error message "error: dependent module does not exist" is displayed during the installation of the HAP.
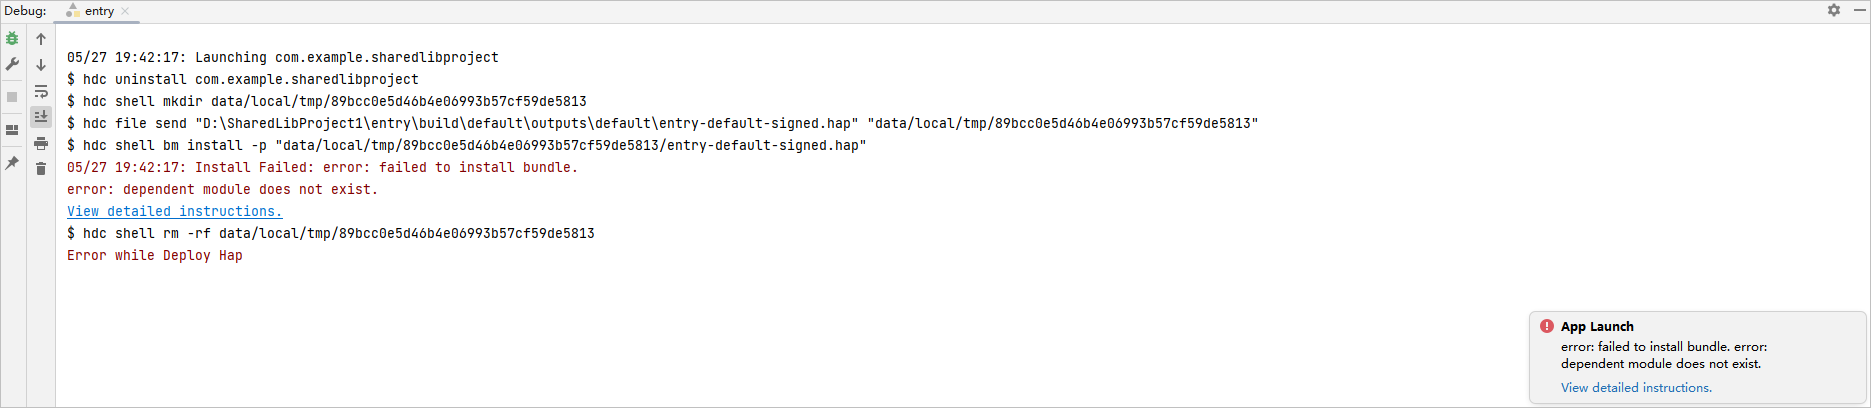
Solution
The SharedLibrary module on which the application depends is not installed. To solve this problem, perform the following steps:
-
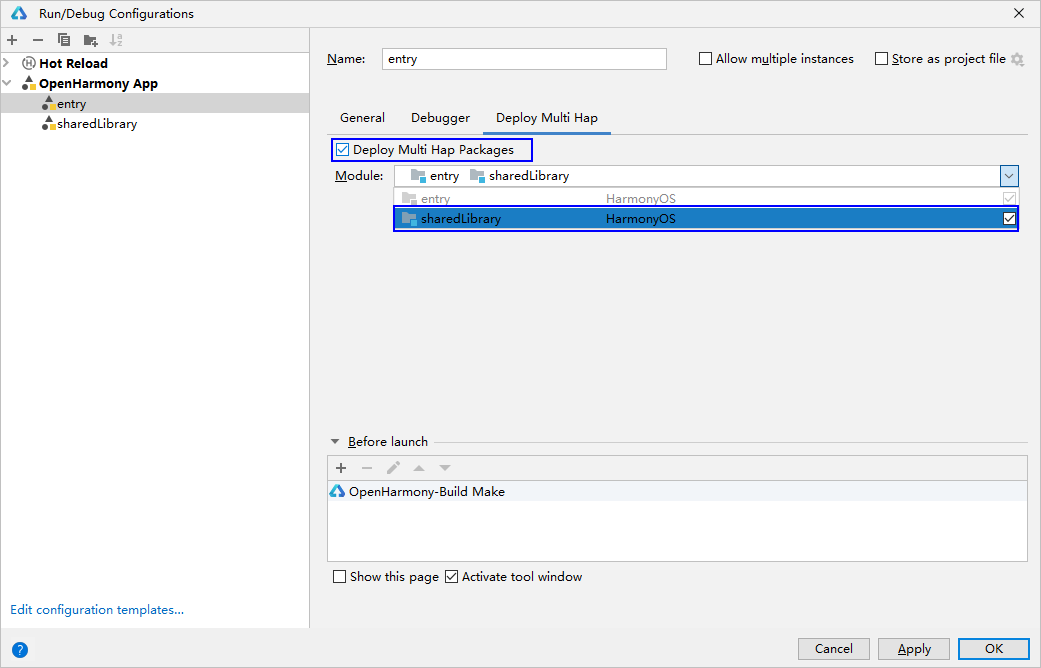
Install the dependent SharedLibrary module. On the Run/Debug Configurations page of DevEco Studio, select Keep Application Data on the General tab page, and click OK to save the configuration. Then run or debug the application again.
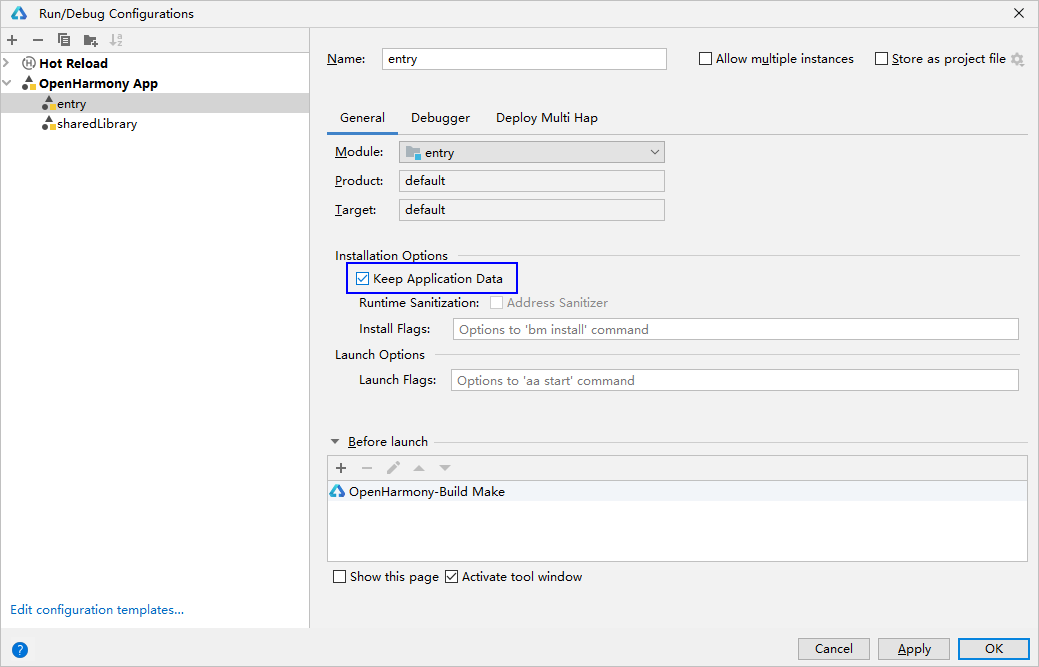
-
On the Run/Debug Configurations page of DevEco Studio, click the Deploy Multi Hap tab, select Deploy Multi Hap Packages, select the dependent module SharedLibrary, and click OK to save the configuration. Then run or debug the application again.
Error Message "code:9568259 error: install parse profile missing prop" Is Displayed During HAP Installation
Symptom
When you start debugging or run an application, the error message "error: install parse profile missing prop" is displayed during the installation of the HAP.

Solution
Some mandatory fields are missing in the app.json5 and module.json5 files.
-
Method 1: Check and add mandatory fields by referring to the app.json5 file and module.json5 file.
-
Method 2: Determine the missing fields based on the HiLog.
Run the following command to enable disk flushing:
hilog -w startDisk location: /data/log/hilog
Open the log file and find profile prop %{public}s is mission. For example, profile prop icon is mission indicates that the icon field is missing.
Error Message "code:9568258 error: install releaseType target not same" Is Displayed During HAP Installation
Symptom
When you start debugging or run an application, the error message "error: install releaseType target not same" is displayed during the installation of the HAP.

Solution
The value of releaseType in the SDK used by the existing HAP is different from that used by the new HAP. Uninstall the existing HAP on the device, and then install the new HAP.
Error Message "code:9568322 error: signature verification failed due to not trusted app source" Is Displayed During HAP Installation
Symptom
When you start debugging or run an application, the error message "error: signature verification failed due to not trusted app source" is displayed during the installation of the HAP.
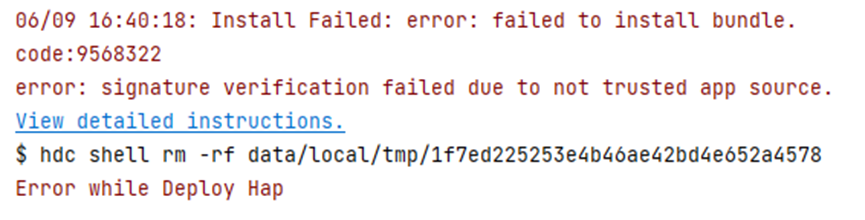
Solution
The signature does not contain the UDID of the debugging device. To solve this problem, perform the following steps:
- Use automatic signature. After the device is connected, sign the application again.
- If manual signature is used, add the UDID of the device to the UnsgnedDebugProfileTemplate.json file. For details, see OpenHarmony Application Manual Signature.
// Command for obtaining the UDID
hdc shell bm get -u
Error Message "code:9568289 error: install failed due to grant request permissions failed" Is Displayed During HAP Installation
Symptom
When you start debugging or run an application, the error message "error: install failed due to grant request permissions failed" is displayed during the installation of the HAP.
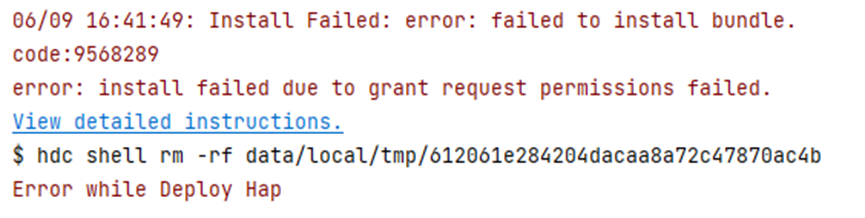
Solution
The application uses the default Ability Privilege Level (APL), which is normal, and requires the system_basic or system_core permission.
Change the API in the UnsgnedDebugProfileTemplate.json file to system_basic or system_core, and sign and pack the application again.
Error Message "code:9568297 error: install failed due to older sdk version in the device" Is Displayed During HAP Installation
Symptom
When you start debugging or run an application, the error message "error: install failed due to older sdk version in the device" is displayed during the installation of the HAP.
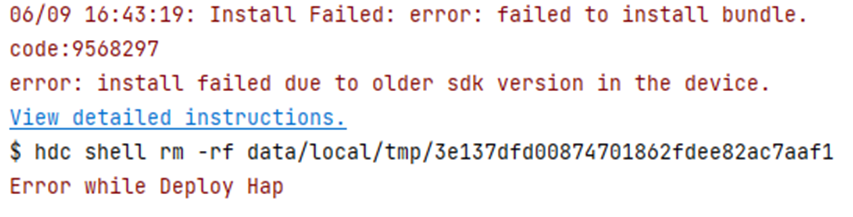
Solution
The SDK version used for build and packing does not match the device image version. The possible scenarios are as follows:
-
Scenario 1: The device image version is earlier than the SDK version for build and packing. Update the device image version. Run the following command to query the device image version:
hdc shell param get const.ohos.apiversionIf the API version provided by the image is 10 and the SDK version used for application build is also 10, the possible cause is that the image version is too early to be compatible with the SDK verification rules of the new version. In this case, update the image version to the latest version.
-
Scenario 2: For applications that need to run on OpenHarmony devices, ensure that runtimeOS has been changed to OpenHarmony.
Error Message "code:9568332 error: install sign info inconsistent" Is Displayed During HAP Installation
Symptom
When you start debugging or run an application, the error message "error: install sign info inconsistent" is displayed during the installation of the HAP.
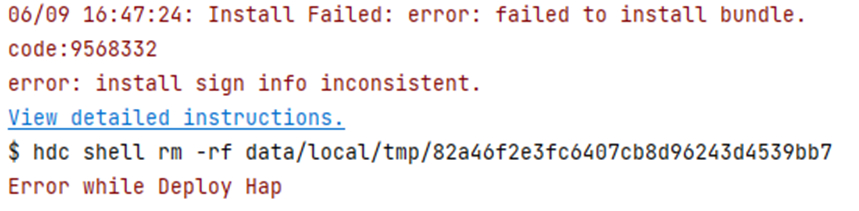
Solution
The signature of the application installed on the device is different from that of the new application. Keep Application Data is selected in Edit Configurations (the application is installed without being uninstalled) and the signature is re-signed.
Uninstall the application, or deselect Keep Application Data. Then install the new application.