Linux Kernel
Overview
Linux kernel porting involves basic kernel compilation, building, and verification after third-party chipset patches are installed based on the Linux kernel baseline.
Basic Information
The current Linux kernel baseline evolves based on the Linux LTS version 4.19 and incorporates the CVE and bugfix patches. For details, see the kernel_linux code repository. The code path for the repo project is kernel/linux-4.19.
Bootloader
You can use the Bootloader provided by the chipset vendor or open-source U-Boot to load the kernel image. For example, you can use U-Boot for the Hi3516D V300 development board.
Adaptation, Building, Burning, and Startup
-
Prepare the kernel configuration files, especially the chipset-related configuration files. Source code directory of the configuration files: kernel/linux/config/
Create a <YOUR_CHIP>_small_defconfig file, such as hi3516dv300_small_defconfig, in the linux-4.19/arch/arm/configs/ directory. The configuration file can be created by combining the general-purpose small_common_defconfig file and chipset-specific configurations.
-
Prepare the chipset patches.
Source code directory of the patch files: kernel/linux/patches/linux-4.19
Create a <YOUR_CHIP>_patch directory by referring to the existing patch directory hi3516dv300_small_patch, and place the related chipset patches, such as hdf.patch (recommended), in this directory.
-
Start the build.
In the project directory kernel/linux/patches/, after version-level build commands are passed to the kernel_module_build.sh and kernel.mk files, adapt the patch and defconfig configuration file paths, compiler, chipset architecture, and kernel image format.
Adjust the patches based on build error logs. Typical error scenarios are as follows:
(1) A conflict occurs in installing a patch. In this case, context adaptation is required.
(2) The build fails due to kernel version mismatch. In this case, kernel adaptation is required, including function implementation adjustment.
 CAUTION
-
As in the kernel.mk file, patches are applied after the code environment of kernel/linux-4.19 is copied during compilation and building of the OpenHarmony project. Retain the original code environment of kernel/linux-4.19 before running the OpenHarmony version-level build command.
-
You can modify the patches in out/<***>/kernel/linux-4.19, to which the code environment is copied.
-
-
Burn images and start the development board.
The burning mode varies according to the development board of the chipset. Pay attention to the size of each burnt image and the configuration of the boot parameters. Below is the U-Boot parameter settings of Hi3516D V300:
setenv bootargs 'mem=128M console=ttyAMA0,115200 root=/dev/mmcblk0p3 ro rootfstype=ext4 rootwait blkdevparts=mmcblk0:1M(boot),9M(kernel),50M(rootfs),50M(userfs)'
Verification
Debug the init process, start shell, and run a simple program in the user space to check whether the kernel porting is successful. Below is the OS image structure of the OpenHarmony small system and the Linux user-space program startup process.
Figure 1 OS image structure and user-space program startup process based on the Linux kernel
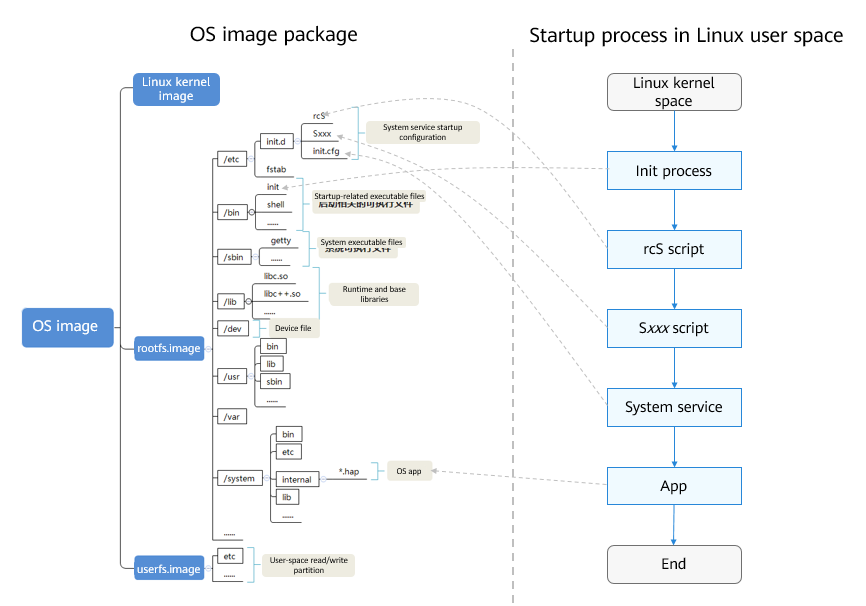
Based on the preceding process, the recommended verification procedure is as follows:
-
Create a root file system image.
Create a root file system image rootfs.img by following instructions in Building Procedures. As shown in the preceding figure, the startup process is closely related to the product configuration. You need to complete the following configuration when creating rootfs.img:
- Component configuration In the product component configuration file vendor/{company}/{product}/config.json, configure the init component of the startup subsystem and the linux_4_1_9 component of the kernel subsystem.
- System service configuration Modify the system service configuration file vendor/{company}/{product}/init_configs/init_xxx.cfg to start the shell service.
- File system configuration In the file system configuration file vendor/{company}/{product}/fs.yml, create the /bin/sh -> mksh and /lib/ld-musl-arm.so.1 -> libc.so soft links. These two files are the shell executable program and the c library on which the executable program depends, respectively.
- Startup configuration In the vendor/{company}/{product}/init_configs/etc directory, configure startup settings, including the fstab, rsS, and Sxxx files. Configure the startup settings as needed.
After the build is complete, check the rootfs content in the product compilation output directory to determine whether the generated rootfs.img file meets the expectation.
-
Debug the init process and shell.
Burn rootfs.img and debug the init process and shell. The burning tools and processes vary according to the development board. Follow the instructions provided by the chipset solution vendor. Before burning rootfs.img, ensure that the bootloader and Linux kernel are started properly. When rootfs.img is properly mounted by the kernel, the /bin/init program is executed, indicating the start of the user space.
The init process calls the /etc/init.d/rcS script. The rcS script runs the first command /bin/mount -a to load the fstab file. After the commands in this file are executed, rcS calls the Sxxx scripts in sequence to create and scan for device nodes and configure file permissions.
Then the init process reads the init.cfg system service configuration file and starts the shell as configured. If the preceding process is executed properly, the system enters the shell.
If the init startup log contains the version number, the init program is started properly:
Figure 2 Log indicating that the init process is started properly

After entering the shell, run the ls command. The following figure shows the information printed over the serial port.
Figure 3 Information printed after the ls command is executed in the shell

-
Configure the NFS.
After the init process and shell are started, run the following command in the root directory to enable the NFS service. In this example, the server IP address is 192.168.1.22 and the client IP address is 192.168.1.4.
ifconfig eth0 192.168.1.4 netmask 255.255.255.0
mkdir -p /storgage/nfs
mount -t nfs -o nolock,addr=192.168.1.22 192.168.1.22:/nfs /storage/nfs