使用Drawing实现图形绘制与显示
场景介绍
Native Drawing模块提供了一系列的接口用于基本图形和字体的绘制。
Drawing绘制的内容无法直接在屏幕上显示,需要借用XComponent以及Native Window的能力支持,将绘制的内容通过Native Window送显。
接口说明
Drawing常用接口如下表所示,详细的接口说明请参考Drawing。
| 接口名 | 描述 |
|---|---|
| OH_Drawing_BitmapCreate (void) | 创建一个位图对象。 |
| OH_Drawing_BitmapBuild (OH_Drawing_Bitmap *, const uint32_t width, const uint32_t height, const OH_Drawing_BitmapFormat *) | 初始化位图对象的宽度和高度,并且为该位图设置像素格式。 |
| OH_Drawing_CanvasCreate (void) | 创建一个画布对象。 |
| OH_Drawing_CanvasBind (OH_Drawing_Canvas *, OH_Drawing_Bitmap *) | 将一个位图对象绑定到画布中,使得画布绘制的内容输出到位图中(即CPU渲染)。 |
| OH_Drawing_CanvasAttachBrush (OH_Drawing_Canvas *, const OH_Drawing_Brush *) | 设置画刷给画布,画布将会使用设置的画刷样式和颜色去填充绘制的图形形状。 |
| OH_Drawing_CanvasAttachPen (OH_Drawing_Canvas *, const OH_Drawing_Pen *) | 设置画笔给画布,画布将会使用设置画笔的样式和颜色去绘制图形形状的轮廓。 |
| OH_Drawing_CanvasDrawPath (OH_Drawing_Canvas *, const OH_Drawing_Path *) | 画一个自定义路径。 |
| OH_Drawing_PathCreate (void) | 创建一个路径对象。 |
| OH_Drawing_PathMoveTo (OH_Drawing_Path *, float x, float y) | 设置自定义路径的起始点位置。 |
| OH_Drawing_PathLineTo (OH_Drawing_Path *, float x, float y) | 添加一条到目标点的线段。 |
| OH_Drawing_PathClose (OH_Drawing_Path *) | 闭合路径,会添加一条到路径起点位置的线段。 |
| OH_Drawing_PenCreate (void) | 创建一个画笔对象。 |
| OH_Drawing_PenSetAntiAlias (OH_Drawing_Pen *, bool) | 设置抗锯齿属性,如果为真则说明画笔会启用抗锯齿功能,在绘制图形时会对图形的边缘像素进行半透明的模糊处理。 |
| OH_Drawing_PenSetWidth (OH_Drawing_Pen *, float width) | 设置画笔的厚度属性,厚度属性描述了画笔绘制图形轮廓的宽度。 |
| OH_Drawing_BrushCreate (void) | 创建一个画刷对象。 |
| OH_Drawing_BrushSetColor (OH_Drawing_Brush *, uint32_t color) | 设置画刷的颜色属性,颜色属性描述了画刷填充图形时使用的颜色,用一个32位(ARGB)的变量表示。 |
| OH_Drawing_CreateTypographyStyle (void) | 创建一个排版对象,用于定义排版样式。 |
| OH_Drawing_CreateTextStyle (void) | 创建一个文本对象,用于定义文本样式。 |
| OH_Drawing_TypographyHandlerAddText (OH_Drawing_TypographyCreate *, const char *) | 设置文本内容。 |
| OH_Drawing_TypographyPaint (OH_Drawing_Typography *, OH_Drawing_Canvas *, double, double) | 显示文本。 |
图形绘制与显示开发步骤
开发流程
使用Drawing进行图形绘制与显示时,需要使用Native Drawing模块的画布画笔绘制一个基本的2D图形;并将图形内容写入Native Window提供的图形Buffer,将Buffer提交到图形队列;再利用XComponent将C++代码层与ArkTS层对接,实现在ArkTS层调用绘制和显示的逻辑,最终在应用上显示图形。
本文以实现2D图形和文本的绘制与显示为例,给出具体的开发指导。
添加开发依赖
添加动态链接库
CMakeLists.txt中添加以下lib。
libace_napi.z.so
libace_ndk.z.so
libnative_window.so
libnative_drawing.so
头文件
#include <ace/xcomponent/native_interface_xcomponent.h>
#include "napi/native_api.h"
#include <native_window/external_window.h>
#include <native_drawing/drawing_bitmap.h>
#include <native_drawing/drawing_color.h>
#include <native_drawing/drawing_canvas.h>
#include <native_drawing/drawing_pen.h>
#include <native_drawing/drawing_brush.h>
#include <native_drawing/drawing_path.h>
#include <cmath>
#include <algorithm>
#include <stdint.h>
#include <sys/mman.h>
使用XComponent构建绘制环境
-
在Index.ets文件中添加XComponent组件。
import XComponentContext from "../interface/XComponentContext";

const TAG = '[Sample_DrawingAPI]';

@Entry
@Component
struct Index {
  private xComponentContext: XComponentContext | undefined = undefined;

  build() {
      Column() {
      Row() {
          XComponent({ id: 'xcomponentId', type: 'surface', libraryname: 'entry' })
          .onLoad((xComponentContext) => {
              this.xComponentContext = xComponentContext as XComponentContext;
          }).width('640px') // 64的倍数
      }.height('88%')
    }
  }
}
若要改变XComponent的宽,值需为64的倍数,例如640px。
-
在 Native C++层获取NativeXComponent。建议使用单例模式保存XComponent。此步骤需要在napi_init的过程中处理。
创建一个PluginManger单例类,用于管理NativeXComponent。
class PluginManager {
public:
    ~PluginManager();

    static PluginManager *GetInstance();

    void SetNativeXComponent(std::string &id, OH_NativeXComponent *nativeXComponent);
    SampleBitMap *GetRender(std::string &id);
    void Export(napi_env env, napi_value exports);
private:

    std::unordered_map<std::string, OH_NativeXComponent *> nativeXComponentMap_;
    std::unordered_map<std::string, SampleBitMap *> pluginRenderMap_;
};
SampleBitMap类会在后面的绘制2D图形步骤中创建。
void PluginManager::Export(napi_env env, napi_value exports) { if ((env == nullptr) || (exports == nullptr)) { DRAWING_LOGE("Export: env or exports is null"); return; } napi_value exportInstance = nullptr; if (napi_get_named_property(env, exports, OH_NATIVE_XCOMPONENT_OBJ, &exportInstance) != napi_ok) { DRAWING_LOGE("Export: napi_get_named_property fail"); return; } OH_NativeXComponent *nativeXComponent = nullptr; if (napi_unwrap(env, exportInstance, reinterpret_cast<void **>(&nativeXComponent)) != napi_ok) { DRAWING_LOGE("Export: napi_unwrap fail"); return; } char idStr[OH_XCOMPONENT_ID_LEN_MAX + 1] = {'\0'}; uint64_t idSize = OH_XCOMPONENT_ID_LEN_MAX + 1; if (OH_NativeXComponent_GetXComponentId(nativeXComponent, idStr, &idSize) != OH_NATIVEXCOMPONENT_RESULT_SUCCESS) { DRAWING_LOGE("Export: OH_NativeXComponent_GetXComponentId fail"); return; } std::string id(idStr); auto context = PluginManager::GetInstance(); if ((context != nullptr) && (nativeXComponent != nullptr)) { context->SetNativeXComponent(id, nativeXComponent); auto render = context->GetRender(id); if (render != nullptr) { render->RegisterCallback(nativeXComponent); render->Export(env, exports); } else { DRAWING_LOGE("render is nullptr"); } } } -
注册回调函数。通过
OnSurfaceCreated回调函数获取Native Window,建议将Native Window同样存储在单例中。// 定义回调函数 void OnSurfaceCreatedCB(OH_NativeXComponent* component, void* window) { // 可获取 OHNativeWindow 实例 OHNativeWindow* nativeWindow = static_cast<OHNativeWindow*>(window); char idStr[OH_XCOMPONENT_ID_LEN_MAX + 1] = {'\0'}; uint64_t idSize = OH_XCOMPONENT_ID_LEN_MAX + 1; if (OH_NativeXComponent_GetXComponentId(component, idStr, &idSize) != OH_NATIVEXCOMPONENT_RESULT_SUCCESS) { DRAWING_LOGE("OnSurfaceCreatedCB: Unable to get XComponent id"); return; } std::string id(idStr); auto render = SampleBitMap::GetInstance(id); render->SetNativeWindow(nativeWindow); uint64_t width; uint64_t height; int32_t xSize = OH_NativeXComponent_GetXComponentSize(component, window, &width, &height); if ((xSize == OH_NATIVEXCOMPONENT_RESULT_SUCCESS) && (render != nullptr)) { render->SetHeight(height); render->SetWidth(width); DRAWING_LOGI("xComponent width = %{public}llu, height = %{public}llu", width, height); } } void OnSurfaceChangedCB(OH_NativeXComponent* component, void* window) { // 可获取 OHNativeWindow 实例 OHNativeWindow* nativeWindow = static_cast<OHNativeWindow*>(window); char idStr[OH_XCOMPONENT_ID_LEN_MAX + 1] = {'\0'}; uint64_t idSize = OH_XCOMPONENT_ID_LEN_MAX + 1; if (OH_NativeXComponent_GetXComponentId(component, idStr, &idSize) != OH_NATIVEXCOMPONENT_RESULT_SUCCESS) { DRAWING_LOGE("OnSurfaceChangedCB: Unable to get XComponent id"); return; } std::string id(idStr); auto render = SampleBitMap::GetInstance(id); uint64_t width; uint64_t height; int32_t xSize = OH_NativeXComponent_GetXComponentSize(component, window, &width, &height); if ((xSize == OH_NATIVEXCOMPONENT_RESULT_SUCCESS) && (render != nullptr)) { render->SetHeight(height); render->SetWidth(width); DRAWING_LOGI("Surface Changed : xComponent width = %{public}llu, height = %{public}llu", width, height); } } void OnSurfaceDestroyedCB(OH_NativeXComponent* component, void* window) { // 可获取 OHNativeWindow 实例 OHNativeWindow* nativeWindow = static_cast<OHNativeWindow*>(window); // ... } void DispatchTouchEventCB(OH_NativeXComponent* component, void* window) { // 可获取 OHNativeWindow 实例 OHNativeWindow* nativeWindow = static_cast<OHNativeWindow*>(window); // ... }XComponent的所有Callback必须初始化,可以将不需要的Callback定义为空指针。
// OH_NativeXComponent_Callback是个struct OH_NativeXComponent_Callback callback; callback.OnSurfaceCreated = OnSurfaceCreatedCB; callback.OnSurfaceChanged = OnSurfaceChangedCB; callback.OnSurfaceDestroyed = OnSurfaceDestroyedCB; callback.DispatchTouchEvent = DispatchTouchEventCB; -
将
OH_NativeXComponent_Callback注册给NativeXComponent。// 注册回调函数 OH_NativeXComponent_RegisterCallback(nativeXComponent, &callback);
经过以上步骤,绘制环境已搭建完成,接下来介绍如何使用Drawing接口进行内容绘制。
绘制2D图形
以下步骤描述了如何使用Native Drawing模块的画布画笔绘制一个基本的2D图形:
-
创建Bitmap实例。使用drawing_bitmap.h的
OH_Drawing_BitmapCreate接口创建一个Bitmap实例cBitmap并使用OH_Drawing_BitmapBuild指定其长宽大小和像素格式。创建一个SampleBitMap类,并声明接下来需要的私有成员变量。
class SampleBitMap {
public:
    // member functions
private:
    OH_NativeXComponent_Callback renderCallback_;

    uint64_t width_ = 0;
    uint64_t height_ = 0;
    OH_Drawing_Bitmap *cBitmap_ = nullptr;
    OH_Drawing_Canvas *cCanvas_ = nullptr;
    OH_Drawing_Path *cPath_ = nullptr;
    OH_Drawing_Brush *cBrush_ = nullptr;
    OH_Drawing_Pen *cPen_ = nullptr;
    OHNativeWindow *nativeWindow_ = nullptr;
    uint32_t *mappedAddr_ = nullptr;
    BufferHandle *bufferHandle_ = nullptr;
    struct NativeWindowBuffer *buffer_ = nullptr;
    int fenceFd_ = 0;
};
// 创建一个bitmap对象 cBitmap_ = OH_Drawing_BitmapCreate(); // 定义bitmap的像素格式 OH_Drawing_BitmapFormat cFormat {COLOR_FORMAT_RGBA_8888, ALPHA_FORMAT_OPAQUE}; // 构造对应格式的bitmap,width的值必须为 bufferHandle->stride / 4 OH_Drawing_BitmapBuild(cBitmap_, width_, height_, &cFormat); -
创建画布实例。使用drawing_canvas.h的
OH_Drawing_CanvasCreate接口创建一个画布实例cCanvas,并使用OH_Drawing_CanvasBind接口将cBitmap实例绑定到cCanvas上,后续在画布上绘制的内容会输出到绑定的cBitmap实例中。// 创建一个canvas对象 cCanvas_ = OH_Drawing_CanvasCreate(); // 将画布与bitmap绑定,画布画的内容会输出到绑定的bitmap内存中 OH_Drawing_CanvasBind(cCanvas_, cBitmap_); // 使用白色清除画布内容 OH_Drawing_CanvasClear(cCanvas_, OH_Drawing_ColorSetArgb(0xFF, 0xFF, 0xFF, 0xFF)); -
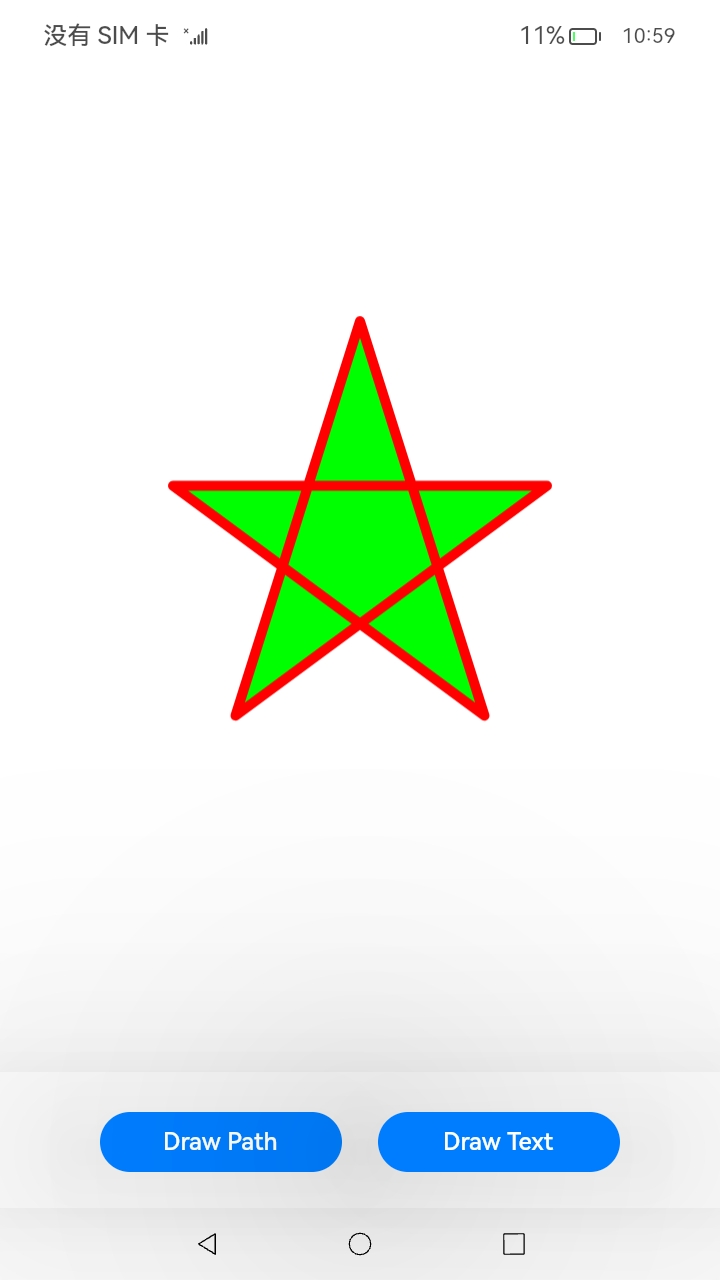
构造Path形状。使用drawing_path.h提供的接口完成一个五角星形状的构造cPath。
int len = height_ / 4; float aX = width_ / 2; float aY = height_ / 4; float dX = aX - len * std::sin(18.0f); float dY = aY + len * std::cos(18.0f); float cX = aX + len * std::sin(18.0f); float cY = dY; float bX = aX + (len / 2.0); float bY = aY + std::sqrt((cX - dX) * (cX - dX) + (len / 2.0) * (len / 2.0)); float eX = aX - (len / 2.0); float eY = bY; // 创建一个path对象,然后使用接口连接成一个五角星形状 cPath_ = OH_Drawing_PathCreate(); // 指定path的起始位置 OH_Drawing_PathMoveTo(cPath_, aX, aY); // 用直线连接到目标点 OH_Drawing_PathLineTo(cPath_, bX, bY); OH_Drawing_PathLineTo(cPath_, cX, cY); OH_Drawing_PathLineTo(cPath_, dX, dY); OH_Drawing_PathLineTo(cPath_, eX, eY); // 闭合形状,path绘制完毕 OH_Drawing_PathClose(cPath_); -
设置画笔和画刷样式。使用drawing_pen.h的
OH_Drawing_PenCreate接口创建一个画笔实例cPen, 并设置抗锯齿、颜色、线宽等属性,画笔用于形状边框线的绘制。使用drawing_brush.h的OH_Drawing_BrushCreate接口创建一个画刷实例cBrush,并设置填充颜色, 画刷用于形状内部的填充。使用drawing_canvas.h的OH_Drawing_CanvasAttachPen和OH_Drawing_CanvasAttachBrush接口将画笔画刷的实例设置到画布实例中。// 创建一个画笔Pen对象,Pen对象用于形状的边框线绘制 cPen_ = OH_Drawing_PenCreate(); OH_Drawing_PenSetAntiAlias(cPen_, true); OH_Drawing_PenSetColor(cPen_, OH_Drawing_ColorSetArgb(0xFF, 0xFF, 0x00, 0x00)); OH_Drawing_PenSetWidth(cPen_, 10.0); OH_Drawing_PenSetJoin(cPen_, LINE_ROUND_JOIN); // 将Pen画笔设置到canvas中 OH_Drawing_CanvasAttachPen(cCanvas_, cPen_); // 创建一个画刷Brush对象,Brush对象用于形状的填充 cBrush_ = OH_Drawing_BrushCreate(); OH_Drawing_BrushSetColor(cBrush_, OH_Drawing_ColorSetArgb(0xFF, 0x00, 0xFF, 0x00)); // 将Brush画刷设置到canvas中 OH_Drawing_CanvasAttachBrush(cCanvas_, cBrush_); -
绘制Path形状。使用drawing_canvas.h的
OH_Drawing_CanvasDrawPath接口将五角星绘制到画布上。// 在画布上画path的形状,五角星的边框样式为pen设置,颜色填充为Brush设置 OH_Drawing_CanvasDrawPath(cCanvas_, cPath_);
文本绘制开发步骤
以下步骤描述了如何使用Native Drawing模块的文字显示功能:
-
创建画布和bitmap实例。
// 创建bitmap cBitmap_ = OH_Drawing_BitmapCreate(); OH_Drawing_BitmapFormat cFormat {COLOR_FORMAT_RGBA_8888, ALPHA_FORMAT_OPAQUE}; // width的值必须为bufferHandle->stride / 4 OH_Drawing_BitmapBuild(cBitmap_, width_, height_, &cFormat); // 创建canvas cCanvas_ = OH_Drawing_CanvasCreate(); OH_Drawing_CanvasBind(cCanvas_, cBitmap_); OH_Drawing_CanvasClear(cCanvas_, OH_Drawing_ColorSetArgb(0xFF, 0xFF, 0xFF, 0xFF)); -
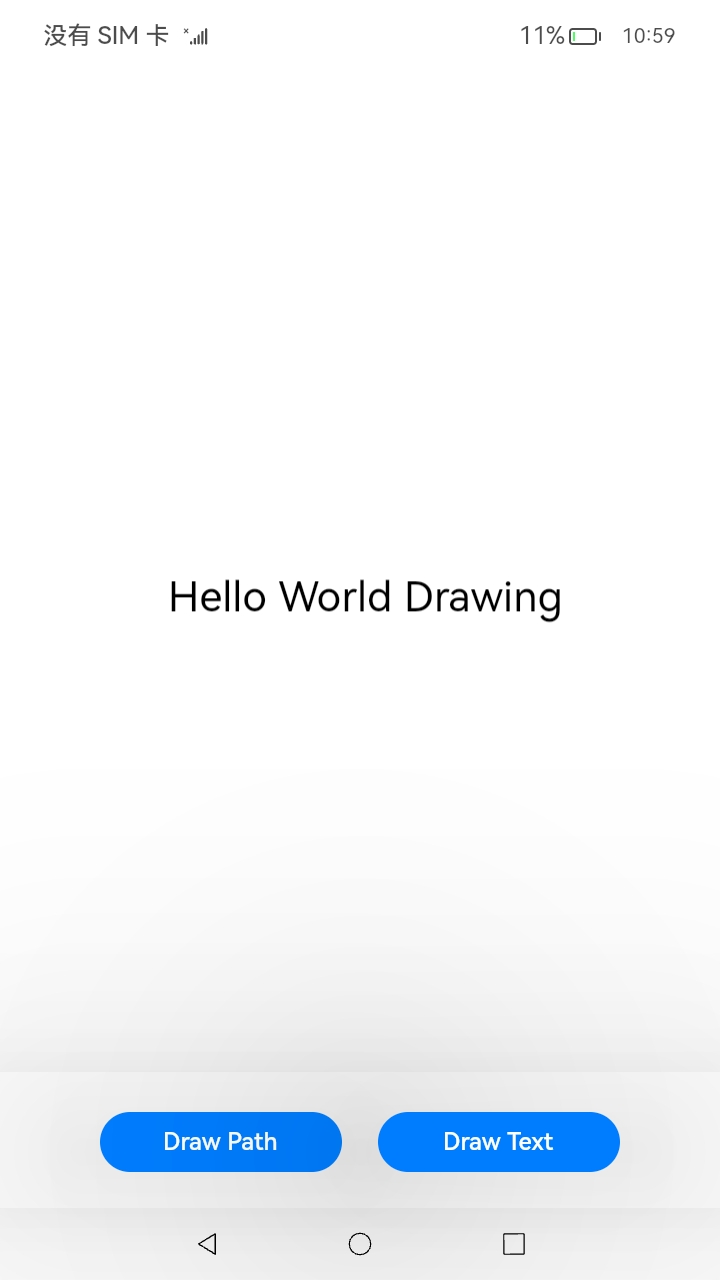
设置排版风格。
// 选择从左到右/左对齐等排版属性 OH_Drawing_TypographyStyle* typoStyle = OH_Drawing_CreateTypographyStyle(); OH_Drawing_SetTypographyTextDirection(typoStyle, TEXT_DIRECTION_LTR); OH_Drawing_SetTypographyTextAlign(typoStyle, TEXT_ALIGN_LEFT); -
设置文本风格。
// 设置文字颜色,例如黑色 OH_Drawing_TextStyle* txtStyle = OH_Drawing_CreateTextStyle(); OH_Drawing_SetTextStyleColor(txtStyle, OH_Drawing_ColorSetArgb(0xFF, 0x00, 0x00, 0x00)); // 设置文字大小、字重等属性 double fontSize = width_ / 15; OH_Drawing_SetTextStyleFontSize(txtStyle, fontSize); OH_Drawing_SetTextStyleFontWeight(txtStyle, FONT_WEIGHT_400); OH_Drawing_SetTextStyleBaseLine(txtStyle, TEXT_BASELINE_ALPHABETIC); OH_Drawing_SetTextStyleFontHeight(txtStyle, 1); // 设置字体类型等 const char* fontFamilies[] = {"Roboto"}; OH_Drawing_SetTextStyleFontFamilies(txtStyle, 1, fontFamilies); OH_Drawing_SetTextStyleFontStyle(txtStyle, FONT_STYLE_NORMAL); OH_Drawing_SetTextStyleLocale(txtStyle, "en"); -
生成最终文本显示效果。
OH_Drawing_TypographyCreate* handler = OH_Drawing_CreateTypographyHandler(typoStyle,
    OH_Drawing_CreateFontCollection());
OH_Drawing_TypographyHandlerPushTextStyle(handler, txtStyle);
// 设置文字内容
const char* text = "Hello World Drawing\n";
OH_Drawing_TypographyHandlerAddText(handler, text);
OH_Drawing_TypographyHandlerPopTextStyle(handler);
OH_Drawing_Typography* typography = OH_Drawing_CreateTypography(handler);
// 设置页面最大宽度
double maxWidth = width_;
OH_Drawing_TypographyLayout(typography, maxWidth);
// 设置文本在画布上绘制的起始位置
double position[2] = {width_ / 5.0, height_ / 2.0};
// 将文本绘制到画布上
OH_Drawing_TypographyPaint(typography, cCanvas_, position[0], position[1]);
绘制内容送显
前面我们已经通过Drawing API实现了Path绘制以及文字绘制。现在需要将其呈现在Native Window上。
-
通过前面
OnSurfaceCreatedCB回调保存的Native Window指针,来申请Native Window Buffer。// 通过 OH_NativeWindow_NativeWindowRequestBuffer 获取 OHNativeWindowBuffer 实例 int32_t ret = OH_NativeWindow_NativeWindowRequestBuffer(nativeWindow_, &buffer_, &fenceFd_); -
通过
OH_NativeWindow_GetBufferHandleFromNative获取bufferHandle。bufferHandle_ = OH_NativeWindow_GetBufferHandleFromNative(buffer_); -
使用系统mmap接口拿到bufferHandle的内存虚拟地址。
mappedAddr_ = static_cast<uint32_t *>( // 使用内存映射函数mmap将bufferHandle对应的共享内存映射到用户空间,可以通过映射出来的虚拟地址向bufferHandle中写入图像数据 // bufferHandle->virAddr是bufferHandle在共享内存中的起始地址,bufferHandle->size是bufferHandle在共享内存中的内存占用大小 mmap(bufferHandle_->virAddr, bufferHandle_->size, PROT_READ | PROT_WRITE, MAP_SHARED, bufferHandle_->fd, 0)); if (mappedAddr_ == MAP_FAILED) { DRAWING_LOGE("mmap failed"); } -
使用drawing_bitmap.h的
OH_Drawing_BitmapGetPixels接口获取到画布绑定bitmap实例的像素地址,该地址指向的内存包含画布刚刚绘制的像素数据。将绘制内容填充到申请的Native Window Buffer中。// 画完后获取像素地址,地址指向的内存包含画布画的像素数据 void *bitmapAddr = OH_Drawing_BitmapGetPixels(cBitmap_); uint32_t *value = static_cast<uint32_t *>(bitmapAddr); // 使用mmap获取到的地址来访问内存 uint32_t *pixel = static_cast<uint32_t *>(mappedAddr_); for (uint32_t x = 0; x < width_; x++) { for (uint32_t y = 0; y < height_; y++) { *pixel++ = *value++; } } -
设置刷新区域,并将其送显。
// 如果Region中的Rect为nullptr,或者rectNumber为0,则认为OHNativeWindowBuffer全部有内容更改。 Region region {nullptr, 0}; // 通过OH_NativeWindow_NativeWindowFlushBuffer 提交给消费者使用,例如:显示在屏幕上。 OH_NativeWindow_NativeWindowFlushBuffer(nativeWindow_, buffer_, fenceFd_, region); -
内存释放。
Drawing内存释放。
// 去掉内存映射
int result = munmap(mappedAddr_, bufferHandle_->size);
if (result == -1) {
    DRAWING_LOGE("munmap failed!");
}
// 销毁创建的对象
OH_Drawing_BrushDestroy(cBrush_);
cBrush_ = nullptr;
OH_Drawing_PenDestroy(cPen_);
cPen_ = nullptr;
OH_Drawing_PathDestroy(cPath_);
cPath_ = nullptr;
OH_Drawing_CanvasDestroy(cCanvas_);
cCanvas_ = nullptr;
OH_Drawing_BitmapDestroy(cBitmap_);
cBitmap_ = nullptr;
Surface内存释放。
void OnSurfaceDestroyedCB(OH_NativeXComponent *component, void *window) {
    DRAWING_LOGI("OnSurfaceDestroyedCB");
    if ((component == nullptr) || (window == nullptr)) {
        DRAWING_LOGE("OnSurfaceDestroyedCB: component or window is null");
        return;
    }
    char idStr[OH_XCOMPONENT_ID_LEN_MAX + 1] = {'\0'};
    uint64_t idSize = OH_XCOMPONENT_ID_LEN_MAX + 1;
    if (OH_NativeXComponent_GetXComponentId(component, idStr, &idSize) != OH_NATIVEXCOMPONENT_RESULT_SUCCESS) {
        DRAWING_LOGE("OnSurfaceDestroyedCB: Unable to get XComponent id");
        return;
    }
    std::string id(idStr);
    SampleBitMap::Release(id);
}
用户调用
以上为Native层C++代码,用户想要调用还需要通过ArkTS层代码对接。
- 定义ArkTS接口文件,命名XComponentContext.ts,用来对接Native代码。
export default interface XComponentContext { drawPattern(): void; drawText(): void; };void SampleBitMap::Export(napi_env env, napi_value exports) { if ((env == nullptr) || (exports == nullptr)) { DRAWING_LOGE("Export: env or exports is null"); return; } napi_property_descriptor desc[] = { {"drawPattern", nullptr, SampleBitMap::NapiDrawPattern, nullptr, nullptr, nullptr, napi_default, nullptr}, {"drawText", nullptr, SampleBitMap::NapiDrawText, nullptr, nullptr, nullptr, napi_default, nullptr}}; napi_define_properties(env, exports, sizeof(desc) / sizeof(desc[0]), desc); if (napi_define_properties(env, exports, sizeof(desc) / sizeof(desc[0]), desc) != napi_ok) { DRAWING_LOGE("Export: napi_define_properties failed"); } } - 添加button控件供用户点击,并调用已定义的接口。
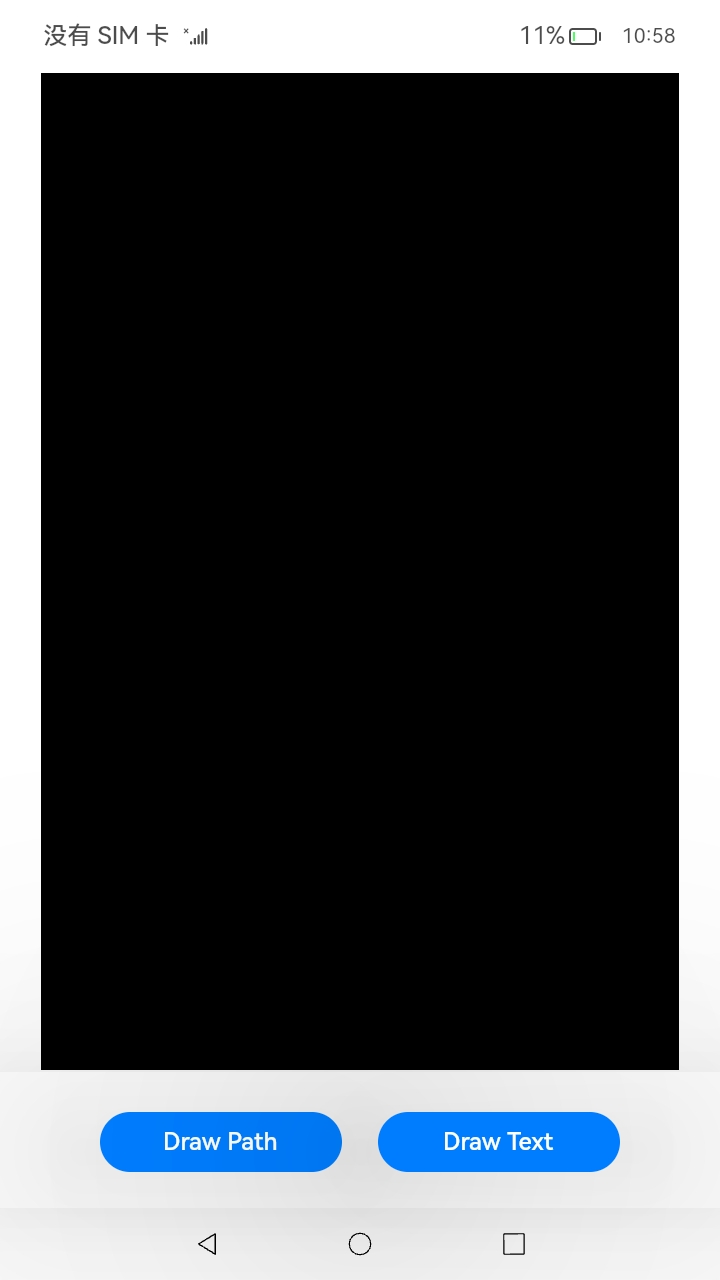
build() { Column() { Row() { XComponent({ id: 'xcomponentId', type: 'surface', libraryname: 'entry' }) .onLoad((xComponentContext) => { this.xComponentContext = xComponentContext as XComponentContext; }).width('640px') // Multiples of 64 }.height('88%') Row() { Button('Draw Path') .fontSize('16fp') .fontWeight(500) .margin({ bottom: 24, right: 12 }) .onClick(() => { console.log(TAG, "Draw Path click"); if (this.xComponentContext) { console.log(TAG, "Draw Path"); this.xComponentContext.drawPattern(); } }) .width('33.6%') .height(40) .shadow(ShadowStyle.OUTER_DEFAULT_LG) Button('Draw Text') .fontSize('16fp') .fontWeight(500) .margin({ bottom: 24, left: 12 }) .onClick(() => { console.log(TAG, "draw text click"); if (this.xComponentContext) { console.log(TAG, "draw text"); this.xComponentContext.drawText(); } }) .width('33.6%') .height(40) .shadow(ShadowStyle.OUTER_DEFAULT_LG) } .width('100%') .justifyContent(FlexAlign.Center) .shadow(ShadowStyle.OUTER_DEFAULT_SM) .alignItems(VerticalAlign.Bottom) .layoutWeight(1) } } - 绘制与显示的效果图如下:
| 主页 | 绘制五角星 | 绘制文字 |
|---|---|---|
 |
 |
 |
相关实例
以上代码为Drawing绘制关键代码,完整代码请参考下面sample。