Standard System Porting Guide
This document describes the general process for porting a development board, rather than the porting process specific to a System on Chip (SoC). In the future, the community will provide more development board porting examples for your reference.
Defining a Development Board
This document uses the process of porting a development board named MyProduct as an example. This development board is provided by MyProductVendor and uses the SoC MySOC produced by MySoCVendor.
Defining a Product
Create a file named config.json in the //vendor/MyProductVendor/{product_name} directory. This file is used to describe the SoC used by the product and the required subsystems. For example, if product_name is MyProduct, configure the //vendor/MyProductVendor/MyProduct/config.json file as follows:
//vendor/MyProductVendor/MyProduct/config.json
{
    "product_name": "MyProduct",
    "version": "3.0",
    "type": "standard",
    "target_cpu": "arm",
    "ohos_version": "OpenHarmony 1.0",
    "device_company": "MyProductVendor",
    "board": "MySOC",
    "enable_ramdisk": true,
    "subsystems": [
      {
        "subsystem": "ace",
        "components": [
          { "component": "ace_engine_lite", "features":[] }
        ]
      },
	...
    ]
}
The main configurations are as follows:
| Item | Description |
|---|---|
| product_name | (Mandatory) Product name. |
| version | (Mandatory) Version. |
| type | (Mandatory) System level, such as small and standard. |
| target_cpu | (Mandatory) CPU type of the device, such as arm64, riscv, or x86. |
| ohos_version | (Optional) Operating system version. |
| device_company | (Mandatory) Device manufacturer name. |
| board | (Mandatory) Development board name. |
| enable_ramdisk | (Mandatory) Whether to start the RAM disk. |
| kernel_type | (Optional) Kernel type. |
| kernel_version | (Optional) Kernel version. The values of both kernel_type and kernel_version are fixed in the standard system. |
| subsystems | (Mandatory) Subsystem to enable. A subsystem can be treated as an independently built functional block. |
| product_company | Device manufacturer name. It is not set in the configuration, but in the directory name, next to the vendor name. It can be accessed from build.gn script. |
You can find predefined subsystems in //build/subsystem_config.json. You can also customize subsystems.
You are advised to copy the configuration file of Hi3516D V300 and delete the hisilicon_products subsystem, which is used to compile the kernel for Hi3516D V300.
Verifying the Porting
Run the following command to start the build of your product:
./build.sh --product-name MyProduct
After the build is complete, you can view the built image file in //out/{device_name}/packages/phone/images.
Porting the Kernel
Now, you need to port the Linux kernel to enable it to run successfully.
Adding a Kernel-built Subsystem to the SoC
Modify the //build/subsystem_config.json file to add a subsystem. For example, if product_name is MyProduct, configure the //vendor/MyProductVendor/MyProduct/config.json file as follows:
  "MySOCVendor_products": {
    "project": "hmf/MySOCVendor_products",
    "path": "device/MySOCVendor/MySOC/build",
    "name": "MySOCVendor_products",
    "dir": "device/MySOCVendor"
  },
Then, open the configuration file //vendor/MyProductVendor/MyProduct/config.json and add the new subsystem to the product.
Building the Kernel
The OpenHarmony source code provides the Linux kernel 4.19, which is archived in //kernel/linux-4.19. This section uses this kernel version as an example to describe how to build the kernel.
The path for building the subsystem is defined when you define the subsystem in the previous step. In this example, the path is //device/MySOCVendor/MySOC/build. Now, you need to create a build script in this path to instruct the build system to build the kernel.
The recommended directory structure is as follows:
├── build
│ ├── kernel
│ │     ├── linux
│ │           ├──standard_patch_for_4_19.patch // Patch for the Linux kernel 4.19
│ ├── BUILD.gn
│ ├── ohos.build
The BUILD.gn file is the only entry for building the subsystem.
The expected build result described in the table below.
| File | Description |
|---|---|
| $root_build_dir/packages/phone/images/uImage | Kernel image. |
| $root_build_dir/packages/phone/images/uboot | Bootloader image. |
Verifying the Porting
Now start build, and check whether the kernel image is generated as expected.
User-mode Boot
-
Overview of user-mode boot process

When the system is powered on, the kernel loads and starts services and applications as follows:
- The kernel loads the init process, which is specified by cmdline of the kernel when the bootloader starts the kernel, for example, init=/init root/dev/xxx.
- After the init process is started, tmpfs and procfs are mounted and basic dev nodes are created to establish a basic root file system.
- The init process starts the ueventd process to listen for device hot-swap events in the kernel and creates dev nodes for related devices as well as partitions for the block device.
- After mounting partitions (system and vendor) of the block device, the init process scans for the init startup script of each system service and launches the respective service ability (SA).
- Each SA registers with the samgr process, which serves as the service registration center. The samgr process assigns each SA with an ID, which will be used by an application to access the desired SA.
- The foundation process implements application lifecycle management. It is a special SA service process that provides the user program management framework and basic services.
- The appspawn process directly spawns the application process, eliminating the need for the application to load the JS runtime environment. This reduces the application startup time.
-
init module
The configuration file of the init module contains service names, executable file paths, permissions, and other information of all key system services that need to be started by the init process. The boot script of each system service is installed in the /system/etc/init directory.
When porting a new chip platform, you need to add the /vendor/etc/init/init.{hardware}.cfg file that contains the platform-level initialization configuration. This file is used to implement platform-level initialization, for example, installing the ko driver and configuring information on the related /proc nodes.
The code of the init process is stored in the //base/startup/init_lite directory. This process is the first process in the system and does not depend on other processes.
For details about how to develop the initialization configuration file, see Startup.
Porting the HDF Driver
LCD
This section describes how to port a Liquid Crystal Display (LCD) driver. The hardware driver framework (HDF) designs a driver model for the LCD. To support an LCD, you must compile a driver, generate a model instance in the driver, and register the instance.
The LCD drivers are stored in the //drivers/hdf_core/framework/model/display/driver/panel directory.
-
Create a panel driver.
In the Init method of the driver, call RegisterPanel to register the model instance. For example:
int32_t XXXInit(struct HdfDeviceObject *object) { struct PanelData *panel = CreateYourPanel(); // Registration if (RegisterPanel(panel) != HDF_SUCCESS) { HDF_LOGE("%s: RegisterPanel failed", __func__); return HDF_FAILURE; } return HDF_SUCCESS; } struct HdfDriverEntry g_xxxxDevEntry = { .moduleVersion = 1, .moduleName = "LCD_XXXX", .Init = XXXInit, }; HDF_INIT(g_xxxxDevEntry); -
Configure and load the panel driver. All device information about the product is defined in the //vendor/MyProductVendor/MyProduct/config/device_info/device_info.hcs file. Modify the file by adding configurations for the device named device_lcd to the host named display.
Note: The value of moduleName must be the same as that in the panel driver.
root {
    ...
    display :: host {
        device_lcd :: device {
            deviceN :: deviceNode {
                policy = 0;
                priority = 100;
                preload = 2;
                moduleName = "LCD_XXXX";
            }
        }
    }
}
For details about driver development, see LCD.
Touchscreen
This section describes how to port a touchscreen driver. The touchscreen driver is stored in the //drivers/hdf_core/framework/model/input/driver/touchscreen directory. To port a touchscreen driver, register a ChipDevice model instance.
-
Create a touchscreen driver.
Create the touch_ic_name.c file in the directory. Replace ic_name with the name of your chip. The file template is as follows:
#include "hdf_touch.h"

static int32_t HdfXXXXChipInit(struct HdfDeviceObject *device)
{
    ChipDevice *tpImpl = CreateXXXXTpImpl();
    if(RegisterChipDevice(tpImpl) != HDF_SUCCESS) {
        ReleaseXXXXTpImpl(tpImpl);
        return HDF_FAILURE;
    }
    return HDF_SUCCESS;
}

struct HdfDriverEntry g_touchXXXXChipEntry = {
    .moduleVersion = 1,
    .moduleName = "HDF_TOUCH_XXXX",
    .Init = HdfXXXXChipInit,
};

HDF_INIT(g_touchXXXXChipEntry);
Implement the following interfaces in ChipDevice:
| API | Description |
|---|---|
| int32_t (*Init)(ChipDevice *device) | Initializes a touchscreen. |
| int32_t (*Detect)(ChipDevice *device) | Detects a touchscreen. |
| int32_t (*Suspend)(ChipDevice *device) | Suspends a touchscreen. |
| int32_t (*Resume)(ChipDevice *device) | Resumes a touchscreen. |
| int32_t (*DataHandle)(ChipDevice *device) | Reads data from a touchscreen and writes the touch point data to device > driver > frameData. |
| int32_t (*UpdateFirmware)(ChipDevice *device) | Upgrades the firmware. |
-
Configure the product and load the driver.
All device information about the product is defined in the //vendor/MyProductVendor/MyProduct/config/device_info/device_info.hcs file. Modify the file by adding configurations for the device named device_touch_chip to the host named input. Note: The value of moduleName must be the same as that in the touchscreen driver.
deviceN :: deviceNode {
    policy = 0;
    priority = 130;
    preload = 0;
    permission = 0660;
    moduleName = "HDF_TOUCH_XXXX";
    deviceMatchAttr = "touch_XXXX_configs";
}
For details about driver development, see Touchscreen.
WLAN
The WLAN driver is divided into two parts. One of the parts manages WLAN devices, and the other part manages WLAN traffic. HDF WLAN provides abstraction for the two parts. Currently, only the WLAN with the SDIO interface is supported.
Figure 1 WLAN chip
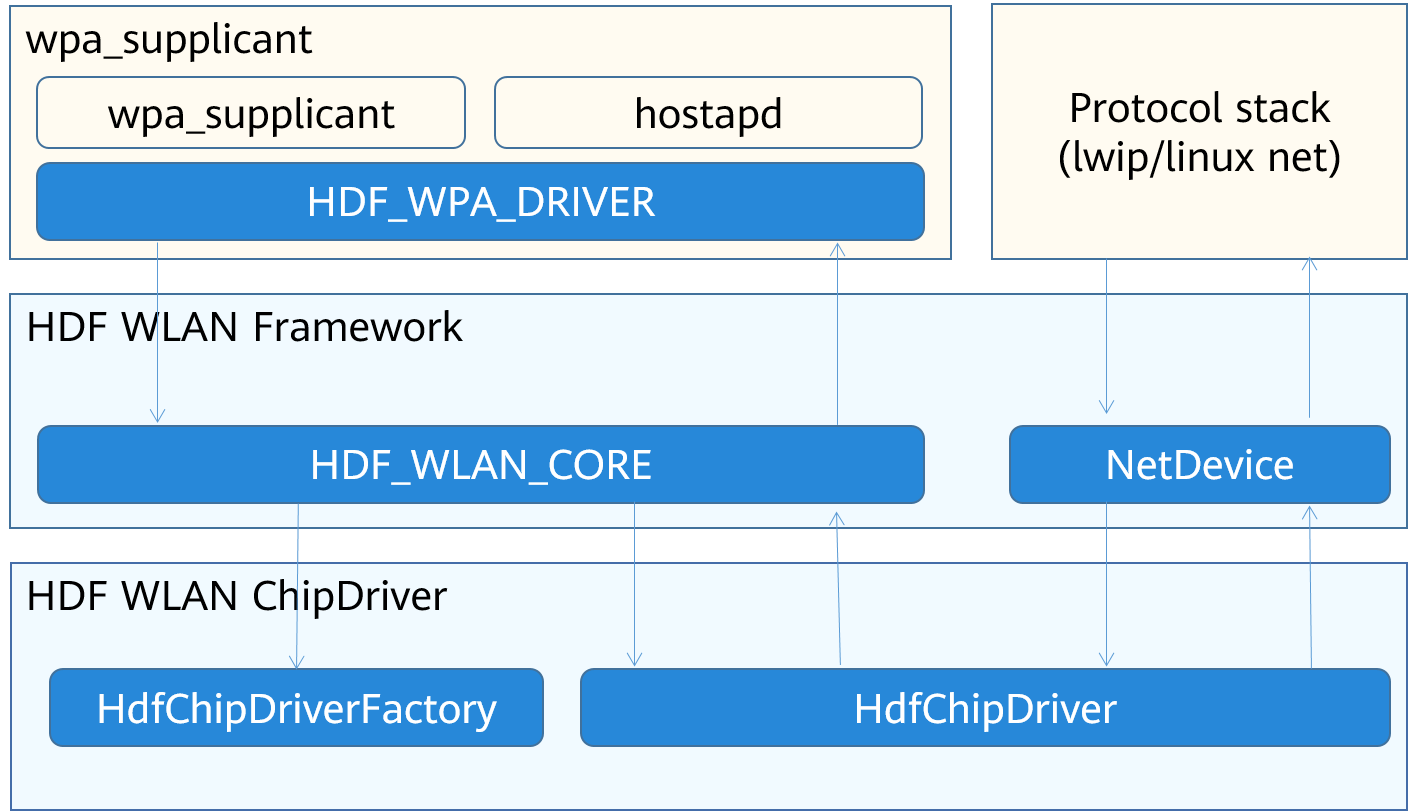
To support a chip, implement a ChipDriver for it. The major task is to implement the following interfaces provided by HDF_WLAN_CORE and NetDevice.
| API | Header File | Description |
|---|---|---|
| HdfChipDriverFactory | //drivers/hdf_core/framework/include/wifi/hdf_wlan_chipdriver_manager.h | Supports multiple WLAN interfaces of a chip. |
| HdfChipDriver | //drivers/hdf_core/framework/include/wifi/wifi_module.h | Manages a specific WLAN interface. Each WLAN interface corresponds to an HdfChipDriver. |
| NetDeviceInterFace | //drivers/hdf_core/framework/include/net/net_device.h | Communicates with the protocol stack, such as sending data and setting the status of network interfaces. |
To port a WLAN driver, perform the following steps:
-
Create an HDF driver. You are advised to place the code file in the //device/MySoCVendor/peripheral/wifi/chip_name/ directory. The file template is as follows:
static int32_t HdfWlanXXXChipDriverInit(struct HdfDeviceObject *device) {
    static struct HdfChipDriverFactory factory = CreateChipDriverFactory();
    struct HdfChipDriverManager *driverMgr = HdfWlanGetChipDriverMgr();
    if (driverMgr->RegChipDriver(&factory) != HDF_SUCCESS) {
        HDF_LOGE("%s fail: driverMgr is NULL!", __func__);
        return HDF_FAILURE;
    }
    return HDF_SUCCESS;
}

struct HdfDriverEntry g_hdfXXXChipEntry = {
    .moduleVersion = 1,
    .Init = HdfWlanXXXChipDriverInit,
    .Release = HdfWlanXXXChipRelease,
    .moduleName = "HDF_WIFI_CHIP_XXX"
};

HDF_INIT(g_hdfXXXChipEntry);
Create an HdfChipDriverFactory in the CreateChipDriverFactory. The APIs are as follows:
| API | Description |
|---|---|
| const char *driverName | Indicates the driver name. |
| int32_t (*InitChip)(struct HdfWlanDevice *device) | Initializes a chip. |
| int32_t (*DeinitChip)(struct HdfWlanDevice *device) | Deinitializes a chip. |
| void (_ReleaseFactory)(struct HdfChipDriverFactory _factory) | Releases the HdfChipDriverFactory object. |
| struct HdfChipDriver _(_Build)(struct HdfWlanDevice *device, uint8_t ifIndex) | Creates an HdfChipDriver. In the input parameters, device indicates the device information, and ifIndex indicates the sequence number of this interface in the chip. |
| void (_Release)(struct HdfChipDriver _chipDriver) | Releases the HdfChipDriver. |
| uint8_t (*GetMaxIFCount)(struct HdfChipDriverFactory *factory) | Obtains the maximum number of APIs supported by the current chip. |
Implement the following APIs in the HdfChipDriver.
| API | Description |
|---|---|
| int32_t (*init)(struct HdfChipDriver *chipDriver, NetDevice *netDev) | Initializes the current network interface. The NetDeviceInterFace needs to be provided for the netDev. |
| int32_t (*deinit)(struct HdfChipDriver *chipDriver, NetDevice *netDev) | Deinitializes the current network interface. |
| struct HdfMac80211BaseOps *ops | Provides the WLAN basic capability interface set. |
| struct HdfMac80211STAOps *staOps | Provides the interface set required for supporting the standalone (STA) mode. |
| struct HdfMac80211APOps *apOps | Provides the interface set required for supporting the access point (AP) mode. |
-
Compile the configuration file to describe the devices supported by the driver.
Create the chip configuration file //vendor/MyProductVendor/MyProduct/config/wifi/wlan_chip_chip_name.hcs in the product configuration directory.
Replace MyProductVendor, MyProduct, and chip_name in the path with the actual names.
The sample code is as follows:
root { wlan_config { chip_name :& chipList { chip_name :: chipInst { match_attr = "hdf_wlan_chips_chip_name"; /* Configure the matching attribute, which is used to provide the configuration root of the driver.*/ driverName = "driverName"; /* The value must be the same as that of driverName in HdfChipDriverFactory.*/ sdio { vendorId = 0x0296; deviceId = [0x5347]; } } } } } -
Edit the configuration file and load the driver.
All device information about the product is defined in the //vendor/MyProductVendor/MyProduct/config/device_info/device_info.hcs file. Modify the file by adding configurations for the device named device_wlan_chips to the host named network.
Note: The value of moduleName must be the same as that in the touchscreen driver.
deviceN :: deviceNode { policy = 0; preload = 2; moduleName = "HDF_WLAN_CHIPS"; deviceMatchAttr = "hdf_wlan_chips_chip_name"; serviceName = "driverName"; } -
Build the driver.
-
Create a kernel configuration menu. Create a Kconfig file in the //device/MySoCVendor/peripheral directory. The file template is as follows:
config DRIVERS_WLAN_XXX
    bool "Enable XXX WLAN Host driver"
    default n
    depends on DRIVERS_HDF_WIFI
    help
      Answer Y to enable XXX Host driver. Support chip xxx
Add the following configuration to the end of the //drivers/hdf_core/adapter/khdf/linux/model/network/wifi/Kconfig file:
source "../../../../../device/MySoCVendor/peripheral/Kconfig" -
Create a build script.
Add the following configuration to the end of the //drivers/hdf_core/adapter/khdf/linux/model/network/wifi/Makefile file:
HDF_DEVICE_ROOT := $(HDF_DIR_PREFIX)/../device
obj-$(CONFIG_DRIVERS_WLAN_XXX) += $(HDF_DEVICE_ROOT)/MySoCVendor/peripheral/build/standard/
When DRIVERS_WLAN_XXX is enabled in the kernel, makefile in //device/MySoCVendor/peripheral/build/standard/ is called. For details about the development, see LED Peripheral Control.
-