共享元素转场
共享元素转场是一种界面切换时对相同或者相似的两个元素做的一种位置和大小匹配的过渡动画效果,也称一镜到底动效。
如下例所示,在点击图片后,该图片消失,同时在另一个位置出现新的图片,二者之间内容相同,可以对它们添加一镜到底动效。左图为不添加一镜到底动效的效果,右图为添加一镜到底动效的效果,一镜到底的效果能够让二者的出现消失产生联动,使得内容切换过程显得灵动自然而不生硬。
 |
 |
|---|
实现一镜到底动效的方式有多种,实际开发过程中,需要依据具体的场景,选择相应的合适的方式进行实现。以下为基本的实现方式介绍。
使用geometryTransition共享元素转场实现一镜到底动效
geometryTransition用于组件内隐式共享元素转场,在视图状态切换过程中提供丝滑的上下文继承过渡体验。
geometryTransition的使用方式为对需要添加一镜到底动效的两个组件使用geometryTransition接口绑定同一id,这样在其中一个组件消失同时另一个组件创建出现的时候,系统会对二者添加一镜到底动效。
geometryTransition的简单使用
对于同一个页面中的两个元素的一镜到底效果,geometryTransition接口的简单使用示例如下:
import curves from '@ohos.curves';

@Entry
@Component
struct IfElseGeometryTransition {
  @State isShow: boolean = false;

  build() {
    Stack({ alignContent: Alignment.Center }) {
      if (this.isShow) {
        Image($r('app.media.spring'))
          .autoResize(false)
          .clip(true)
          .width(200)
          .height(200)
          .borderRadius(100)
          .geometryTransition("picture")
          .transition(TransitionEffect.OPACITY)
          // 在打断场景下,即动画过程中点击页面触发下一次转场,如果不加id,则会出现重影
          // 加了id之后,新建的spring图片会复用之前的spring图片节点,不会重新创建节点,也就不会有重影问题
          // 加id的规则为加在if和else下的第一个节点上,有多个并列节点则也需要进行添加
          .id('item1')
      } else {
        // geometryTransition此处绑定的是容器,那么容器内的子组件需设为相对布局跟随父容器变化,
        // 套多层容器为了说明相对布局约束传递
        Column() {
          Column() {
            Image($r('app.media.sky'))
              .size({ width: '100%', height: '100%' })
          }
          .size({ width: '100%', height: '100%' })
        }
        .width(100)
        .height(100)
        // geometryTransition会同步圆角,但仅限于geometryTransition绑定处,此处绑定的是容器
        // 则对容器本身有圆角同步而不会操作容器内部子组件的borderRadius
        .borderRadius(50)
        .clip(true)
        .geometryTransition("picture")
        // transition保证节点离场不被立即析构,设置通用转场效果
        .transition(TransitionEffect.OPACITY)
        .position({ x: 40, y: 40 })
        .id('item2')
      }
    }
    .onClick(() => {
      animateTo({
        curve: curves.springMotion()
      }, () => {
        this.isShow = !this.isShow;
      })
    })
    .size({ width: '100%', height: '100%' })
  }
}

geometryTransition结合模态转场使用
更多的场景中,需要对一个页面的元素与另一个页面的元素添加一镜到底动效。可以通过geometryTransition搭配模态转场接口实现。以点击头像弹出个人信息页的demo为例:
class PostData {
  avatar: Resource = $r('app.media.flower');
  name: string = '';
  message: string = '';
  images: Resource[] = [];
}

@Entry
@Component
struct Index {
  @State isPersonalPageShow: boolean = false;
  @State selectedIndex: number = 0;
  @State alphaValue: number = 1;

  private allPostData: PostData[] = [
    { avatar: $r('app.media.flower'), name: 'Alice', message: '天气晴朗',
      images: [$r('app.media.spring'), $r('app.media.tree')] },
    { avatar: $r('app.media.sky'), name: 'Bob', message: '你好世界',
      images: [$r('app.media.island')] },
    { avatar: $r('app.media.tree'), name: 'Carl', message: '万物生长',
      images: [$r('app.media.flower'), $r('app.media.sky'), $r('app.media.spring')] }];

  private onAvatarClicked(index: number): void {
    this.selectedIndex = index;
    animateTo({
      duration: 350,
      curve: Curve.Friction
    }, () => {
      this.isPersonalPageShow = !this.isPersonalPageShow;
      this.alphaValue = 0;
    });
  }

  private onPersonalPageBack(index: number): void {
    animateTo({
      duration: 350,
      curve: Curve.Friction
    }, () => {
      this.isPersonalPageShow = !this.isPersonalPageShow;
      this.alphaValue = 1;
    });
  }

  @Builder
  PersonalPageBuilder(index: number) {
    Column({ space: 20 }) {
      Image(this.allPostData[index].avatar)
        .size({ width: 200, height: 200 })
        .borderRadius(100)
        // 头像配置共享元素效果,与点击的头像的id匹配
        .geometryTransition(index.toString())
        .clip(true)
        .transition(TransitionEffect.opacity(0.99))

      Text(this.allPostData[index].name)
        .font({ size: 30, weight: 600 })
        // 对文本添加出现转场效果
        .transition(TransitionEffect.asymmetric(
          TransitionEffect.OPACITY
            .combine(TransitionEffect.translate({ y: 100 })),
          TransitionEffect.OPACITY.animation({ duration: 0 })
        ))

      Text('你好,我是' + this.allPostData[index].name)
        // 对文本添加出现转场效果
        .transition(TransitionEffect.asymmetric(
          TransitionEffect.OPACITY
            .combine(TransitionEffect.translate({ y: 100 })),
          TransitionEffect.OPACITY.animation({ duration: 0 })
        ))
    }
    .padding({ top: 20 })
    .size({ width: 360, height: 780 })
    .backgroundColor(Color.White)
    .onClick(() => {
      this.onPersonalPageBack(index);
    })
    .transition(TransitionEffect.asymmetric(
      TransitionEffect.opacity(0.99),
      TransitionEffect.OPACITY
    ))
  }

  build() {
    Column({ space: 20 }) {
      ForEach(this.allPostData, (postData: PostData, index: number) => {
        Column() {
          Post({ data: postData, index: index, onAvatarClicked: (index: number) => { this.onAvatarClicked(index) } })
        }
        .width('100%')
      }, (postData: PostData, index: number) => index.toString())
    }
    .size({ width: '100%', height: '100%' })
    .backgroundColor('#40808080')
    .bindContentCover(this.isPersonalPageShow,
      this.PersonalPageBuilder(this.selectedIndex), { modalTransition: ModalTransition.NONE })
    .opacity(this.alphaValue)
  }
}

@Component
export default struct  Post {
  @Prop data: PostData;
  @Prop index: number;

  @State expandImageSize: number = 100;
  @State avatarSize: number = 50;

  private onAvatarClicked: (index: number) => void = (index: number) => { };

  build() {
    Column({ space: 20 }) {
      Row({ space: 10 }) {
        Image(this.data.avatar)
          .size({ width: this.avatarSize, height: this.avatarSize })
          .borderRadius(this.avatarSize / 2)
          .clip(true)
          .onClick(() => {
            this.onAvatarClicked(this.index);
          })
          // 对头像绑定共享元素转场的id
          .geometryTransition(this.index.toString(), {follow:true})
          .transition(TransitionEffect.OPACITY.animation({ duration: 350, curve: Curve.Friction }))

        Text(this.data.name)
      }
      .justifyContent(FlexAlign.Start)

      Text(this.data.message)

      Row({ space: 15 }) {
        ForEach(this.data.images, (imageResource: Resource, index: number) => {
          Image(imageResource)
            .size({ width: 100, height: 100 })
        }, (imageResource: Resource, index: number) => index.toString())
      }
    }
    .backgroundColor(Color.White)
    .size({ width: '100%', height: 250 })
    .alignItems(HorizontalAlign.Start)
    .padding({ left: 10, top: 10 })
  }
}
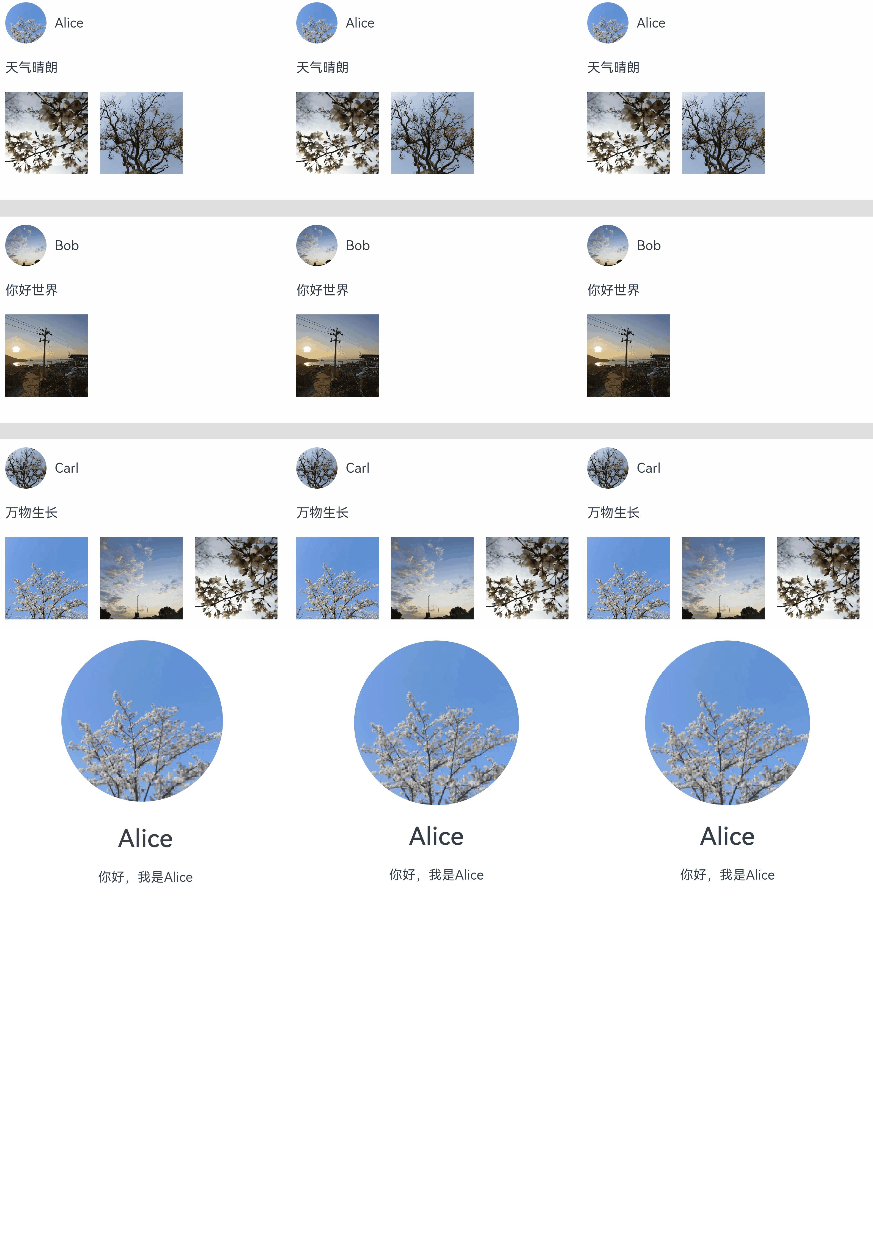
效果为点击主页的头像后,弹出模态页面显示个人信息,并且两个页面之间的头像做一镜到底动效:

使用transition和属性动画实现一镜到底效果
除了使用geometryTransition实现一镜到底动效外,也可以通过使用transition搭配属性动画实现一镜到底效果。
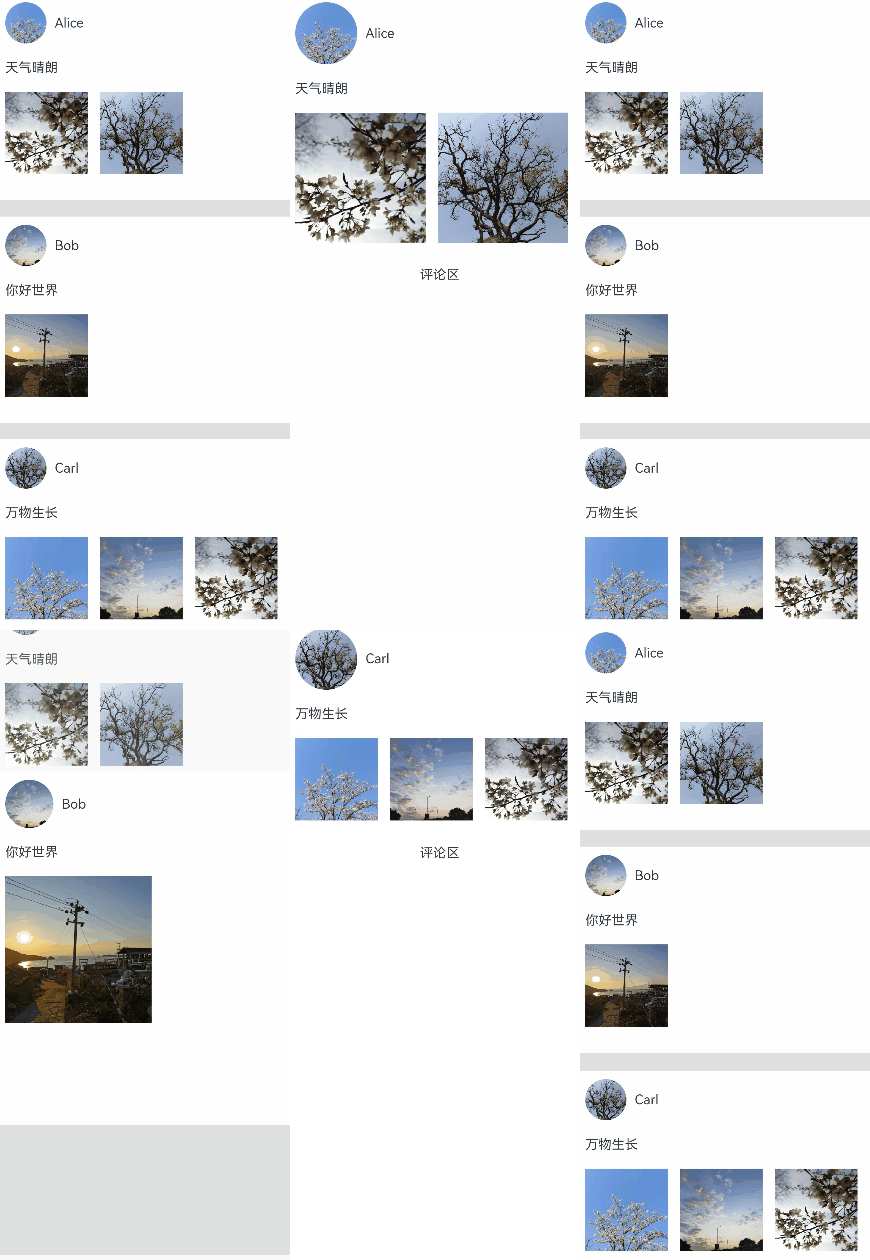
对于同一个容器展开,容器内兄弟组件消失或者出现的场景,可通过对同一个容器展开前后进行宽高位置变化并配置属性动画,对兄弟组件配置出现消失转场动画实现一镜到底效果。基本步骤为:
-
构建需要展开的页面,并通过状态变量构建好普通状态和展开状态的界面。
class Tmp{ set(item:CradData):CradData{ return item } } // 通过状态变量的判断,在同一个组件内构建普通状态和展开状态的界面 @Component export struct MyExtendView { // 声明与父组件进行交互的是否展开状态变量 @Link isExpand: boolean; @State cardList: Array<CardData> = xxxx; build() { List() { // 根据需要定制展开后的组件 if (this.isExpand) { Text('expand') .transition(TransitionEffect.translate({y:300}).animation({ curve: curves.springMotion(0.6, 0.8) })) } ForEach(this.cardList, (item: CradData) => { let Item:Tmp = new Tmp() let Imp:Tmp = Item.set(item) let Mc:Record<string,Tmp> = {'cardData':Imp} MyCard(Mc) // 封装的卡片组件,需自行实现 }) } .width(this.isExpand ? 200 : 500) // 根据需要定义展开后组件的属性 .animation({ curve: curves.springMotion() }) // 为组件属性绑定动画 } } ... -
将需要展开的页面展开,通过状态变量控制兄弟组件消失或出现,并通过绑定出现消失转场实现兄弟组件转场效果。
class Tmp{
  isExpand: boolean = false;
  set(){
    this.isExpand = !this.isExpand;
  }
}
let Exp:Record<string,boolean> = {'isExpand': false}
  @State isExpand: boolean = false

  ...
  List() {
    // 通过是否展开状态变量控制兄弟组件的出现或者消失,并配置出现消失转场动画
    if (!this.isExpand) {
      Text('收起')
        .transition(TransitionEffect.translate({y:300}).animation({ curve: curves.springMotion(0.6, 0.9) }))
    }

    MyExtendView(Exp)
      .onClick(() => {
        let Epd:Tmp = new Tmp()
        Epd.set()
      })

    // 通过是否展开状态变量控制兄弟组件的出现或者消失,并配置出现消失转场动画
    if (this.isExpand) {
      Text('展开')
        .transition(TransitionEffect.translate({y:300}).animation({ curve: curves.springMotion() }))
    }
  }
...
以点击卡片后显示卡片内容详情场景为例:
class PostData {
  avatar: Resource = $r('app.media.flower');
  name: string = '';
  message: string = '';
  images: Resource[] = [];
}

@Entry
@Component
struct Index {
  @State isExpand: boolean = false;
  @State @Watch('onItemClicked') selectedIndex: number = -1;

  private allPostData: PostData[] = [
    { avatar: $r('app.media.flower'), name: 'Alice', message: '天气晴朗',
      images: [$r('app.media.spring'), $r('app.media.tree')] },
    { avatar: $r('app.media.sky'), name: 'Bob', message: '你好世界',
      images: [$r('app.media.island')] },
    { avatar: $r('app.media.tree'), name: 'Carl', message: '万物生长',
      images: [$r('app.media.flower'), $r('app.media.sky'), $r('app.media.spring')] }];

  private onItemClicked(): void {
    if (this.selectedIndex < 0) {
      return;
    }
    animateTo({
      duration: 350,
      curve: Curve.Friction
    }, () => {
      this.isExpand = !this.isExpand;
    });
  }

  build() {
    Column({ space: 20 }) {
      ForEach(this.allPostData, (postData: PostData, index: number) => {
        // 当点击了某个post后,会使其余的post消失下树
        if (!this.isExpand || this.selectedIndex === index) {
          Column() {
            Post({ data: postData, selecteIndex: this.selectedIndex, index: index })
          }
          .width('100%')
          // 对出现消失的post添加透明度转场和位移转场效果
          .transition(TransitionEffect.OPACITY
            .combine(TransitionEffect.translate({ y: index < this.selectedIndex ? -250 : 250 }))
            .animation({ duration: 350, curve: Curve.Friction}))
        }
      }, (postData: PostData, index: number) => index.toString())
    }
    .size({ width: '100%', height: '100%' })
    .backgroundColor('#40808080')
  }
}

@Component
export default struct  Post {
  @Link selecteIndex: number;

  @Prop data: PostData;
  @Prop index: number;

  @State itemHeight: number = 250;
  @State isExpand: boolean = false;
  @State expandImageSize: number = 100;
  @State avatarSize: number = 50;

  build() {
    Column({ space: 20 }) {
      Row({ space: 10 }) {
        Image(this.data.avatar)
          .size({ width: this.avatarSize, height: this.avatarSize })
          .borderRadius(this.avatarSize / 2)
          .clip(true)

        Text(this.data.name)
      }
      .justifyContent(FlexAlign.Start)

      Text(this.data.message)

      Row({ space: 15 }) {
        ForEach(this.data.images, (imageResource: Resource, index: number) => {
          Image(imageResource)
            .size({ width: this.expandImageSize, height: this.expandImageSize })
        }, (imageResource: Resource, index: number) => index.toString())
      }

      if (this.isExpand) {
        Column() {
          Text('评论区')
            // 对评论区文本添加出现消失转场效果
            .transition( TransitionEffect.OPACITY
              .animation({ duration: 350, curve: Curve.Friction }))
            .padding({ top: 10 })
        }
        .transition(TransitionEffect.asymmetric(
          TransitionEffect.opacity(0.99)
            .animation({ duration: 350, curve: Curve.Friction }),
          TransitionEffect.OPACITY.animation({ duration: 0 })
        ))
        .size({ width: '100%'})
      }
    }
    .backgroundColor(Color.White)
    .size({ width: '100%', height: this.itemHeight })
    .alignItems(HorizontalAlign.Start)
    .padding({ left: 10, top: 10 })
    .onClick(() => {
      this.selecteIndex = -1;
      this.selecteIndex = this.index;
      animateTo({
        duration: 350,
        curve: Curve.Friction
      }, () => {
        // 对展开的post做宽高动画,并对头像尺寸和图片尺寸加动画
        this.isExpand = !this.isExpand;
        this.itemHeight = this.isExpand ? 780 : 250;
        this.avatarSize = this.isExpand ? 75: 50;
        this.expandImageSize = (this.isExpand && this.data.images.length > 0)
          ? (360 - (this.data.images.length + 1) * 15) / this.data.images.length : 100;
      })
    })
  }
}

使用transition搭配zIndex实现一镜到底效果
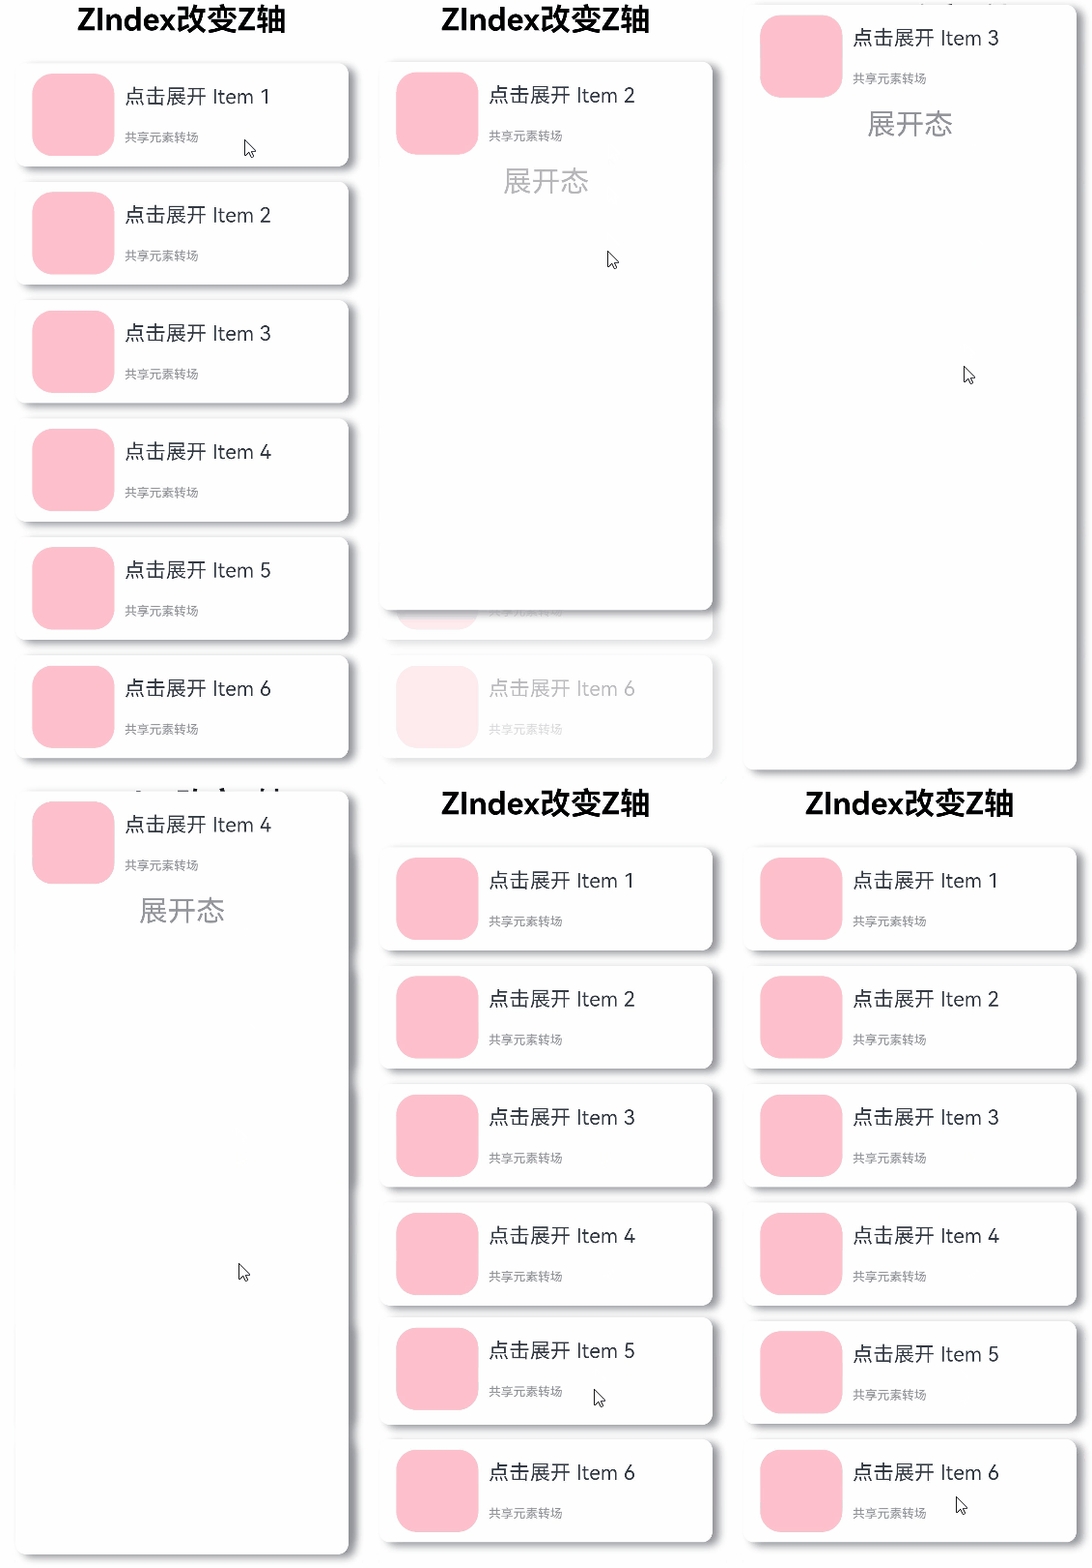
对于同一个容器展开,兄弟组件不消失的场景,可以配合改变Z轴让展开组件显示在最上层,从而实现共享元素转场。
-
同时构建普通状态和展开状态:通过是否展开的状态变量,在同一个组件内构建普通状态和展开状态的界面。
-
通过zIndex改变层级:展开状态将zIndex置为1,因为zIndex默认为0,设置为1就会置于zIndex值为0的兄弟组件上层。
-
通过仿射属性改变位置:根据卡片当前的位置,通过translate在展开的时候移到父容器的顶部。
-
通过占位容器不影响兄弟节点位置:外层容器占位,内部容器改变大小。
完整示例和效果如下。
// utils.ets
import curves from '@ohos.curves';

// 通过状态变量的判断,在同一个组件内构建普通状态和展开状态的界面
@Component
export struct share_zIndex_expand {
  // 声明与父组件进行交互的是否展开状态变量
  @State isExpand: boolean = false;
  @State curIndex: number = 0;
  @State listArray: Array<number> = [1, 2, 3, 4, 5, 6];
  private parentScroller: Scroller = new Scroller(); // 上层滑动组件控制器

  build() {
    Column() {
      List() {
        ForEach(this.listArray, (item:number, index?:number|undefined) => {
          // 根据需要定制展开后的组件
          if (!this.isExpand || this.curIndex == index) {
            ListItem() {
              Column() {
                Row() {
                  Row()
                    .backgroundColor(Color.Pink)
                    .borderRadius(20)
                    .width(80)
                    .height(80)

                  Column() {
                    Text('点击展开 Item ' + item)
                      .fontSize(20)
                    Text('共享元素转场')
                      .fontSize(12)
                      .fontColor(0x909399)
                  }
                  .alignItems(HorizontalAlign.Start)
                  .justifyContent(FlexAlign.SpaceAround)
                  .margin({ left: 10 })
                  .height(80)
                }
                .width('90%')
                .height(100)

                if (this.isExpand && this.curIndex == index) {
                  Row() {
                    Text('展开态')
                      .fontSize(28)
                      .fontColor(0x909399)
                      .textAlign(TextAlign.Center)
                      .transition(TransitionEffect.OPACITY.animation({ curve: curves.springMotion(0.6, 0.9) }))
                  }
                  .width('90%')
                  .justifyContent(FlexAlign.Center)
                }
              }
              .width('90%')
              .height(this.isExpand && this.curIndex == index ? 750 : 100)
              .alignItems(HorizontalAlign.Center)
              .borderRadius(10)
              .margin({ top: 15 })
              .backgroundColor(Color.White)
              .shadow({ radius: 20, color: 0x909399, offsetX: 20, offsetY: 10 })
            }
            .onClick(() => {
              // 定义展开收起的动画参数
              animateTo({ curve: curves.springMotion(0.6, 0.9) }, () => {
                if(index != undefined){
                  this.curIndex = index;
                }
                this.isExpand = !this.isExpand;
              })
            })
            .zIndex(this.curIndex == index ? 1 : 0) // 当前ListItem被选中时,zIndex置1,会显示在其他zIndex为0的兄弟组件之上
            .translate({ // 根据卡片当前的位置,通过translate在展开的时候移到父容器的顶端
                y: this.isExpand && this.curIndex == index ? -60 - this.parentScroller.currentOffset()['yOffset'] : 0
            })
          }
        })
      }
      .clip(false)
      .height('100%') // 占位容器固定大小
      .alignListItem(ListItemAlign.Center)
    }
    .zIndex(1)
    .width('100%')
    .height('100%')
    .justifyContent(FlexAlign.Start)
  }
}
// Index.ets
import { share_zIndex_expand } from './utils'
@Entry
@Component
struct ShareZIndexDemo {
  @State isExpand: boolean = false;
  @State curIndex: number = 0;
  private scroller: Scroller = new Scroller();
  @State Sze:Record<string,boolean|number|Scroller> = { 'isExpand': this.isExpand, 'curIndex': this.curIndex, 'parentScroller': this.scroller }

  build() {
    Scroll(this.scroller) {
      Column() {
        Text('ZIndex改变Z轴')
          .fontWeight(FontWeight.Bold)
          .fontSize(30)
          .fontColor(Color.Black)
          .zIndex(0)
          .margin(10)

        share_zIndex_expand(this.Sze)
      }
      .width('100%')
      .height('100%')
      .justifyContent(FlexAlign.Start)
    }
  }
}

使用属性动画实现一镜到底效果
使用属性动画也可以实现一镜到底效果。对于组件A及组件B之间添加一镜到底动效的场景,实现步骤为:
-
1.获取组件A的位置信息,在该位置放置一个内容与A一致的组件C。
-
2.获取组件B的位置信息,通过A与B的位置信息,对组件C添加一个由A位置到B位置的属性动画。
-
3.在动画结束或根据设计需要,在适当的时机隐藏组件C,显示组件B,完成一镜到底动画效果。
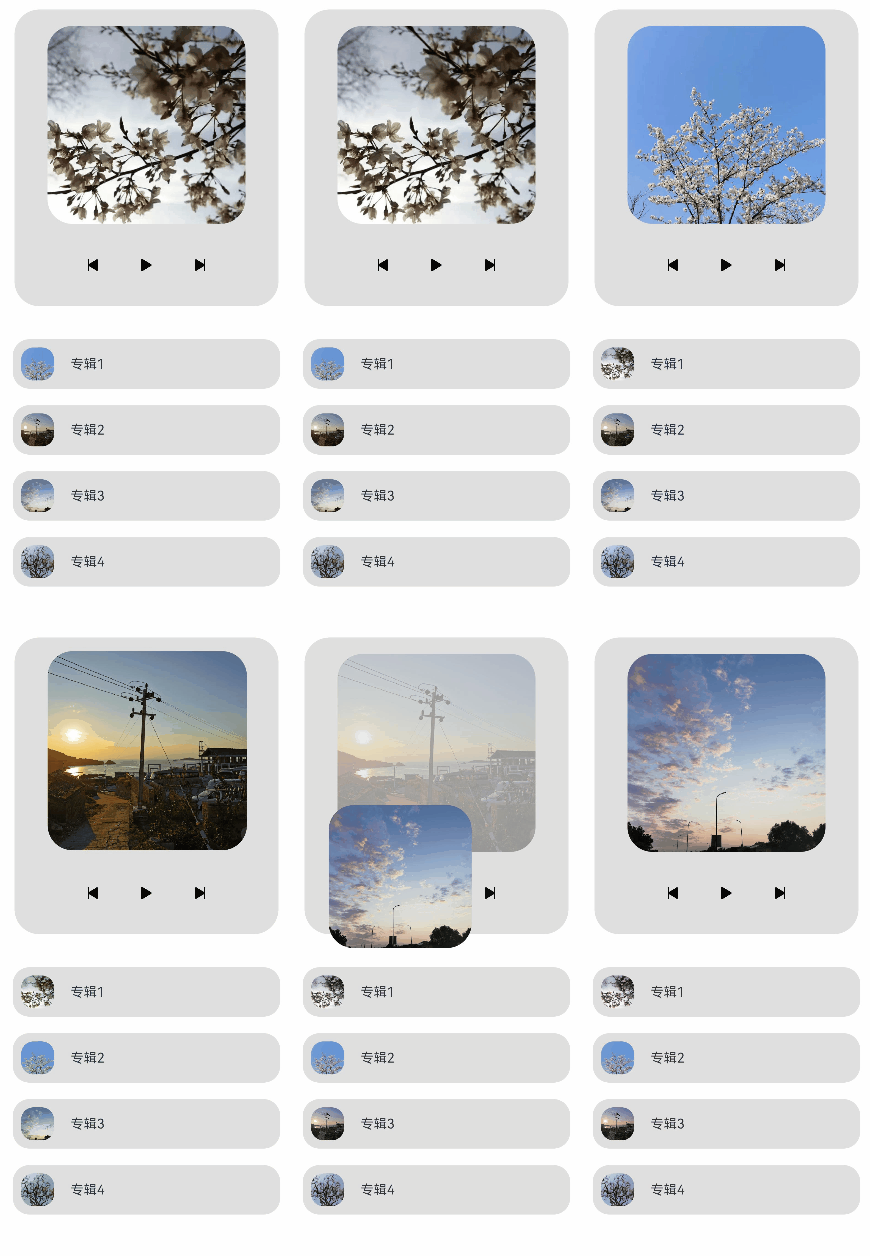
该实现方式相较于其他实现方式而言自由度较高,可以根据需要自定义动画过程中各组件的行为,相关的示例及效果如下:
import curves from '@ohos.curves';

class RectJson {
  $rect: Array<number> = []
}

class RectInfo {
  left: number = 0;
  top: number = 0;
  right: number = 0;
  bottom: number = 0;
}

const LARGE_IMAGE_SIZE = 240;
const SMALL_IMAGE_SIZE = 40;
const LARGE_IMAGE_RADIUS = 30;
const SMALL_IMAGE_RADIUS = 15;

@Entry
@Component
struct Index {
  @State showImage: Resource = $r('app.media.flower');
  @State isTempImageShow: boolean = false;
  @State clickedImage: Resource = $r('app.media.flower');
  @State translateX: number = 0;
  @State translateY: number = 0;
  @State positionX: number = 0;
  @State positionY: number = 0;
  @State showImageAlphaValue: number = 1;
  @State tempImageSize: number = SMALL_IMAGE_SIZE;
  @State imageList: Resource[] = [$r('app.media.island'), $r('app.media.sky'),
    $r('app.media.spring'), $r('app.media.tree')];
  @State radius: number = SMALL_IMAGE_RADIUS;
  // 控制下方的四个图片是否响应点击事件
  @State isEnabled: boolean = true;

  private calculatedTranslateX: number = 0;
  private calculatedTranslateY: number = 0;
  private animationCount: number = 0;
  private formerImageSource: Resource = $r('app.media.flower');

  private calculateData(key: string): void {
    // 分别获取需要进行页面切换的两个组件及二者公共父节点的位置,用以计算做动画组件的动画参数
    let clickedImageInfo = this.getRectInfoById(key);
    let showImageInfo = this.getRectInfoById('showImage');
    let rootStackInfo = this.getRectInfoById('rootStack');
    this.positionX = px2vp(clickedImageInfo.left - rootStackInfo.left);
    this.positionY = px2vp(clickedImageInfo.top - rootStackInfo.top);
    this.calculatedTranslateX = px2vp(showImageInfo.left - clickedImageInfo.left);
    this.calculatedTranslateY = px2vp(showImageInfo.top - clickedImageInfo.top);
  }

  // 根据组件的key获取组件的位置信息
  private getRectInfoById(key: string): RectInfo {
    try {
      let strJson: string = getInspectorByKey(key);
      let rect: RectJson = JSON.parse(strJson);
      let rectInfo: Array<object> = JSON.parse('[' + rect.$rect + ']');
      let rect_left: number = Number(JSON.parse('[' + rectInfo[0] + ']')[0]);
      let rect_top: number = Number(JSON.parse('[' + rectInfo[0] + ']')[1]);
      let rect_right: number = Number(JSON.parse('[' + rectInfo[1] + ']')[0]);
      let rect_bottom: number = Number(JSON.parse('[' + rectInfo[1] + ']')[1]);
      return { left: rect_left, top: rect_top, right: rect_right, bottom: rect_bottom };
    } catch (err) {
      console.log(`getPositionById error ${err}`);
    }
    return { left: 0, top: 0, right: 0, bottom: 0 };
  }

  private onTouchDown(index: number): void {
    this.radius = SMALL_IMAGE_RADIUS;
    this.clickedImage = this.imageList[index];
    this.calculateData(index.toString());
    this.isTempImageShow = true;
    this.formerImageSource = this.imageList[index];
  }

  private onTouchUp(index: number): void {
    this.imageList[index] = this.showImage;
    this.animationCount++;
    this.doOneShotAnimation();
    this.isEnabled = false;
  }

  private doOneShotAnimation(): void {
    animateTo({
      curve: curves.springMotion(),
      onFinish: () => {
        if (this.animationCount === 1) {
          this.onAnimationFinish();
        }
      }
    }, () => {
      this.tempImageSize = LARGE_IMAGE_SIZE;
      this.translateX = this.calculatedTranslateX;
      this.translateY = this.calculatedTranslateY;
      this.showImageAlphaValue = 0;
      this.radius = LARGE_IMAGE_RADIUS;
    });
  }

  private onAnimationFinish(): void {
    this.showImage = this.formerImageSource;
    this.showImageAlphaValue = 1.0;
    this.isTempImageShow = false;
    this.translateX = 0;
    this.translateY = 0;
    this.positionX = 0;
    this.positionY = 0;
    this.tempImageSize = SMALL_IMAGE_SIZE;
    this.animationCount--;
    this.isEnabled = true;
  }

  build() {
    Stack() {
      Column() {
        Column({ space: 40 }) {
          Image(this.showImage)
            .size({ width: 240, height: 240 })
            .syncLoad(true)
            .opacity(this.showImageAlphaValue)
            .key('showImage')
            .borderRadius(30)

          Row() {
            Image($r('app.media.back'))
              .size({ width: 20, height: 20 })

            Image($r('app.media.play'))
              .size({ width: 20, height: 20 })

            Image($r('app.media.forward'))
              .size({ width: 20, height: 20 })
          }
          .justifyContent(FlexAlign.SpaceEvenly)
          .width(240)
        }
        .margin({ top: 20 })
        .padding({ top: 20 })
        .clip(true)
        .borderRadius(30)
        .backgroundColor('#40808080')
        .size({ width: 320, height: 360 })

        Column({ space: 20 }) {
          ForEach(this.imageList, (imageResource: Resource, index: number) => {
            Row({ space: 20 }) {
              Image(imageResource)
                .size({ width: SMALL_IMAGE_SIZE, height: SMALL_IMAGE_SIZE })
                // 需要进行切换的组件都加上.key接口设置键名用以之后获取位置信息
                .key(index.toString())
                .margin({ left: 10 })
                .borderRadius(15)

              Text('专辑' + (index + 1))
                .size({ width: 200 })
            }
            .size({ width: '90%', height: 60 })
            .borderRadius(20)
            .backgroundColor('#40808080')
            .enabled(this.isEnabled)
            .onTouch((event: TouchEvent) => {
              if (event.type === TouchType.Down) {
                this.onTouchDown(index);
              } else if (event.type === TouchType.Up) {
                this.onTouchUp(index);
              }
            })
          })
        }
        .width('100%')
        .justifyContent(FlexAlign.Center)
        .margin({ top: 40 })
      }
      .size({ width: '100%', height: '100%' })

      // 临时的用于做一镜到底动画的图片
      if (this.isTempImageShow) {
        Image(this.clickedImage)
          .size({ width: this.tempImageSize, height: this.tempImageSize })
          .translate({ x: this.translateX, y: this.translateY })
          .position({ x: this.positionX, y: this.positionY })
          .borderRadius(this.radius)
      }
    }
    .size({ width: '100%', height: '100%' })
    .key('rootStack')
  }
}

相关实例
针对共享元素转场开发,有以下相关实例可供参考: